Good luck on your painting! Use your garage and just buy a cheap plastic drop cloth, the paint shouldn't be going all over the place if you are doing it right. I used my garage and brought the shield into my adjoining laundry room to let the coats dry. I did this because I found leaving it in the garage left it exposed to dust/debris falling on to the paint. If that's not an option make sure it's drying in a place where this can't happen or build a plastic cover to protect it.
Don't overstress the painting, know that you might have to repaint a few times and be ok with that. Most of us painted and repainted until we got it right. You can always start over if you aren't happy with the results.
Neither the star, the back of the shield, nor the unpainted ring will "flash rust" so long as you are keeping them both somewhere relatively humidity free. Don't worry about rushing your shield build because of that. You will want to clear coat the entire shield and not just the unpainted parts.
As far as which type of clear to use that will depend largely on you and how glossy or satin you want your finish. I went the duplicolor route so I used duplicolor perfect match clear coat for a bit of a glossy look and just to keep everything consistent however I think I'm going to try the Testors paint and gloss coat laquer route next time for a more satin finish.
As far as epoxy goes JB weld is the most common. I've used JB quick for a quicker setting time. Either route just be careful with how much you apply particularly at the points of the star. You want enough so that the points aren't free to snag but not too much that it comes squirting out. Cleaning it off the shield can be a pain and a mess. I've used a Q-tip dipped in acetone for cleanup. Because of all these reasons it's advisable to attach the star before you start painting.
Good luck and post your pics :thumbsup


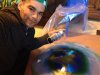
 Hello, I've followed this thread so long...feels like I actually know some of u. I've been a life long Captain America fan (reading the comics as a child)and this has been one project that has brought me personal satisfaction...I've posted some pics of my journey...thank you Valor and to all of you who have contributed to this thread.