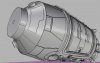
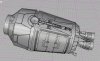
As my Y-Wing project is going to take awhile to do, I thought it would be fun to start on something simple that could be completed in less time. The Escape Pod from Star Wars:A New Hope. The shot of it dropping away from the Blockade Runner is just perfection in it's simplicity.
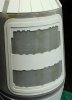
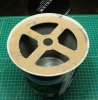
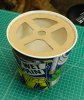
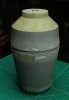
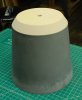
As with the original model, I'm starting with a couple of 5 quart paper paint buckets. Rather than fill them with foam I used the buckets like a roto mold to build up a thin shell. The first step was to cut a couple of 1/8" particle board discs with the CNC. The smaller disc fit snuggly inside the bottom lip of the paper bucket, the larger disc snapped into the indent for a lid near the top. Both discs were secured in place with hot melt glue. The discs served two purposes, the snug fit held the bucket round and the holes in the centers allowed the bucket to be rotated on a pipe. Before glueing the large disc in place I sprayed the inside surface of the bucket and disc with a couple coats of clear lacquer followed by an application of paste wax as a mold release.
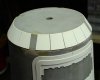
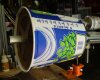
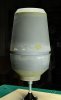
The bucket assembly was slipped over a pipe set up so that the bottom side of the bucket would be level. The idea being that the resin would self level as the bucket was slowly spun. this proved to not really be all that critical. For much of the cure time I took the bucket off the pipe to rotate it. I used Silcast II resin which has about a 7 minute working time to which I added a thixotropic powder to make it thicker and coat better. I did the resin in two pours to build up a thickness of about 1/8".
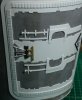
For additional strength and rigidity a single layer of fiberglass was added to the inside of the fully cured resin. I prefer to use an epoxy resin for glassing. It's pretty expensive but if far less toxic and doesn't stink up the whole shop like polyester resin does.
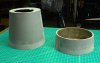
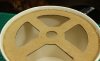
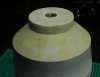
Following a 24 hour cure the paper buckets were peeled off and I had two nice hollow resin shells. A bit of trimming and they were ready to go.
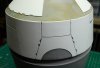
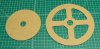
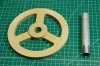
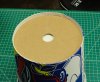
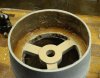
I wanted to do a simple armature with a single mounting point out the nose. For this a spoked disc was machined on the CNC router and a short piece of aluminum tube turned to fit into the hub. The resin shells were epoxy glassed to opposite faces of the disc forming the channel around the equator of the pod.
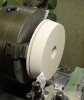
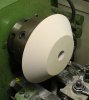
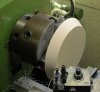
The conical sections at each end of the pod were turned on the lathe from 30 pound density rigid urethane foam. The surface of the foam was filled with automotive putty and sanded smooth.
And with that I've got an Escape Pod hull ready for detailing.
As with the original model, I'm starting with a couple of 5 quart paper paint buckets. Rather than fill them with foam I used the buckets like a roto mold to build up a thin shell. The first step was to cut a couple of 1/8" particle board discs with the CNC. The smaller disc fit snuggly inside the bottom lip of the paper bucket, the larger disc snapped into the indent for a lid near the top. Both discs were secured in place with hot melt glue. The discs served two purposes, the snug fit held the bucket round and the holes in the centers allowed the bucket to be rotated on a pipe. Before glueing the large disc in place I sprayed the inside surface of the bucket and disc with a couple coats of clear lacquer followed by an application of paste wax as a mold release.
The bucket assembly was slipped over a pipe set up so that the bottom side of the bucket would be level. The idea being that the resin would self level as the bucket was slowly spun. this proved to not really be all that critical. For much of the cure time I took the bucket off the pipe to rotate it. I used Silcast II resin which has about a 7 minute working time to which I added a thixotropic powder to make it thicker and coat better. I did the resin in two pours to build up a thickness of about 1/8".
For additional strength and rigidity a single layer of fiberglass was added to the inside of the fully cured resin. I prefer to use an epoxy resin for glassing. It's pretty expensive but if far less toxic and doesn't stink up the whole shop like polyester resin does.
Following a 24 hour cure the paper buckets were peeled off and I had two nice hollow resin shells. A bit of trimming and they were ready to go.
I wanted to do a simple armature with a single mounting point out the nose. For this a spoked disc was machined on the CNC router and a short piece of aluminum tube turned to fit into the hub. The resin shells were epoxy glassed to opposite faces of the disc forming the channel around the equator of the pod.
The conical sections at each end of the pod were turned on the lathe from 30 pound density rigid urethane foam. The surface of the foam was filled with automotive putty and sanded smooth.
And with that I've got an Escape Pod hull ready for detailing.
Attachments
-
 IMG_1660.jpg400.9 KB · Views: 482
 -
 IMG_1699.jpg396.9 KB · Views: 489
 -
 IMG_1696.jpg486.5 KB · Views: 442
 -
 IMG_1671.jpg381.8 KB · Views: 428
 -
 IMG_1669.jpg467.7 KB · Views: 465
 -
 IMG_1668.jpg602 KB · Views: 448
 -
 IMG_1666.jpg448 KB · Views: 470
 -
 IMG_1664.jpg279.8 KB · Views: 459
 -
 IMG_1663.jpg600.6 KB · Views: 413
 -
 IMG_1662.jpg498.2 KB · Views: 420
 -
 IMG_1737.jpg223.6 KB · Views: 458
 -
 IMG_1736.jpg251.1 KB · Views: 413
 -
 IMG_1733.jpg334.4 KB · Views: 408
 -
 IMG_1727.jpg396.5 KB · Views: 449
 -
 IMG_1725.jpg460.4 KB · Views: 461
 -
 IMG_1724.jpg462.6 KB · Views: 398
 -
 IMG_1706.jpg422.9 KB · Views: 450
 -
 IMG_1701.jpg479 KB · Views: 464
Last edited:
") Another awesome project. Man to have your motivation. Cheers,
Another awesome project. Man to have your motivation. Cheers,