I think that jacket was specifically made for the Disney employee walking around the park as Star Lord for special events and whatnot. I don't think it's available to the public for sale.
You are using an out of date browser. It may not display this or other websites correctly.
You should upgrade or use an alternative browser.
You should upgrade or use an alternative browser.
The Definitive Peter Quill/Star-Lord Costume Thread
- Thread starter Kevin Gossett
- Start date
Check it out!
3D printed MDR-5a headphones:
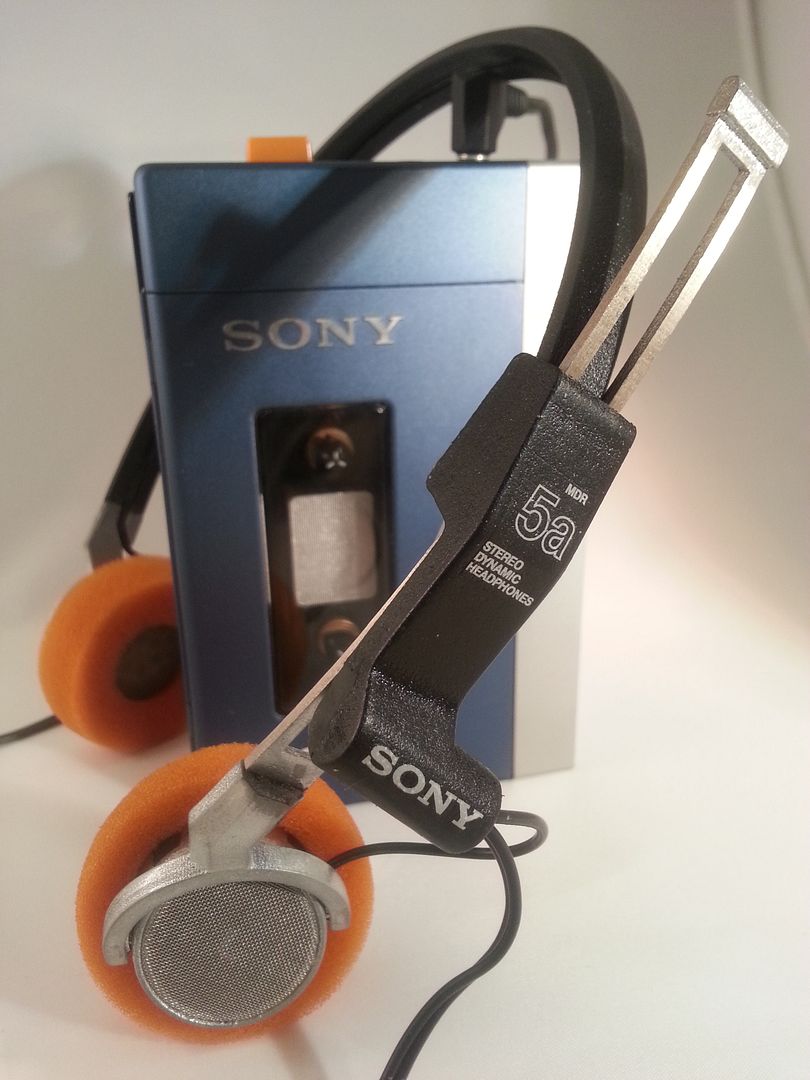
Credit goes to RPF member FreelanceSculpt for the original 3D model. Printed through Shapeways. Finished and retrofitted with mesh screens and decals by yours truly
3D printed MDR-5a headphones:
Credit goes to RPF member FreelanceSculpt for the original 3D model. Printed through Shapeways. Finished and retrofitted with mesh screens and decals by yours truly
grudgehammer
Well-Known Member
Alright, so, here's pictures for anyone interested in the Ravager's flight suit jacket from America Suits.


Overall, it's really great quality. Obviously not the correct materials, but it still looks good enough. Very stiff to begin with though, cause the neck part of the jacket to stick up a lot farther than I think it should. I need to create some of the additional armor that goes with it (across the back near the shoulders, the bottom of the jacket on the back and the left shoulder). The emblem on the right arm is way too big, so I might remove this one and replace it with a higher quality version. The blue is way too bright so I'll need to subdue that somehow into a more grey blue. I'm going to be cosplaying him at the end of the movie when he has the infinity stone in his hand, so I'll be distressing the jacket a ton as well.
A very nice base for modifying and the sizing from the vendor was spot on.
Hi Star Lord guys, i thought id share my progress on my boots. Here is my black leather mounted to the base with the sole glued. Its been slow going working on it. I will be hopefully able to start the other one this weekend.


Capn_Jack_Savvy
Sr Member
Isn't the back of the boot black?
It is... and those are black (?)
Capn_Jack_Savvy
Sr Member
OK....I wasn't too sure!!!
Yep, it is. Italian black leather. My desk lamp looks to have washed some of the color as it was right next to it.
Mystic5523
Active Member
Alright, so, here's pictures for anyone interested in the Ravager's flight suit jacket from America Suits.
View attachment 434288View attachment 434287
Overall, it's really great quality. Obviously not the correct materials, but it still looks good enough. Very stiff to begin with though, cause the neck part of the jacket to stick up a lot farther than I think it should. I need to create some of the additional armor that goes with it (across the back near the shoulders, the bottom of the jacket on the back and the left shoulder). The emblem on the right arm is way too big, so I might remove this one and replace it with a higher quality version. The blue is way too bright so I'll need to subdue that somehow into a more grey blue. I'm going to be cosplaying him at the end of the movie when he has the infinity stone in his hand, so I'll be distressing the jacket a ton as well.
A very nice base for modifying and the sizing from the vendor was spot on.
Looks great! Did you end up getting PU or real leather?
grudgehammer
Well-Known Member
Went with the real leather. Might as well make it a jacket worth wearing for fun sometimes.Looks great! Did you end up getting PU or real leather?
And is it just me or is this the most accurate jacket out there?
Obviously I'm tooting my own horn here, but the one I made might be a little more accurate than the Disney version when it comes to the overall "look" of the fabric and leather, even though I had to ad-hoc the pattern. (I really do need to get around to putting my money where my keyboard is, photographing and showing it soon, haha.)
The screen printing of the Disney version looks a bit "off" for some reason. It might be that they added color to the paint/pattern (it's supposed to be clear) or that they bleached the fabric "incorrectly" after printing. It's easier to bleach-tone the fabric before screen printing, but I think Soulinertia was able to do a great job of post-bleaching with the fabric I supplied. It does look like the Disney version was made from the production pattern though... and it's rather complicated, so quite hard to replicate exactly. I'm not sure but some of the ribbing in the back of the collar may not be present, or it's just less scrunched up than in the film.
There's just something wrong if you compare it with the Arclight jacket. I think maybe going back to the beaching... the pattern is too dark-red against the lightened orange. The screen jacket has different shades, but they are not so high-contrast within each panel. Now that I think about it... it looks a little like the Entertainment Weekly photoshoot version... maybe they even used the Disney one for that. It does look a bit baggy and large on the guy playing Quill at the Disney theme park.
Heh... sorry guys... I've been living with this jacket for too long now. It's starting to wear at my sanity.
Hi Star Lord guys, i thought id share my progress on my boots.
Nice to see someone taking things up a notch! How confident are you that they will hold up with some wear and tear? Soles and shoes are one of those things that are often hard to "put back together" once taken apart unless you have some real industrial-strength adhesives. I was thinking of just covering the bast sketcher with leather and doing some wet-sculpting, but I'm not sure it will hold up in the long run without the edges flaring.
dakotajoe
New Member
Check it out!
3D printed MDR-5a headphones:
http://i44.photobucket.com/albums/f33/GirlsofComicCon08/Mobile Uploads/20150201_192140.jpg
Credit goes to RPF member FreelanceSculpt for the original 3D model. Printed through Shapeways. Finished and retrofitted with mesh screens and decals by yours truly
How did you make the decals?
It's a special Japanese ALPS printer that prints resin micro thin onto a clear carrier. These are waterslide decals.
@joatrash, thanks I feel pretty confident about them. I'm using the strongest glue I can get local. The stetching, in the front nose and back should help hold it. The bottom has good solid surface for the glue. But I just need them last for the once in awhile wear and not a daily wearing
I feel pretty confident about them. I'm using the strongest glue I can get local. The stetching, in the front nose and back should help hold it. The bottom has good solid surface for the glue. But I just need them last for the once in awhile wear and not a daily wearing
Last edited by a moderator:
TK9336
Active Member
Soulinertia, do you think in theory you could gut a modern pair of similarly sized headphones and combine them into the printed parts to make them functional? I have my own working TPS-L2 and converted MDR-3 headphones that work. I doubt any one outside this forum will notice when out on the convention circuit but that's the first thing that came to mind. They look great.
Several of us have already put working drivers into the MDR shells. They're made to fit functional drivers in
Soulinertia, do you think in theory you could gut a modern pair of similarly sized headphones and combine them into the printed parts to make them functional? I have my own working TPS-L2 and converted MDR-3 headphones that work. I doubt any one outside this forum will notice when out on the convention circuit but that's the first thing that came to mind. They look great.
Yeah, just the shell is 3D printed. These are functional. I retrofitted them with working drivers. The model was built to accept all the "guts" needed to make them actually work.
80sKIDAutoman
Well-Known Member
Color me sold. Wish I had stumbled upon these before getting real ones. Should be a easy sell then!
Thanks for the info guys.
I am using driver guts from 1980s to 1990s era SONY headphones model MDR-005. The other model SONY MDR-010 works also. Those are the only 2 models I bought and tested myself. They are readily avail online for $20 and under. They fit perfectly in the 3D SONY MDR-5a headphones. Once you gently pull them off from the headband i used a Dremel with a diamond cutting wheel disc to cut off the edges. You also need to do some light soldering if you want to lose the excess wire length. I am currently awaiting nylon washers i ordered from overseas to add in between the C arm holder and drive cups to get actual swivel action from them. You need to carefully add a small pilot hole to the C arms and to the drive cup. Will be using a threaded or unthreaded cut down to size RC control rod. We also ordered some 1/8" and 1/4" length 4-40 Allen set screws to play around and see which will hold up better. I have all the wiring cut to length and currently held together temporarily with scotch tape until i get my parts orders. IMHO They sound great and what better way then to use SONY guts. Pics below.
BEFORE pics of the wiring


AFTER pics of the the wiring cut to perfect length and resoldered back to the drivers.


Similar threads
- Replies
- 13
- Views
- 278
- Replies
- 1
- Views
- 185
- Replies
- 0
- Views
- 173
- Replies
- 2
- Views
- 245