T1 and T2 Endoskeleton Research Thread

Хотя... уверены ли мы, что внутренняя часть носовой части М1 правильная? Может быть, нам следует придерживаться соответствия отливкам Музея ЭМИ.
I mentioned M1 just as an example because I recognized several details in it that were not used in T1-T2 (I'm talking about the nose). But yeah, we should do it the way we did in T1-T2.
 
Maybe the paint is too uniform. Didn't your larger pieces have darker spots dotted in, in irregular placements?
Yeah, that's the problem, I got lazy to paint properly. See, you're already accurately identifying issues, so it's time for you to start trying photogrammetry too. But actually, photogrammetry is very slow, inconvenient, and in my case, messy.
 
Btw: found the uploader showing off the DIY 3D scanner I was talking about. Seems like a similar setup to the old David Laserscanner. Unsure whether the software is similar. It looks more DIY and with more features, if that makes sense. Apparently the scanner is called FlexScan3D, but only one video is showing it used in a way I would be able to use for scanning the endoskeleton... though, it seems to be a modified one... so would probably require a technically smart person.


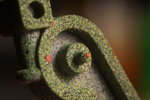
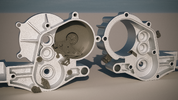
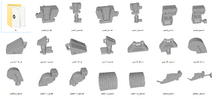
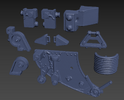
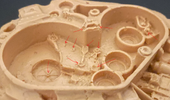
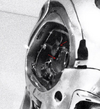
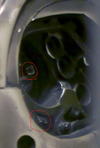
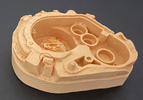
But just look at these scans:


It is usually paired with a direcitonal turntable kinda deal, which I cannot use, but this one video shows it used in a different way.

I should also put together a two-axis rotating platform to simplify preparing photos for photogrammetry. It would be more convenient to photograph all sorts of small things.
 

Attachments

  • DSC02530.jpg
    DSC02530.jpg
    1.2 MB · Views: 35
  • DSC02533.jpg
    DSC02533.jpg
    9.1 MB · Views: 26
I don't mind slow and inconvenient if I get the result I want. I used David LaserScanner. That was slow and inconvenient because whenever the laser could reach an area the camera couldn't because there was a 30° difference in angle between the two, so it was hard to angle the objects just right to get every surface and some surfaces just wouldn't get reached.

Seems the FlexScan3D achieved a better result... or... similar to David LaserScanner by those who turned it into a structured light scanner instead of a laser scanner. I'm sure that eliminated the 30° issue.

However. I'm still so disappointed that a $1000 Shining scanner cannot achieve the FlexScan3D results. But if they had actually made that... then no one would keep buying their expensive scanners... so from a business standpoint I guess I understand. Still... kinda silly.
Generally, if you need high-resolution scanning and the object is large, you can't set an 8 million polygon limit during scanning. Some of my scans had 200 million polygons, and even there, the level of detail was insufficient. Perhaps you're not getting the desired quality because of the limitation you've set yourself. Large file sizes and slow opening in other 3D programs are normal. Quality requires patience and time. Sometimes importing a large scan could take about an hour, and every action would cause the programs to freeze for several minutes. Nevertheless, I managed to process and save them, then simply used ProOptimizer for the model in 3ds Max, which works slightly better, then simple Decimate in Blender.
 
Last edited:
I set the limit to 8mio triangles, not polygons. And it was only after seeing for myself that it did nothing to hinder the quality of the scan because the software kept the loose spacing between polygons to areas where there were very little surface detail and kept the concentrated close polygons to detail areas.

I had the 1+gb file next to the 400mb (8mio triangles) scan right next to each other, flipping between one and the other to see if there was any noticeable difference. Both had the same errors, since they were the same scan, just processed with different settings. But one was more manageable to work with.
 
Last edited:
The issues I experience isn't caused by that limitation, because that is a post-processing thing. The issues I have with the scanner is stuff happening during the scan in the 0.1mm setting, where it simply refuses to capture certain things no matter what I try.
 
I honestly think the issue might be the company itself. Shining already have great software and great scanners (expensive). They have nothing to really gain by putting their best work into and improving things when they make cheaper scanners like the Einstar as they probably won't want their expensive scanners to go obsolete.

A company like Revopoint has everything to gain by improving their scanners and software with each release, while keeping the price low, as they are working from the bottom up. So, it is that kinda company we will see the biggest push for better and cheaper scanners from.
 
Last edited:
I set the limit to 8mio triangles, not polygons. And it was only after seeing for myself that it did nothing to hinder the quality of the scan because the software kept the loose spacing between polygons to areas where there were very little surface detail and kept the concentrated close polygons to detail areas.

I had the 1+gb file next to the 400mb (8mio triangles) scan right next to each other, flipping between one and the other to see if there was any noticeable difference. Both had the same errors, since they were the same scan, just processed with different settings. But one was more manageable to work with.
Sorry, I meant triangles (I'm just used to calling them polygons).
 
I spent two full days scanning all these details, and there are still a few left. Incredibly tired, but the result is paramount, and I am very happy about it. Scans at this scale look quite good in the render; noise and various defects aren't visible because they're smaller than the pixel size of the image.
 

Attachments

  • 4.png
    4.png
    4.9 MB · Views: 56
  • Screenshot 2024-03-24 213317.png
    Screenshot 2024-03-24 213317.png
    348.2 KB · Views: 59
  • Screenshot 2024-03-24 214532.png
    Screenshot 2024-03-24 214532.png
    890.7 KB · Views: 55
Last edited:
On gizmo's temple inserts, the big piece at the bottom of your last picture has a shovel instead of that straight piece on the surface. Did they grind the original bit off and swap it with a shovel, or could the whole piece be from another kit of the same thing (I forgot, was it a vehicle or a weapon) from another company?
 
On gizmo's temple inserts, the big piece at the bottom of your last picture has a shovel instead of that straight piece on the surface. Did they grind the original bit off and swap it with a shovel, or could the whole piece be from another kit of the same thing (I forgot, was it a vehicle or a weapon) from another company?
I don't quite understand which detail you're talking about, could you mark it on the picture?
 
Or maybe they just cut off parts, so it ended up looking like a shovel!?

View attachment 1803371
I'm pretty sure it's just casting defects. This often happens when there are cylindrical details on the master model protruding from the surface, resulting in an inverted shape on the silicone mold - a cylindrical indentation. And when resin is poured into the mold from the top, air bubbles form in these indentations.
 

Attachments

  • Screenshot 2024-03-25 173053.png
    Screenshot 2024-03-25 173053.png
    2.4 MB · Views: 17
Yeah. Makes sense. The question then is... should we recreate it with the actual model kit part or should we recreate it with the air-bubble voids?

Would be interesting to see how the EMPMuseum temples look, but I haven't been able to find any pictures showing the temples in clear view.
 
Yeah. Makes sense. The question then is... should we recreate it with the actual model kit part or should we recreate it with the air-bubble voids?

Would be interesting to see how the EMPMuseum temples look, but I haven't been able to find any pictures showing the temples in clear view.
It's clear that all the details there are defect-free. Also, that round detail on the left temple is rotated 180 degrees. But in the T1 movie, this detail is exactly the same as we see on the Gizmo parts.
 

Attachments

  • Screenshot 2024-03-25 180420.png
    Screenshot 2024-03-25 180420.png
    734.1 KB · Views: 27
  • Screenshot 2024-03-25 180545.png
    Screenshot 2024-03-25 180545.png
    877.1 KB · Views: 27
  • Screenshot 2024-03-25 180539.png
    Screenshot 2024-03-25 180539.png
    1.4 MB · Views: 27

Your message may be considered spam for the following reasons:

If you wish to reply despite these issues, check the box below before replying.
Be aware that malicious compliance may result in more severe penalties.
Back
Top