T1 and T2 Endoskeleton Research Thread

Yes I’ve seen that. I need to send T-Studio a message. I’m friends with him on Facebook I’m just not sure of the language barrier. I know he flew to America to find out where his skull came from.

I’ve been really busy this week but I’ll post some stuff on the weekend. :)
I have found "the language barrier" is basically gone now: ChatGPT
I speak several languages, and having used ChatGPT(for free) I have used it to translate into Russian, Chinese, Bosnian, Spanish, Portuguese and have found it to be almost 100% correct. By far the best "translator" tool I have used.

So you can simply write a message, ask ChatGPT to translate it into Japanese or whatever language you desire and it'll take care of it. Then simply copy/paste and send it, or paste it into Google Translate(which sucks) and it should be able to translate it back into English or whatever and confirm the translation.


"SKYNET is here to help you and improve your way of life. Help us help you." :lol:
 
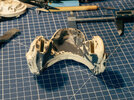
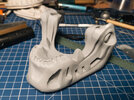
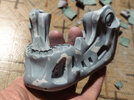
Alongside working on my skull's jaw, I continue to look at others' works, and I've taken a closer look at the resin kit from Future Tech Collectibles. The surface is very clean and smooth, which is cool, but the fact that all the sharp edges are smoothed out is disappointing. Creating sharp edges is quite a tedious task, and ideally, sharp edges should be on the master model so that they also appear on all castings. This approach would be ideal since almost all the edges of the original T1 are very sharp, and if that's not needed, there's always sandpaper to remove corners, which is easier than creating them on a resin casting.
This is why I think when creating like a super accurate 3D model, certain edges should not be beveled, at least if the model is to be used for like 3D printing/mold making.

If it used in a CG environment then naturally all edges should be beveled since there are no perfectly sharp edges in the real world.
Also, people who make models for 3D printing forget that the model will be painted afterward, and painting is done in several layers, often filling various seams and joints, as well as areas where parts are joined (if it's assembled). With Skynet2029, for example, such models, when painted, suffer greatly in terms of detail due to the layer of paint. The same goes for electroplating models with metals. However, there is a downside to electroplating - dendrites start to grow on highly sharp edges, so in any case, before electroplating, you need to round off the corners, but this should be done not in the 3D model, but already on the printed specimen manually
 
Also, people who make models for 3D printing forget that the model will be painted afterward, and painting is done in several layers, often filling various seams and joints, as well as areas where parts are joined (if it's assembled). With Skynet2029, for example, such models, when painted, suffer greatly in terms of detail due to the layer of paint. The same goes for electroplating models with metals. However, there is a downside to electroplating - dendrites start to grow on highly sharp edges, so in any case, before electroplating, you need to round off the corners, but this should be done not in the 3D model, but already on the printed specimen manually
So in short, the real world sucks :lol: :lol:
 
So thanks again to my good friend TooMuchGarlic/Carsten, I was able to obtain 2 more awesome pieces recently. The first being a LFS skull. Here’s some comparisons with my T1.

9AEFB79F-1362-4AF5-A899-D6CD783145C5.jpeg
6F3CE397-7772-4019-BEA7-631F45EE21B1.jpeg
04BA9A5B-A17C-41C7-865F-8060C77B672C.jpeg
869ED83B-2884-4625-9B02-4472171D90FE.jpeg
9E35D98A-262F-460B-8569-321F30091DB1.jpeg
E1E5ED4C-010F-4AF1-858E-8193EF95E1FA.jpeg


The next item was a T23D pulse rifle from original Stan Winston molds borrowed to be used for the production of the ride.

3BD9CE9B-015F-405B-BA74-46BBEE687238.jpeg


Again, Thanks buddy,

Ben
 
Gotta admit those skulls look good together, even though the LFS has a longer upper lip area. If you don't want to fix it like I am doing by cutting away the excess between top and bottom, but just sand it down, then just call that one Cyberdyne Systems model 102 or one of the other 100 numbers before the Schwarzenegger model. :)

And yeah. That T2:3D Pulse Rifle is amazing. Glad you got them and enjoy them. :)
 
So thanks again to my good friend TooMuchGarlic/Carsten, I was able to obtain 2 more awesome pieces recently. The first being a LFS skull. Here’s some comparisons with my T1.

View attachment 1801101View attachment 1801102View attachment 1801103View attachment 1801104View attachment 1801105View attachment 1801106

The next item was a T23D pulse rifle from original Stan Winston molds borrowed to be used for the production of the ride.

View attachment 1801107

Again, Thanks buddy,

Ben
Wow, these skulls are quite similar in overall shape. I really like that they have a lot of sharp edges!

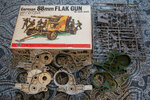
I'll share my joy too; today I finally received a package from Italy. Judging by the design of the box, this is the very first edition of this set. Now, knowing the size of the parts, I'll be able to calculate how much the halves of the gearbox have been reduced during the initial copying, and these details will also help refine the size of the skull exhibited at the EMP museum (but since the details in the nose are small and the resolution of the photos is low, one should not expect great accuracy; this is just an auxiliary option). I still need to find a scan or a copy of the original temple parts, or at least Timeless, then I'll be able to recreate all of this in CAD with high precision!
 

Attachments

  • DSC02350-2.jpg
    DSC02350-2.jpg
    9.9 MB · Views: 108
  • Screenshot 2024-03-18 172044.png
    Screenshot 2024-03-18 172044.png
    260.3 KB · Views: 97
Last edited:
Would be interesting to see if there is a difference between the 1972 tooling and the 198x tooling and which one matches the T1 used ones. But cool find. Could you enlighten my unenlightened self regarding the different gear boxes in the picture. I can see the differences... but which one is the one that is the Terminator used one?
 
Would be interesting to see if there is a difference between the 1972 tooling and the 198x tooling and which one matches the T1 used ones. But cool find. Could you enlighten my unenlightened self regarding the different gear boxes in the picture. I can see the differences... but which one is the one that is the Terminator used one?
Regarding the Flak, it's obvious that we need a version that was released on the market before the release of T1. According to the information on the second picture, the Flak kit was created in 1972, and until the 1990s, the parts remained unchanged; only the box was changed, and it wasn't until 2010 that they redesigned the parts. So, I think that from the '70s to the '90s, the parts were cast in the same thermoplastic machine molds (they are quite durable, and producing new ones is costly), so there's no need to worry about the dimensions of the castings, as they are pressure cast.

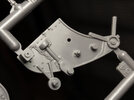
Regarding the gearbox. In the top left is one of the very old versions of the gearbox, where externally all the details match what can be seen in the early pictures, where they create a formwork around the clay skull for the mold. On the right, the green parts are ones I printed on my printer using my accurate 3D models to align and compare them with the original - everything matched up. In the bottom left is the 2010 version of the gearbox, which differs from what was used in T1 by various curves and some dimensions. And yes, all these gearboxes are from the Tamiya Sand Scorcher.
 
Last edited:
I wonder if your photogrammetry skills wouldn't outmatch an affordable 3D scanner if you were to attempt to make 3D models of these parts.
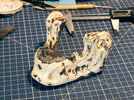
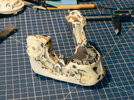
I will definitely try to do scanning using photogrammetry. I have many plans for these parts in general. First, I would like to finish the jaw (it turned out to be very hard work, and since I'm doing this only for the second time in my life, it takes a lot of time). After that, I want to duplicate the necessary parts of the Flak 18 with silicone and polyurethane, and only then try to scan the original parts, after which I will start reverse engineering in CAD.
 

Attachments

  • DSC02338.jpg
    DSC02338.jpg
    7.7 MB · Views: 93
  • DSC02340.jpg
    DSC02340.jpg
    8.2 MB · Views: 86
  • DSC02342.jpg
    DSC02342.jpg
    7.8 MB · Views: 88
  • 2024-03-17 21.55.17.jpg
    2024-03-17 21.55.17.jpg
    3.5 MB · Views: 82
  • 2024-03-18 03.41.13.jpg
    2024-03-18 03.41.13.jpg
    1.9 MB · Views: 89
I wonder if your photogrammetry skills wouldn't outmatch an affordable 3D scanner if you were to attempt to make 3D models of these parts.
In general, the details are small, with very fine detailing, and regular 3D scanners won't handle them, you need jewelry or dental scanners for this. As for photogrammetry, I'm still doubtful, but I'll try anyway.
 
Well, if you can get that good scans for the skull, I believe you can get that good scans out of these parts too. Just consider the scale. Do everything smaller - the paint spatter patterns should be fine and take as many pictures as you would a larger object, even though it might not seem necessary since the part is so small. Would you look at me... someone who's never done photogrammetry trying to sound smart to a guy who's done it beyond well. Sorry... that was kinda arrogant of me.

It's kinda insane that the cheaper made scanners still aren't up to the quality of the David Laserscanner from over 15 years ago. That scanner could scan small parts, if you had the right setup. I never advanced beyond rookie entry level low-resolution scanning.
Sharing experiences or thoughts on how to improve the process is not arrogance, I appreciate it. And you're right, the paint application should be so minimal as not to damage the details, and the paint droplets should be very small. I will try not to paint the model entirely, but will apply the paint as dust, allowing the plastic to show through this layer of paint. This way, I will introduce minimal distortion to the size of the part and avoid spoiling the details. Another issue is that I don't have such a long-focus lens. I have a 300mm lens, but the minimum focusing distance is large. I also have macro rings and a teleconverter. I also have a 500mm mirror lens, but unfortunately, it's not suitable for this purpose, as its minimum focusing distance is approximately 4 meters. In general, I will experiment.
 
An idea could be to try it on a casting first, so you don't just jump into the deep end with the actual styrene parts.

And yeah... I forgot this is basically gonna be "macro" photography in similar style to people photographing small insects and butterflies.
 
Wow, these skulls are quite similar in overall shape. I really like that they have a lot of sharp edges!

I'll share my joy too; today I finally received a package from Italy. Judging by the design of the box, this is the very first edition of this set. Now, knowing the size of the parts, I'll be able to calculate how much the halves of the gearbox have been reduced during the initial copying, and these details will also help refine the size of the skull exhibited at the EMP museum (but since the details in the nose are small and the resolution of the photos is low, one should not expect great accuracy; this is just an auxiliary option). I still need to find a scan or a copy of the original temple parts, or at least Timeless, then I'll be able to recreate all of this in CAD with high precision!
Do you think I could pour some silicone or something similar onto my timeless skull and send you a casting? Might work?
 
Back
Top