You are using an out of date browser. It may not display this or other websites correctly.
You should upgrade or use an alternative browser.
You should upgrade or use an alternative browser.
Studio Scale Tie Fighter Build - Nice'N Model Designs
- Thread starter Corellianexports
- Start date
We had a fairly dry November, so I was able to put an initial coat of primer on the wing details.
I decided to break the bank and purchase the super expensive, Tamiya primer. It turned out to be high quality primer, perfect for models
because it goes on thin, not hiding any details. And the details on these parts are extremely tiny.
Along with the Tamiya primer, I also found some "sanding sticks". Also a bit spendy but they are coming in handy for getting into those tiny crevasses. I will try to remember to post a photo of them.
Attachments
My $.02... and to be 100% truthful - this is mostly conjecture... They used LEDs in the sockets but they weren't lit. They likely had the intention of using them as light points for the fx... but like the fiber optics in the X-wings gun tips it didn't work out well in Film.. The lights were too bright, so they weren't used.
Jedi Dade
Jedi Dade is quite right. They did use orange/amber LEDs with the rounded edge turned to have a bevel.
This information was confirmed by two different people (both here on the RPF) that had first hand, close-up inspection of a few of the original filming miniatures, including taking actual measurements off these models.
Vince,
very nice workmanship!
I love your attention to detail,
... also nice website, those jumpsuits, look great.
Thanks!
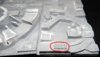
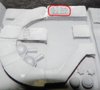
While working on the Death Star base, I've come across a small, detailed piece which appears to be in a "step" formation.
I think it's suppose to be level all the way across. Does anyone have a reference for the original part? It looks like it attaches to a rod or hinge of some sort. Thanks.
While working on the Death Star base, I've come across a small, detailed piece which appears to be in a "step" formation.
I think it's suppose to be level all the way across. Does anyone have a reference for the original part? It looks like it attaches to a rod or hinge of some sort. Thanks.
Attachments
I decided to take a break from the electronics and work exclusively on the Death Star base. Here's some progress pics:


I think a couple more coats of paint should do it, but there is still plenty of sanding and putty applying that still needs to be done. I might take a break from it and go back to the electronics next week, partially due to the cold weather.
I think a couple more coats of paint should do it, but there is still plenty of sanding and putty applying that still needs to be done. I might take a break from it and go back to the electronics next week, partially due to the cold weather.
The base is finished. Photos are forthcoming.
After taking a detour through a Han Solo Bespin blaster build, a summer vacation and a bout with Hay Fever, I'm finally back to work on this. Time to bring "this ship into shore", as the song goes. So with that in mind, I'm back to the wiring:

I had some trouble getting all four LEDs to light properly (2 whites for the blasters and 2 reds for the engines). The two engine lights worked fine, but as soon as I added the white LEDs all of them started dimming, so I've added resistors to all the LEDs and that seemed to do the trick.
I also finished turning some wooden dowels to be used as LED holders:

Everything fits so the next step is to shorten the wires and get the resistors onto some sort of board, possibly attached to the under side of the battery holder.
After taking a detour through a Han Solo Bespin blaster build, a summer vacation and a bout with Hay Fever, I'm finally back to work on this. Time to bring "this ship into shore", as the song goes. So with that in mind, I'm back to the wiring:
I had some trouble getting all four LEDs to light properly (2 whites for the blasters and 2 reds for the engines). The two engine lights worked fine, but as soon as I added the white LEDs all of them started dimming, so I've added resistors to all the LEDs and that seemed to do the trick.
I also finished turning some wooden dowels to be used as LED holders:
Everything fits so the next step is to shorten the wires and get the resistors onto some sort of board, possibly attached to the under side of the battery holder.
I came across a piece of perf board. I marked it up and did some measuring:

I placed the four resistors and bolted the board to the under side of the battery holder, which has now become more of a "control board".

With every thing in place, I tested the connections with a volt meter to avoid taking every thing apart twice. So far so good. I'm getting 3 volts from all four connections.
I placed the four resistors and bolted the board to the under side of the battery holder, which has now become more of a "control board".
With every thing in place, I tested the connections with a volt meter to avoid taking every thing apart twice. So far so good. I'm getting 3 volts from all four connections.
That sounds about right because when I used the clear acrylic rods, I had to turn them down quite a bit to get them to fit inside the tubes. It would have been a lot easier with just LEDs because the wires could have fit easily inside the tubes.Jedi Dade is quite right. They did use orange/amber LEDs with the rounded edge turned to have a bevel.
This information was confirmed by two different people (both here on the RPF) that had first hand, close-up inspection of a few of the original filming miniatures, including taking actual measurements off these models.
Vince,
very nice workmanship!
I love your attention to detail,
... also nice website, those jumpsuits, look great.
One reason why I was thinking about white lights is due to the scene when the Vader TIE Advanced shoots at Luke's X-wing. The orange blasters give off a pulsating, white light. It may have just been another special effect, like the green bolts coming from the TIE fighter blasters.
robn1
Master Member
It sure looks to me like the LEDs are lit up here. They have a bit of color, and there is some glare that wouldn't be in the animation effect.One reason why I was thinking about white lights is due to the scene when the Vader TIE Advanced shoots at Luke's X-wing. The orange blasters give off a pulsating, white light. It may have just been another special effect, like the green bolts coming from the TIE fighter blasters.
Very cool. ")
The wiring is basically complete. I might research some flashing, white LEDs for the blasters. I'm skeptical that I'll find the same timing seen in the film, but they might be out there.
Next up is finishing the interior. Unfortunately, the kit didn't come with the small, triangular part, so I'll scratch build that part:

I've got some small, ammo boxes for the top of the interior that seem to fit. Does anyone know any details about this area of the model or have some good reference photos?
Next up is finishing the interior. Unfortunately, the kit didn't come with the small, triangular part, so I'll scratch build that part:
I've got some small, ammo boxes for the top of the interior that seem to fit. Does anyone know any details about this area of the model or have some good reference photos?
There is a small space that is left between the pilot cockpit "backing" and the forward section, so I've used a small piece of flat, resin left over from a pull to cover it up:


Now I will be able to add the ammo boxes and other details for the "ceiling" of the cockpit.
Now I will be able to add the ammo boxes and other details for the "ceiling" of the cockpit.
The finished version of the boxes were actually about 50% smaller than what I had started out with.
I did use a full size box with some angles cut across it for the "Targeting Computer" just to the pilot's left side.
I'll have to re-watch the film, because I only vaguely remember it.


I checked all the detailed parts I have for my SS Y-Wing, but surprisingly, I didn't find any rectangular parts and the one rectangular part that I did find was too large to use. The ammo boxes add some nice detail, however. One of these days we'll figure out what was really used, but these will do for now.

I did use a full size box with some angles cut across it for the "Targeting Computer" just to the pilot's left side.
I'll have to re-watch the film, because I only vaguely remember it.
I checked all the detailed parts I have for my SS Y-Wing, but surprisingly, I didn't find any rectangular parts and the one rectangular part that I did find was too large to use. The ammo boxes add some nice detail, however. One of these days we'll figure out what was really used, but these will do for now.
What to do next...……...so I went through my box of detailed parts and realized that the two, flat "wing" pieces needed to be curved.
Here's a "before" picture:

I used some double stick tape to keep the parts in place and then hit the parts with a heat gun (background).
Here's an "After" picture, after holding down the heated part for a few minutes:

Up next: Test fitting the detail parts for the back panel, then cleaning and finally.....painting.
Here's a "before" picture:
I used some double stick tape to keep the parts in place and then hit the parts with a heat gun (background).
Here's an "After" picture, after holding down the heated part for a few minutes:
Up next: Test fitting the detail parts for the back panel, then cleaning and finally.....painting.
I double checked the back panel and it's in good shape. All the parts (Interior and Exterior) are accounted for, so the next step will be to start cleaning all the parts with soap and water, let them dry then start the painting the process....which will probably be this weekend.
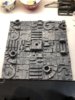
So here's the Death Star base, finally finished after about 12 months of work off and on. It's hard to believe that the work on this started way back in June of last year. After applying several coats of primer I began to realize that it was starting to cover some of the details, so it was time to throw in the towel and simply apply a finishing coat;, calling it quits, but with the kudo that the final coat would be primer just in case I decide to do some more tweaking in the far off future.

I think it would be amazing if this base could be 3D printed. Of course it would probably lose it's circa 1976 feel, but it would certainly appear more high tech. So now it's on to the TIE parts cleaning...
So here's the Death Star base, finally finished after about 12 months of work off and on. It's hard to believe that the work on this started way back in June of last year. After applying several coats of primer I began to realize that it was starting to cover some of the details, so it was time to throw in the towel and simply apply a finishing coat;, calling it quits, but with the kudo that the final coat would be primer just in case I decide to do some more tweaking in the far off future.
I think it would be amazing if this base could be 3D printed. Of course it would probably lose it's circa 1976 feel, but it would certainly appear more high tech. So now it's on to the TIE parts cleaning...
All parts washed and rinsed off:

All of the aluminum parts were cleaned off with denatured alcohol and either hung up or placed on a small box:

I used the Tamiya light grey primer:

All of the aluminum parts were cleaned off with denatured alcohol and either hung up or placed on a small box:
I used the Tamiya light grey primer:
All the parts have been sprayed with Tamiya Light Grey paint so I am going through the process of sanding the parts down with 1500 and 600 grit sand paper to help clean them up before applying more coats.
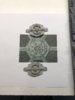
I thought the hatch part was interesting. While checking it against some reference photos, I discovered some missing "rivet" holes, so I used a small, jewelers drill bit (about 1/32") to add these holes. Most of them are new the bottom of the photo, in white:

I also came across a couple of holes that may have been mistakes, so I filled those in.
So once the primer coats are complete, I will finish most of the parts with Haze Grey. The interior parts, including the pilot and front hatch will be finished with German Grey (i.e. Dark Grey). If I didn't know better, I'd say this model was intended for a black and white film, but then again there are plenty of Naval ships and planes painted different shades of grey.
I thought the hatch part was interesting. While checking it against some reference photos, I discovered some missing "rivet" holes, so I used a small, jewelers drill bit (about 1/32") to add these holes. Most of them are new the bottom of the photo, in white:
I also came across a couple of holes that may have been mistakes, so I filled those in.
So once the primer coats are complete, I will finish most of the parts with Haze Grey. The interior parts, including the pilot and front hatch will be finished with German Grey (i.e. Dark Grey). If I didn't know better, I'd say this model was intended for a black and white film, but then again there are plenty of Naval ships and planes painted different shades of grey.
A few of the interior parts, including the pilot are done. I'm now trying to tackle the larger parts including the cockpit. Holes are being re-drilled and indentations are being filled with putty. Lots of sanding with 220, 600 and 1500 grit sand paper.
I'm coming across some mistakes that were made (which I'm fixing), but I'm seeing lots of amazing details.
I'm keeping my fingers crossed that I'll be able to get all the painting completed before the bad weather sets in... some time in October.
Pilot assembly is complete and all the interior parts are done.
Primer painting on the cockpit along with some putty application is complete. Right now I'm attacking the wings by removing small "divets" or mold imperfections with X-Acto knives and then sanding the smooth surfaces with sand paper. I'm also checking these against reference photos to make sure I'm not removing any detail that should be there.
Up next, more sanding and putty work on the cock pit, outer detail parts and wings. More painting resumes later this week when the weather gets better.
Fett_Ish
Sr Member
Those wings are a chore! I painted and stripped mine 3 times due to paint pull, and they were warped from the mold. Both sides had sort of pulled away, so it took some creative putty, sand and paint to hide those. also where the stars met the arm was not flat so a bunch of work to get the wings to appear straight and square from most angles. If I recall the Koolshade should get painted first as its easier to mask that way. You are putting alot of great work into this, it's gonna look great!
Similar threads
- Replies
- 56
- Views
- 8,340
- Replies
- 5
- Views
- 390