thibkaji
Well-Known Member
It's been a few months, but I've not been idle! I'm back now with a new studio scale build thread for the B-Wing Attack Starfighter! This ship is one of my all-time favorites -- everything about it I find cool and awesome, and so I've decided to have a go at it. I might be out of my mind -- in fact, I KNOW I'm out of my mind -- for attempting this build when I've only created one other SS build prior. But to quote the Cheshire Cat, "We're all Mad here..."
Leading up to now I've done a TON of research, combing through other threads here on the RPF and other sources, but mostly my own independent research using reference photos and scouring through kits and scans to identify as many kit parts as possible. I've also had some assistance filling in a few really hard-to-ID kit parts from a few folks who, upon request, have chosen to remain anonymous. The result is that I've got a pretty complete picture of everything needed --at least kit-wise -- and I'm going to be detailing the build here.
So let's jump in and get going!
First, an obligatory picture of kits collected thus far. I have another 4-5 kits still on the way, and that should put me into pretty good shape. It's a lot of kits compared to the bomber, with some contributing only 1-2 parts. I think I'm at around 28 total unique kits thus far, but I'm still researching a handful of unidentified parts, so that could go up.

And, yes, that F-14A box is REALLY rough (it's what's inside that counts!)!
I'm planning to build this as much like Bill George did at ILM as I possibly can, and this of course means vacuum-forming multiple parts -- the cockpit halves, the main wing halves, the engine housing halves, the upper neck, the main wing gun surround and probably the wing gun housings. I'm in the process of building my own vacuum-forming machine, and will be working up the bucks needed to cast the parts.
As another preparatory step, I also picked up the Bandai 1/72 B-Wing kit. This kit was created using scans of the original filming model, and I can tell you it's super accurate!! I'm amazed at how they were able to reproduce, at scale, a number of obscure parts on the kit. Just amazing, and an excellent resource for making measurements -- this will be especially useful when I go to make the bucks. My only real complaint with the model is that the scale isn't actually 1/72 -- it's much closer to being 1/80th scale. I determined this through numerous measurements of the actual kits parts vs. the representation of the parts on the Bandai kit. This means that for any of the measurements I might need I have to end of multiplying it by around 2.54x on average.
And with that, let's begin!
The Cockpit Neck Mid-Section
I wanted to get going on this build, so I picked a section I thought would be easy enough to build -- so I went with what I'm calling the "cockpit neck". This section is made up of two Airfix Saturn V rocket parts, some Leopold parts and styrene strips. I know there's been some debate as to whether it's an Airfix, Revell or Entex kit that contributes to this, but as you'll see, all of the reference markings definitively show it's the Airfix kit.
First thing was to trim up the halves -- you can see the trimmed up section on the left and untrimmed on the right. This primarily consisted of removing the thin locking section at the front and sanding down all of the raised sections around the perimeter (with the exception of the large bump still on the left-hand half).

Then I glued up the halves together. There is a collar that goes around where the cockpit connects to this section and so I also cut out a disk of styrene and glued that to the end to act as the main support for the collar.

This was followed by the collar itself.

Finally, I added a few strips of styrene around the perimeter to match the reference.

Once I got to this point, something about it kept bothering me. Looking closer, I really didn't like the raised sections around the perimeter of the Saturn V parts. This was creating an uneven shape, and looking again at the reference pics, I wasn't finding any indications that these sections were on the filming model. They needed to go! Unfortunately, while attempting to fix this I ended up screwing it up. Luckily I had another Saturn V kit ready to donate!

Here you can see the two halves with the raised sections cut off -- not really a circle anymore, is it?

With a little friendly coercion I was able to glue it up and into a circular shape. The disk inside the assembly is part of the coercion, keeping the shape from pulling back into an oval.

I added all of the strip styrene back -- this looks a LOT better! You can see now where the cut marks and protrusion I left in place match up to the reference.


Throw on a few Leopold parts and the last of the needed styrene and this section is looking pretty good.

The reference also shows a few of these little triangular shapes, which are the result of sanding off the raised sections around the Saturn V parts. With this current version, these markings also now line up.


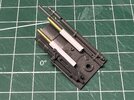
I still need to add a bit of wiring, but I think it's a pretty good start for this build. Once I've worked out the armature, this will have to get mounted to that, likely with a hole cut through the bottom and a bearing to allow for cockpit rotation. I'll also have to run electrical wiring down through the neck so I can light up the rice lights in the cockpit.
Next up I will be tackling the cockpit itself. Here's a teaser with the kit parts I've collected so far:

And with that we're off! I'm expecting this to be a fairly slow-burn of a build. I have lots more research still to do -- need to work out the structure of the armature, finish building the vacuum former, and create all the bucks needed -- not to mention finish gathering kits, parts, and working out the rest of the assemblies. But I've got a lot figured out already, and look forward to sharing my progress with everyone. Til next time, keep on scratchin!
Leading up to now I've done a TON of research, combing through other threads here on the RPF and other sources, but mostly my own independent research using reference photos and scouring through kits and scans to identify as many kit parts as possible. I've also had some assistance filling in a few really hard-to-ID kit parts from a few folks who, upon request, have chosen to remain anonymous. The result is that I've got a pretty complete picture of everything needed --at least kit-wise -- and I'm going to be detailing the build here.
So let's jump in and get going!
First, an obligatory picture of kits collected thus far. I have another 4-5 kits still on the way, and that should put me into pretty good shape. It's a lot of kits compared to the bomber, with some contributing only 1-2 parts. I think I'm at around 28 total unique kits thus far, but I'm still researching a handful of unidentified parts, so that could go up.
And, yes, that F-14A box is REALLY rough (it's what's inside that counts!)!
I'm planning to build this as much like Bill George did at ILM as I possibly can, and this of course means vacuum-forming multiple parts -- the cockpit halves, the main wing halves, the engine housing halves, the upper neck, the main wing gun surround and probably the wing gun housings. I'm in the process of building my own vacuum-forming machine, and will be working up the bucks needed to cast the parts.
As another preparatory step, I also picked up the Bandai 1/72 B-Wing kit. This kit was created using scans of the original filming model, and I can tell you it's super accurate!! I'm amazed at how they were able to reproduce, at scale, a number of obscure parts on the kit. Just amazing, and an excellent resource for making measurements -- this will be especially useful when I go to make the bucks. My only real complaint with the model is that the scale isn't actually 1/72 -- it's much closer to being 1/80th scale. I determined this through numerous measurements of the actual kits parts vs. the representation of the parts on the Bandai kit. This means that for any of the measurements I might need I have to end of multiplying it by around 2.54x on average.
And with that, let's begin!
The Cockpit Neck Mid-Section
I wanted to get going on this build, so I picked a section I thought would be easy enough to build -- so I went with what I'm calling the "cockpit neck". This section is made up of two Airfix Saturn V rocket parts, some Leopold parts and styrene strips. I know there's been some debate as to whether it's an Airfix, Revell or Entex kit that contributes to this, but as you'll see, all of the reference markings definitively show it's the Airfix kit.
First thing was to trim up the halves -- you can see the trimmed up section on the left and untrimmed on the right. This primarily consisted of removing the thin locking section at the front and sanding down all of the raised sections around the perimeter (with the exception of the large bump still on the left-hand half).
Then I glued up the halves together. There is a collar that goes around where the cockpit connects to this section and so I also cut out a disk of styrene and glued that to the end to act as the main support for the collar.
This was followed by the collar itself.
Finally, I added a few strips of styrene around the perimeter to match the reference.
Once I got to this point, something about it kept bothering me. Looking closer, I really didn't like the raised sections around the perimeter of the Saturn V parts. This was creating an uneven shape, and looking again at the reference pics, I wasn't finding any indications that these sections were on the filming model. They needed to go! Unfortunately, while attempting to fix this I ended up screwing it up. Luckily I had another Saturn V kit ready to donate!
Here you can see the two halves with the raised sections cut off -- not really a circle anymore, is it?
With a little friendly coercion I was able to glue it up and into a circular shape. The disk inside the assembly is part of the coercion, keeping the shape from pulling back into an oval.
I added all of the strip styrene back -- this looks a LOT better! You can see now where the cut marks and protrusion I left in place match up to the reference.
Throw on a few Leopold parts and the last of the needed styrene and this section is looking pretty good.
The reference also shows a few of these little triangular shapes, which are the result of sanding off the raised sections around the Saturn V parts. With this current version, these markings also now line up.
I still need to add a bit of wiring, but I think it's a pretty good start for this build. Once I've worked out the armature, this will have to get mounted to that, likely with a hole cut through the bottom and a bearing to allow for cockpit rotation. I'll also have to run electrical wiring down through the neck so I can light up the rice lights in the cockpit.
Next up I will be tackling the cockpit itself. Here's a teaser with the kit parts I've collected so far:
And with that we're off! I'm expecting this to be a fairly slow-burn of a build. I have lots more research still to do -- need to work out the structure of the armature, finish building the vacuum former, and create all the bucks needed -- not to mention finish gathering kits, parts, and working out the rest of the assemblies. But I've got a lot figured out already, and look forward to sharing my progress with everyone. Til next time, keep on scratchin!
Attachments
Last edited: