Store Display naboo star fighter converison into Mando's new ship yep 1/6th scale big

Wow, you are really going all out with this!
Yep, might as well I have nothing else to build other than that sad creature, I didn't light up anything, but I can't say I didn't think about it the cock pit would have looked cool lit up but he said he did not want lights, I am trying My Friend Thanks for the kind words
 
Okay Friends, Thanks for all the comments and likes, This is what gives me fuel and that is quite pricey now a days. I do thank all. So today has been hit and miss had yard duty and pool duty to take care of and it was very hot. Primer was still needing more cure time before I could do any sanding I guess cause of the heat it was slowing the cure time down. This thing kind a reminds me of one of those rc planes the way they are ribbed, so starting to get a bit of skin on real close to having this engine done. here is some of todays hot fun
20220722_204129.jpg
I didn't show the skeleton under this back part but whilest I was at this I did the other engine as well but no skin on that side yet I did take some pics of that side there isn more
20220722_204136.jpg
20220722_204144.jpg
20220722_204152.jpg
Okay Guys, seems like I am getting a little skin on sitting here looking at this whole other engine waiting looks like a lot of fun there waiting yep for sure love it. Wifey has to pry me from the shop, still a bunch more fun awaits. I am real close to having one engine done. But I do need to slow down and enjoy the build on super glue 9 have 10 11 12 13 14 on hand thanks to a very cool cuz sent me a package full of all kinds of gorilla glue about 100 bucks worth might be more in some places prices are getting crazy but I bare it . Thanks Cuz! Well back in the shop I will finish this one engine and move on over and repeat but this engine will have all the coverings but all the detail will be there and I will go with the removable panels Stay Tuned more fun happening Thanks
 
LOVE the engine work, and it’s going to be even more awesome with the addition of removable panels to be able to show off that detail.

Awesome job, keep it up!
 
LOVE the engine work, and it’s going to be even more awesome with the addition of removable panels to be able to show off that detail.

Awesome job, keep it up!
Thanks a bunch I really still have a bunch more detail work yet to be completed but plugging away at it seem like each day a bit more done, and yes those removable panels will give it that small extra kick Thanks Friend
 
Okay Guys, So another Hot day in the shop with a high speed fan running yep makes things a bit better thinking of bit man mosquitos are bad I have to light my smoker and run them out of there, I also spray a bit of off on deep woods brand. Well here we go as I was working today getting things skinned I thought about Analyzer's question about the paint, so I did a bit of testing. Now on the front cones this is a bit brighter and I didn't spray any on the project, So this is a whole other question in one of the pics I did a test spray on some random parts one is shinny like I think it should look the other is a bit duller or more silver the other is like chrome. With all that said I don't know which way to go, I am thinking shinny what do you guys think Hum just pondering at the moment. Also had something hit me in the face figure of thought. I noticed I am not near being done with this engine cause it has those side lower parts on each side there is 4 all together only 2 per engine still got to make these. I also have added a small bit to the other engine, and did a bit of work inside the cones just to get a break from skinning Thanks Guys for all the comments and likes love it Here is some of todays fun I almost jumped in the pool today but I was just to at it Here ya go Enjoy
20220722_204144.jpg
20220723_180318.jpg
This pic has a bit of color on the engine there's more
20220723_180322.jpg
20220723_180407.jpg
20220723_180414.jpg
20220723_180422.jpg
20220723_180433.jpg
Okay Guys that above pic is the one only the front cones of the engine with that the rest is what is on the engine its a bit more duller and a tad darker this is on the engine which will be all over the ship. the dull silver is just a test for the front cone only. There's more
20220723_180457.jpg
Still a bunch to do on this one but I hit it here and there with a bit of something There's more
20220723_180509.jpg
This color you are seeing is the whole ship color I will be using just wondering about those front cones I just went on and sprayed a bit on any ways There's More
20220723_192747.jpg
20220723_192814.jpg
20220723_202341.jpg
20220723_212225.jpg
Okay Guys, this last pic I was headed out for the night and thought it looked cool from this distance so I snapped this pic Thanks Guys for all. Lots more happening in the old shop Stay Tuned lots more making happening Thanks
 
Okay Guys,

On the silver paint question: I would suggest using the duller silver as the major color, and then use the brighter silver to highlight areas and details. It would look more realistic if there was variation in the silver colors, rather than having it all one color. I'd even throw in some additional shades of silver - so it would look like some parts are aluminum, others steel, and others titanium or magnesium, etc...
 
Last edited:
On there silver paint question: I would suggest using the duller silver as the major color, and then use the brighter silver to highlight areas and details. It would look more realistic if there was variation in the silver colors, rather than having it all one color. I'd even throw in some additional shades of silver - so it would look like some parts are aluminum, others steel, and others titanium or magnesium, etc...
I like your advice and will apply just what you are saying never thought about those other colors you last mentioned I do have all these colors now will use your advice to the most extent Thanks for your reply
 
Looking great!
Have you tried this on the display stand yet? I would start to be concerned about the over-all weight.
Thanks a bunch, Yep you are rite on I have been thinking about this and my cuz even said I need to test the stand, but I really think and hope all will balance as the set up I have cause where I placed the camera mount it should balance just fine and it is time for a test we will find out I will get some pics of this quest happening Thanks Friend
 
Okay Guys, Thanks for the likes and comments, also some answers much needed, all things have been running through me noggin paint also the balance thing been wondering it is time for another test and I will take that one engine out before I see it bounce across the shop. Okay Friends I didn't get into any skinning today I worked on those booster things on the sides of each engine. I had several fails and finely got it. There is still some detail on these also a bit more work on them Here is todays fun Enjoy
20220724_204051.jpg
20220724_204058.jpg
20220724_204102.jpg
Crazy creature busting through the wall back there its not finished I need to fire the old airbrush back up and get him done I did that off the figure called primal rage to much to do. There is more
20220724_204113.jpg
20220724_204155.jpg
Okay Guys, the other two boosters awaits the next engine, those was tough to make still a bunch of detail on these. I will finish these two up then back to skinning but before that we will do some testing on the stand once back in the shop early in the morning fingers crossed we shall see I will snap some pics of this event. With that being said I do take all comments to heart and apply them to my making ability's which need a bunch of tweeking This is What RPF is all about I Enjoy all you Guys this is gas on my fire so Stay Tuned lot more hot fun bout to happen Thanks
 
One more thing you see some of those cut off parts in the last pic showing the other 2 boosters okay that one cone had some kind of foam in it is that a expanding foam cause I want me some of that stuff I think it would be a cool future project it carves like butter but it rock hard sort of expanding foam? Thanks
 
One more thing you see some of those cut off parts in the last pic showing the other 2 boosters okay that one cone had some kind of foam in it is that a expanding foam cause I want me some of that stuff I think it would be a cool future project it carves like butter but it rock hard sort of expanding foam? Thanks
We always used X-30 Expanding Foam.
You mix the two liquid parts; and then in a few minutes, it expands 30 times its volume - and then hardens like surfboard foam. You need to work quickly with it, as it starts to expand rapidly.

Be careful - it sticks to everything! And it needs to be able to vent any excess out of anything you pour it in to, or else it may burst your part open. Experiment with how much to use, so it doesn't overflow.
Thanks Friend, will have to grab me some get ready for the next fun post
 
Okay Friends, Thanks guys for all the imput likes and comments all taken to heart. So and so today was very careful and what a day. I got the one booster detailed also skinning is complete, now for the inside booster. I also did some redo work inside the cones that is now completed on both sides. So very much done and I just want to get something right after I read it about those test on the random parts one is more silver the other is chrome shinny this is for the cones only not the whole ship the paint you see on the cone now also the engine is a dull silver this is going to be the main base of the whole ship the shinny and just silver is only for the cones I think the screen grab has a shinny chrome only on the front cones. As said BALANCE so does it fly well see for your selves Enjoy
20220725_131458.jpg
20220725_142610.jpg
20220725_144146-jpg.1601613
20220725_144227.jpg
20220725_144234.jpg
Okay Guys, you remember once I said everything in me shop is moveable well here that yellow work bench is about to move TIME TO FLY
20220725_145452.jpg
No its not leaning I have it adjusted like that I will level it out in a bit Oh there is lots more
20220725_145505.jpg
20220725_145734.jpg
NO Wiggle No Wobble nicee and tight me and my 10 yr old grandson placed it on no problem There is more
20220725_145744.jpg
20220725_145935.jpg
Nice and Level time to lower the stand a bit with the crank see how that does the gold part is about to lower there is more
20220725_145952.jpg
20220725_150051.jpg
There its lowered in the above pic there is more
20220725_164134.jpg
Okay Guys stand test over back on the bench which I cleaned whilest the ship was Flying around more work happening There is more
20220725_164142.jpg
Detail work happening more
20220725_192311.jpg
20220725_192319.jpg
I was being badly distracted whilest I was gluing that first whole part and me old eyes are not what they was you see all the glasses laying around and surgery was a joke don't let anybody poke around in your eye type balls more
20220725_192339.jpg
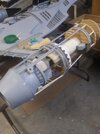
Okay Guys, lots more detail added even that scoop under the cone I forgot all about that part I will have to get more pics of that. you can kind of see it in the crooked cap in the cone pic I will have to fix that and that glue puddle as said 4 yr old grandson was on me here I ma holding glued parts well on me. I think wrapping the stand up with some paint paper and painting it on the stand, speaking of I think I will do another stand test just for fun might as well pics will be shared yep Analyzer once again that guestion came to me again once I noticed the other 3 boosters that need detail you know that question so I got busy and got up and went to get me self a drink for sure its the thought it does haunt me building makes me happy though sometimes I do have to make myself Enjoy the build but it does come around The Enjoyment I will get the old space ship down don't laugh I just wanted to build something it is what it is funny I will snap a couple pics of it and you see old sad creature back there from time to time seems like he likes getting in the pic. Lots more fun happening Stay Tuned Thanks to all
 
Okay Guys, I have noticed in my screen grab I have gotten the whole back section of the engine you see that is open all that isn't rite I was looking at me screen grabs lot more clearer than a phone pic the grab pics are on me computer which I now typest on Oh well just need to keep it as is it would be to much to change now. I think it looks cool though this is only time I will be doing this build. Oh well as said it is what it is the haunting way to far into it now even the seat well as said also me old eye type balls are not what they use to be Yep its tough to get old yep 62 I try with what I have Thanks Guys for everything Slow down and Enjoy the build Thanks
 
Okay Guys, another busy day in the old shop, Thanks guys for all the likes and comments, So looking at the not rite and it is so very close and I am fine with that just have to do it all once again and that is just what I did and second time I am slowing down a bunch. So that distraction was fixed and cleaned up which I will share. Also it was grounded today no flying around time but bout close for another test cause, today I was in the zone. Now I did some test fitting of engine covers also some magnet testing all good, yep a bunch of these panels are going to be total removable. The cover deal I will share next day in the old shop. Here is some of todays fun Enjoy
20220726_112622.jpg
20220726_112634.jpg
I added those small arches on the back that is really the only thing I could see that it needed there is more
20220726_180310.jpg
20220726_180314.jpg
20220726_180318.jpg
20220726_205026.jpg
Okay Guys, On this engine I have really slowed down and doing a bunch of sanding, this engine is going to look cool with those panels that remove. so that means the under side will have to be thought out screengrab time. Also whilest it was flying around that one black engine cone was pointing down a bit so I fixed that first thing in the shop I will get a pic of that as well. Stay Tuned a bunch more happening I still got to come up with a vac table I can make me self one I might do that after this engine and another test flight after that I am going to do that but before I have debated on the engine on the bottom not really happy with it could burn the tail off after the engine is done I will flip it and dismantle the engine and fix it and it is a bit to small as said Stay Tuned busy stuff happing Thanks
 
Okay Guys, What a day in the shop, no distractions lots to share so I might have to break it down into 2 post. Thanks ALL for the likes and comments very much needed. Analyzer in this post or the next I will make you laugh out loud crazy space ship yep I got it down and uncovered it pics just for you my friend. Make something so I got busy. Okay here we go Enjoy
?hash=46faa84389665a8534c4ae9ceab93706.jpg
20220727_103022.jpg
20220727_103025.jpg
20220727_103106.jpg
20220727_103114.jpg
20220727_103121.jpg
Okay enough laughing now Me just wanted to makest something. So on ward
20220727_103219.jpg
20220727_103225.jpg
20220727_161955.jpg
20220727_162004.jpg
20220727_162010.jpg
20220727_162016.jpg
Okay Guys Time To Fly Enjoy
20220727_163522.jpg
Okay it is leaning and I figured out why there is a small screw on the tripod that needed to be screwed in and we took it off and fixed it then some more flying and I got a bit extreme Enjoy
20220727_163532.jpg
20220727_163632.jpg
20220727_163641.jpg
20220727_163658.jpg
20220727_163705.jpg
20220727_165418.jpg
That cone on the back looks better now that it has been fixed more
20220727_165529.jpg
20220727_170612.jpg
20220727_170649.jpg
20220727_170654.jpg
20220727_201415.jpg
20220727_201454.jpg
20220727_201505.jpg
20220727_201521.jpg
Okay Guys that ine panel on top will have some work done on ti to make it rite, still a bunch of engine work done and to do that bottom panel will be removable as well showing the whole bottom of the engine wow Still a lot going on in the lod shop Stay Tuned lot more fun happening Thanks All
 

Attachments

  • 20220726_205026.jpg
    20220726_205026.jpg
    832.4 KB · Views: 43

Your message may be considered spam for the following reasons:

If you wish to reply despite these issues, check the box below before replying.
Be aware that malicious compliance may result in more severe penalties.
Back
Top