Stop Motion Studio ESB AT-ST!

Ah bro...aint that the truth, you know about thelast debacle involving a cat right?
Well today, we wake up to find blood everywhere...turns out our "Pud" has sliced his foot pad in the night, on what i dont know, but we take him to the Vets just in case!

Several hours later...im £153.00 lighter in the pocket, he needed surgery as he had split the pad, and foot webbing...jeez, pets who would have them LOL........but he's very thankful!

lee
 
At least the kitty is well.I spent heaps of $ on my cat.Great work on the feet Ralphee.I'm still purchssing my armature,so I'm gonna be a bit behind the rest of you when it comes to building..
 
Cheers David, how far are you along on IDing her? Hope its going well for you, are you planning an acrylic set up for the armature?

OK anyways, we now have feet, real free standing feet...woot! Ive added the locking screw that secures one ankle to make sure there is no wandering in the region too!

Ive tapped the right foot plate in the centre at M4 too, this way, once finished, one foot can be bolted down into the base...and were ready to pose away then on one leg LOL.

lee


Actually, the kit I bought (secondhand from a board member in fact) did include a set of laser cut acrylic leg parts, so I can hunt for leg parts also! I have to admit, hunting for donor parts, while excruciating at times, has been fun! Sort of a hobby within the hobby!:lol

-David
 
Sheesh, who would have thought about tyres? I thought it was something like the Vostok parts, although the profile was a bit confusing. What a find, top work Lee and Allan!
P.S. Hope your cat's better. I love cats, beautiful animals.. not so keen on dogs..
-JT
 
This thread is one of the greatest recreations ever. Congrats to ALL involved. Neck boot info.. fenom my man.. question is I cant help but imagine you sitting a your hobby room, surrounded by kits and loose kit sprue everywhere... playing with rubber tires. Strange stuff we do ... you are a kitpartaholic! Seek help!! Buy more kits!

Steve
 
It is my favorite chicken :lol

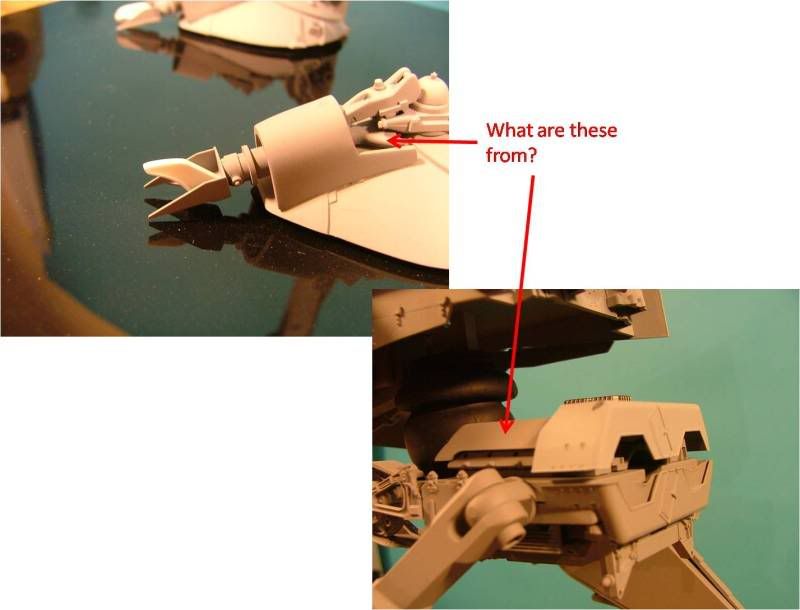
I have a question for some part which is used in AT-ST.
Many thanks for your advices in advance :)
 
Last edited:
Thanks Steve, yeah kinda makes ya wonder when im locked away playing with black rubber huh lol, thanks again for writing in :)

Eric, thats from the Italeri 1/35 Nebelwerfer buddy!

You gonna build one of these?

bests.......lee
 
he he :)

I can't start another chicken because you perfectly made it.
Actually, I found the part in ANH ISD :)

thanks Lee!
 
Eric, thats awesome news, hope you find a kit, they do pop up here and there on the Ebay buddy!

bests.....lee
 
Just wanted to say guys, any parts your not sure of, just ask in the thread, info is free of charge in here and its always better to work together IMO as we can all share and build what we want!

Hell if i get the time ill work on a parts map for you all, but like i said if i get the time!

lee
 
Good show, Lee. I've got a few parts maps in my thread, as well, the trickiest areas. But, like Lee said, if there's something you want to know that you don't see, just ask.
 
Thanks Chris...ill PM you in a minute...need your phone number buddy, ill call you!

Anyhoo, while tinkering with the pod, i knocked up the front shoulder sheilds on this today, the fitment is accurate to the prop, i used two angled pieces of brass strip, and.60 styrene for the sheilds.

Just fitted a couple more parts too, so im about three parts away from priming the main chassis and legs now...woot!

lee
 
Last edited:
Now available in lovely grey primer tones :lol

Should be adding the final few parts, and onto painting soon, still gotta do those armor panels for the head...im lazy!

lee
 
Last edited:
She looks absolutely stunning mate, I bet your grinning like a cheshire cat. Cant wait to see it all painted. Keep em coming bud.
 
Yeah Guy, im pretty stoked right now to see it nice and uniform, gonna get the paint mixed in the AM ready, as it really wont be long TBH, ill maybe get to the vac plugs for the side plates in a day or so too, get 'er done LOL.

lee
 
OK, well i mixed up the basecoat today, pretty happy on the tone, did have to do a few swatches on the way to this shade...but overall i think im close...theres like what...three color pics of this prop, not counting tiny screencaps of course LOL.

Ive latexed out the main areas i want to chip back to black and shot the main head shell and 8rad fender, the rest of the weather job here is mostly by hand with washes and pastels i reckon!


Back of the head, with its basic weather job...lots of washes and pastels needed here!


You can see the tone change here with the 8rad fenders basecoat!
Oh and i gave him some pinky toes!

lee
 
Last edited:
Man that looks awesome Lee. I'm gonna have to get cranking on mine. Quick question...where did you guys find these?
ATSTQuestions.jpg
 
Back
Top