Star Wars movie set den build

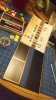
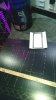
Ceiling Centerpiece construction Day 4. I am adding details to it so the lighting will look better. I purchased another 2 LED rope lights and am fastening them up top. Here is a feature that needs lit within the little grid holes. How about some color?
attachment.php

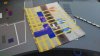
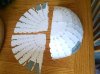
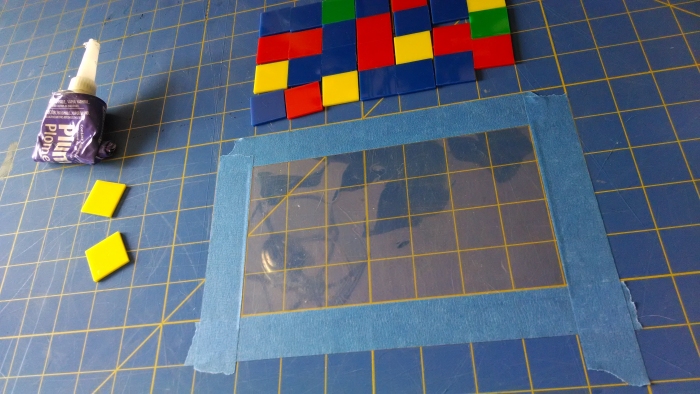
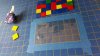
I have some color tiles which are 1" squares. Light will shine through them, and they make good simulated buttons or lit indicators. Below, I picked out some tiles and am arranging them. I found a piece of clear plastic and will glue all the tiles to it. How convenient, the blue mat is marked in 1" squares too.
attachment.php

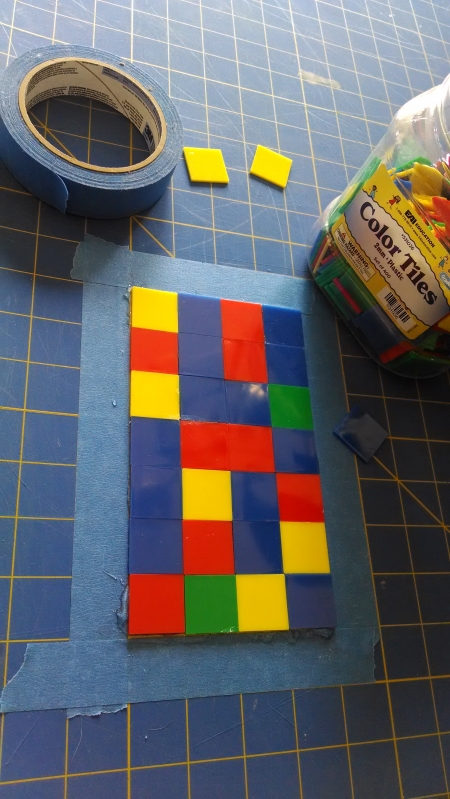
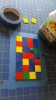
The glue has been spread and the tiles are stuck down, ready for some smoothing.
attachment.php

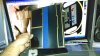
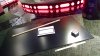
After the glue dried, I pulled off the blue tape, picked up this flat assembly and put it on top of the ceiling centerpiece.
attachment.php

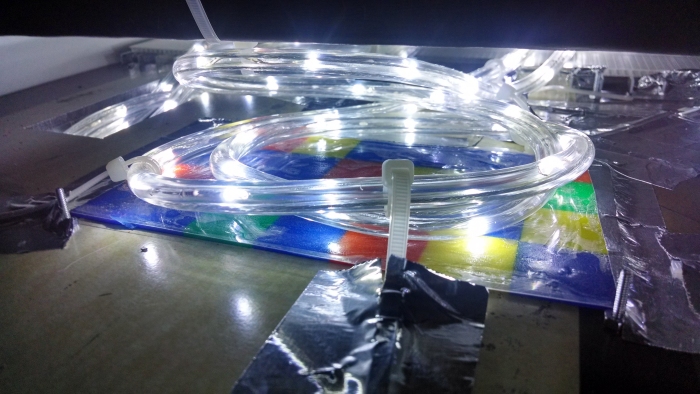
I've laid out a coil of rope light over the top. To hold it in place, I simply put a tie wrap around the rope, and then silver foil tape the tie wrap in place. I like this method because the silver foil tape is easy to reposition until the light looks just right from below. Unlike duct tape, this silver foil tape does not dry out and crumble over time.

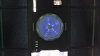
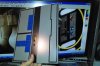
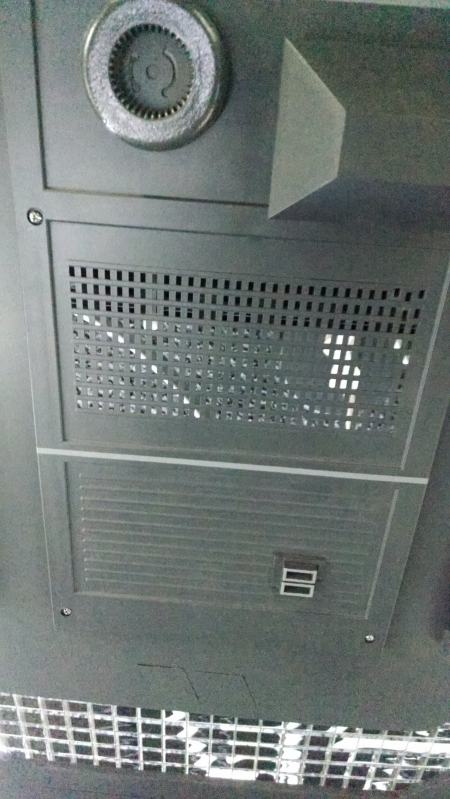
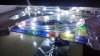
Aaaand, below is the best photo I've taken of the ceiling centerpiece so far! You can see the middle section of it.
attachment.php

How you like dat? I'm digging the light and the color and the "tech" look it has.
attachment.php

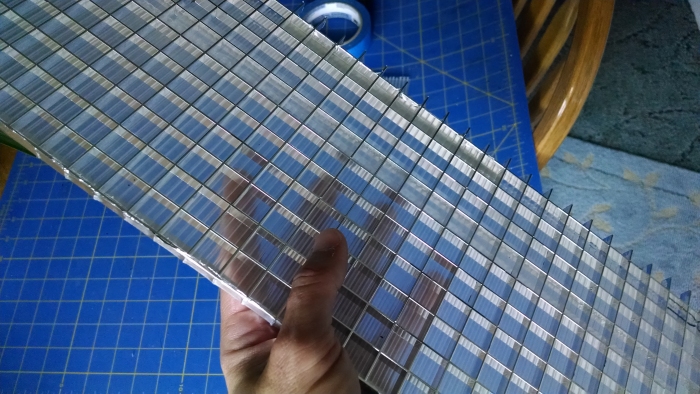
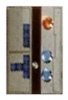
Some sections have this shiny plastic chromed grid. You can buy it at Lowe's or Home Depot in 2ft by 4ft sections. To diffuse the rope light shape, I've taped on some corroplast. It's corrugated clear plastic. A couple years ago, I bought a 4ft by 8ft sheet of this stuff. It was a great investment, as the corroplast is a versatile material. It cuts with a razor knife. I used it for most of my LED lighting lenses.

Next time, some more detail shots will be uploaded.
 

Attachments

  • ceiling 37.jpg
    ceiling 37.jpg
    247.1 KB · Views: 1,702
  • ceiling 38.jpg
    ceiling 38.jpg
    209.5 KB · Views: 1,690
  • ceiling 39.jpg
    ceiling 39.jpg
    251.3 KB · Views: 1,723
  • ceiling 40.jpg
    ceiling 40.jpg
    192 KB · Views: 1,685
  • ceiling 41.jpg
    ceiling 41.jpg
    160.1 KB · Views: 1,691
  • ceiling 42.jpg
    ceiling 42.jpg
    235.4 KB · Views: 1,667
I'd like to build a button panel like this. Does anyone have the dimensions all measured out? Like, does this appear in a blueprint book or other reference source?
http://www.therpf.com/attachment.php?attachmentid=345760&d=1404584301
I'd like to build an accurate copy, lights and all.

Hey DJ,

The panel lights are approx 2 inches wide and the blue acrylic buttons/tiles are 1" square. If you use the 1" measurement, you'll have everything you need. :)

Just by looking... I would guess 13X10 (+ -) ????
 
More progress tonight! This is Ceiling Centerpiece construction Day 5. I'm concentrating on the lighting effects, using found items and low-cost parts I've collected over the past 3 years. I've got all the lenses looking the way I want. The 3 rope lights are all fastened in place and glowing just right. Here is a video, this time showing the lower side and the upper side so you can see how easy it is to position rope lights.
I do have a few more details to add. I've got a greeblie box to dig through that contains some additional goodies. You can see the large circular hole at one end. I will be adding a large 12 volt 360mm fan to it. The fan will be controlled from an animated touch screen on my desk. So there is (always) more stuff to build and wire. I don't have anything to hold the animated touch screen up at an angle, so I suppose I'll build that out of black Sintra. It will be painted gray to match the desk. Coming soon!
 
Last edited by a moderator:
Hi,

I'm trying to make some progress on this room each day. A good friend wants to come and see it soon, so I'm working on the ceiling some more. Tonight I figured out how to attach the fan that sits literally overhead over-my-head. So I can get a cool breeze while gaming (for hours) playing GTA4 on PC. You should race me online in multiplayer mode some night.
attachment.php

Looking up, the fan is powered up and blowing downward. Ahh, feels nice. This is a Rexflo 360mm silent fan with built-in blue LEDs. Measuring across the decorative cover, it is 13 5/8" wide. It runs relatively quiet.
attachment.php

This is the animated fan controller, painted gray to match other stuff in my room. I've temporarily connected it to its own 300Watt PC power supply. Judging by the controls on this touch screen, I could hook up 4 more 12 volt accessories to control the speed or maybe brightness? of devices.

The next problem to solve - how to mount this fan controller. It is exactly the width of a CD-ROM drive and exactly the height of 2 CD-ROM drives. It has no case. So I will have to design a case/holder to position it within reach of my desktop. Looks like I will have 45 feet of wire between controller and fan. There will be some splicing and cussing, no doubt. :eek I'm going to design a holder that will allow the controller to be positioned at the back edge of the desk. For inspiration, I will be examining control surface shapes in the first 3 Star Wars films. I particularly like the controls on the Millennium Falcon, and the ones in Darth's Meditation Chamber, and maybe those in the Star Destroyer. Does anyone have any favorite photos to study?
 

Attachments

  • ceiling 43.jpg
    ceiling 43.jpg
    193.8 KB · Views: 1,491
  • ceiling 44.jpg
    ceiling 44.jpg
    199.5 KB · Views: 1,490
Last edited:
...Above, the threshold is done. Done! ...at least I thought so till my wife came home and saw it. She doesn't like the look of the screws. So, now what? I could put something over it, but keep in mind - almost nothing sticks to un-sanded Sintra, except plumbing (PVC) glue. And I don't want to make this strip any taller. What would you do? Leave it, or trim it somehow?

Did you already look into using a U-profile like is used for laminate flooring as a threshold? http://www.dural.de/de/datenblaetter/produkte-fuer-die-laminat-teppichverleg/clipper-1600.html

http://www.dural.de/de/datenblaetter/produkte-fuer-die-laminat-teppichverleg/trifloor.html
 
Did you already look into using a U-profile like is used for laminate flooring as a threshold?

Yep, I looked at a lot of stuff like that. But looking at my doorway, the center tile "runner" is taller than the sides. So I had to make something that took the 3 odd heights into account.

I might cover the row of screws with a piece of black auto trim, like body side molding. I'm looking for some that is low profile, basically a piece of stick-on black rubber strip. Like this...
33-424.jpg
11/8" X 24' BLACK UNIVERSAL Body Side Molding, roll[/h]
 
The panel lights are approx 2 inches wide and the blue acrylic buttons/tiles are 1" square. If you use the 1" measurement, you'll have everything you need. :) Just by looking... I would guess 13X10 (+ -) ????

Okay, thanks for that estimate. I just may lay that out in 3D with Google Sketchup. That's how this project began, while I was just learning how to draw fantasy things in Google Sketchup. Well, it started as fantasy, anyway! :rolleyes

I think I might convert my room light switch over to a button-type, like this...
arcade-light-switch-cropped-thumb-960x640-14079.jpg
And incorporate that pushbutton panel into the larger silvery panel we are discussing. The piece will be decorative and functional. Well, nevermind that. The arcade-style button switch panels were discontinued in 2012.
 
Last edited:
I have begun to replicate the switch panel that goes next to a door. On the screen version, below, in the black strip, there is a toggle switch. In my version, in the black strip, will be the normal everyday wall light switch that turns on my room lights. I could not find a screen capture that showed the switch panel squarely. I grabbed the largest screen capture I could find and then used Paint Shop Pro to align it square, using their deformation filter. Here is the result.
attachment.php

and then I drew a grid over it. I was checking to see what scale it is if each blue tile is an inch wide. I've drawn thick yellow lines. In reality, the 1" blue tiles touch each other.
attachment.php

For the space available on my wall, I chose to make the size 8.5" x 11", the same size as a piece of paper. Then I printed out this test template. It is sitting on my desk where I laid some of the blue tiles on it...
attachment.php

I will adjust the scale of the final product because my printer didn't print all the way to the edges of the paper. This turned out to be 8" x 10" after I cut off the white edges. On the black strip, I cut out a rectangle where a normal wall light switch could fit through the paper.

Do you think this panel is supposed to be gray or silver? Check the top image, the screen capture. Are the pinstripes dark gray or black?
 

Attachments

  • 20 stormtrooper doorway panel squared.jpg
    20 stormtrooper doorway panel squared.jpg
    63.1 KB · Views: 1,442
  • 20 stormtrooper doorway panel gridded.jpg
    20 stormtrooper doorway panel gridded.jpg
    177.2 KB · Views: 1,442
  • 20 stormtrooper doorway paper.jpg
    20 stormtrooper doorway paper.jpg
    190.4 KB · Views: 1,437
Thanks for following this build. I do enjoy reading feedback from all of you.

Today I got the light switch panel mostly done. Since the material was black, I decided to leave the black portions unpainted, and mask the rest for light gray paint.
attachment.php

Above is the Sintra panel with a light switch hole cut in it. The hole is actually under the blue tape, can't see it. I'm masking off the areas that will remain black with a roll of pinstriping tape.

attachment.php

Above, it is all masked off and ready for some gray paint. The black and gold color reminds me of a Smoky & The Bandit Trans Am, one of my favorite auto color schemes. But that has nothing to do with Star Wars, heh heh. Here, I'm comparing my layout to the movie switch panel on the computer screen.

attachment.php

Above, the gray paint is on. The masking tapes are peeled off. Clear spray has been applied to the whole thing. I'm comparing this with the image on my computer monitor. You may notice I've replaced the toggle switch on the black strip with a standard 120 volt light switch cutout. The blue lenses are applied, and we're ready for some 2" round lights. Except we don't have any. I ordered some clear epoxy stick-on domes from Beijing. I've had pretty good luck ordering supplies from China so far. As long as they arrive sometime this summer, we're good!
 

Attachments

  • 20 stormtrooper doorway masking.jpg
    20 stormtrooper doorway masking.jpg
    201.1 KB · Views: 1,420
  • 20 stormtrooper doorway transam.jpg
    20 stormtrooper doorway transam.jpg
    232.6 KB · Views: 1,415
  • 20 stormtrooper doorway blue buttons.jpg
    20 stormtrooper doorway blue buttons.jpg
    193.7 KB · Views: 1,421
Re: Star Wars movie set den build - epic walls

Wow, I've made 4 posts and no replies. Is everyone at summer camp? :sleep The forums seem a little slow lately.

While I'm waiting for some parts to arrive, I've drawn out a new wall panel. This one looked like it was going to be harder to draw and measure, so I left it for last.
attachment.php

For dimensional accuracy, I started with a screen capture, and drew directly over it. Then I added a grid of 1 square equals 1 inch. These shapes will be cut from Sintra. In case you wanted to make one too, I've indicated the rough dimensions. They are, of course, written in one of the Star Wars fonts called Aurebesh. You've already learned to read text in Aurebesh? Well, you're way ahead of me. At the bottom of the graphic, it says "STAR WARS PANEL "B"
 

Attachments

  • partial 1.jpg
    partial 1.jpg
    556.5 KB · Views: 1,326
HOLY MOLY! Love the new light switch panel! AWESOME :)

- - - Updated - - -

The blue lenses are applied, and we're ready for some 2" round lights. Except we don't have any.

DJ,

Have you tried looking for brushed door stoppers at your local home improvement store and dome lenses I used for the Falcon? Those might work for the bezel dome lights?
 
Have you tried looking for brushed door stoppers at your local home improvement store and dome lenses I used for the Falcon? Those might work for the bezel dome lights?

The ones I've seen have way too big of a rim. I've started to look at trucker light bezels. Which ones did you use?
 
Respect dude i'm impressed great room. Carry on the good work

Thanks for the kind words. The work continues, today with a diversion.
attachment.php

Above, I've got a piece of black Sintra, ready to layout cutting marks for another 3D wall feature.
attachment.php

Then, THIS darned thing happens! I discovered pepakura. What the heck? I found a Stormtrooper helmet pattern and found it really simple to print on card stock. Next thing you know, I'm cutting out bits of this and that. Then the thing practically glued itself together. This was unexpected.
attachment.php

Next thing you know, there's a dome and some other pieces developing. I'm using yellow wood glue. Who knew it was so easy to use, and sets up in 10 seconds. I didn't really intend to start a Stormtrooper helmet, but I found this type of construction easy and immediately rewarding. This pep is from a guy on the forums here, SpaceCowboy. If this delays construction on my Star Wars Movie Set Den, we'll blame him. :rolleyes
attachment.php

Okay, back to laying out the wall panel. I've screwed up many of the lines with a silver Sharpie. I've "X"ed them out and corrected many lines. Whatever, a momentary lapse of reason. I'm going back to the kitchen table to play with the beginnings of this wonderful Stormtrooper helmet. I get there and, Oh great, my wife is wearing the dome. She seems fascinated with it, and asked how I'll ever wear it with the "numbers" all over it. :facepalm wow.
 

Attachments

  • layout 01.jpg
    layout 01.jpg
    252.5 KB · Views: 2,221
  • layout 02.jpg
    layout 02.jpg
    295.3 KB · Views: 2,215
  • layout 03.jpg
    layout 03.jpg
    210.6 KB · Views: 2,209
  • layout 04.jpg
    layout 04.jpg
    207.2 KB · Views: 2,217

Your message may be considered spam for the following reasons:

If you wish to reply despite these issues, check the box below before replying.
Be aware that malicious compliance may result in more severe penalties.
Back
Top