Star Wars movie set den build

Same here. Would like to do some panels for a room project at home, but hitting a roadblock when looking for panel templates.

For Amazing DJ-

Always love this thread.
Been wanting to try my hand at doing some panels. Big question: How on earth did you cut such perfect shapes? They look machined! Looking for any template tips you may have.
Thanks for the inspiration.
 
Hmm, panel templates. I made many drawings and kept refining them. I saved a few. However, during construction, I would draw the "real" patterns (with a magic marker) directly onto the material to be cut. So you don't want to copy my dimensions exactly. Learn from this - how to get your ideas on paper and then refine them.
attachment.php

Above is a blueprint of my ceiling grid framework. I'm still constructing a ceiling that looks roughly like that of a ship's utility room, or a Star Destroyer control room "utility" ceiling. I've added pipes and hoses, some wires and lights.
attachment.php

Above is a blueprint of the control panel that is mounted below my Death Star observation window. I changed that a lot to accommodate the greeblies as I was gathering them. The dimensions of the side profile are accurate to my build.
attachment.php

Above is a blueprint of some wall dimensions. I changed these a lot during construction. The width of the larger sections were changed to 19 inches because they looked more like the scale of the ones seen onscreen. I studied the Star Wars "hallway" scenes a lot and compared the size of the actors to the size of the features on the walls.
attachment.php

I often print designs on cardstock (thick paper) and cut them out with an X-Acto knife or scissors. Above, left, we have a template for a lighting part. In the middle is a template for a wooden Rebel logo. I found the logo online, printed it, traced it onto a piece of wood. Then I was able to cut the wood with a jigsaw. On the right is a template for tracing one of the three sizes of reflective stickers for the walls. For the oval shape, I think I traced around the inside of a roll of tape. The length of this one is 6.25 inches.

I have a three-ring binder that is packed with plans, instruction sheets for room accessories, packing lists, ebay receipts, and hardware store receipts. In fact, I have every receipt from the whole construction project. I do not dare add all those up. Well, I might add those up when the project is done. That seems like never, because it is always fun to seek out some new materials and try a new construction technique.
 

Attachments

  • blueprint01 ceiling grid.jpg
    blueprint01 ceiling grid.jpg
    523.6 KB · Views: 3,143
  • blueprint02 death star controls.jpg
    blueprint02 death star controls.jpg
    276.3 KB · Views: 3,164
  • blueprint03 wall dims.jpg
    blueprint03 wall dims.jpg
    327.8 KB · Views: 3,136
  • blueprint04 patterns.jpg
    blueprint04 patterns.jpg
    230.7 KB · Views: 3,025
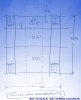
I interrogated my droid and extracted the plans for the desk. It is a circular desk, a cross between a cockpit control surface and Darth's Meditation chamber. You could make something like this.
attachment.php

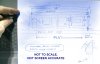
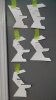
The desk is based on shapes and themes that I admired during the first three Star Wars films that came out. The vertical side supports kind of look like Darth's Meditation Chamber. I made a few attempts at drawing the sides. I was going for a pleasing shape that would support a desk and a shelf without falling apart. I also kept modifying the shape at the bottom so I wouldn't have anything at floor level to accidentally bang my knees or feet on while seated in front of it.
attachment.php

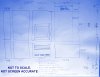
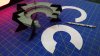
Before buying any wood, I made a scale model of it first. It was then that I decided to use 4 side supports instead of six. And I wanted the whole thing to press-fit together with notches. For assembly, all I had to do was tap the pieces together with a rubber mallet. I used a few sheets of 3/4 inch plywood. In this giant piece of furniture, there are no nails, and very few screws needed to hold it together. The only screws are for holding the two halves of the desk together, underneath.
attachment.php

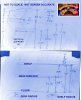
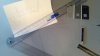
After the fullsize desk was built, I drew on the control surface graphics in pencil. Here is a loose layout guide, on a piece of paper. That was refined as the details were penciled on the gray painted wood. I've also got some paint samples laid out on the desk to see what colors look good together.
attachment.php

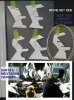
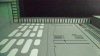
I did the desk graphics to resemble the look of the Millennium Falcon console. I like the "square button" and pinstriped themes that are seen throughout the movies. Below is a GIF animation of the first 8 paint layers going on, 8 frames.
attachment.php

The desktop is hand-painted, first by masking straight lines with Scotch tape, then paint brushing. To make sure there were no brush lines, I use various sizes of fine quality animal hair (not nylon) hobby brushes. After the final painting was done, the whole surface was clearcoated for protection twice with a wider brush. That was a satin clearcoat. It holds up relatively well, although I usually put a mat underneath any items that might dent or mar the surface.

Here's the best picture I've taken of the desk, and it appeared on Page 17 of this same thread.
attachment.php

So there are the desk plans. Let me know if you build anything similar.
 

Attachments

  • blueprint05 desk.jpg
    blueprint05 desk.jpg
    554.2 KB · Views: 2,966
  • blueprint06 desk.jpg
    blueprint06 desk.jpg
    334.3 KB · Views: 143
  • blueprint07 desk.jpg
    blueprint07 desk.jpg
    246.3 KB · Views: 2,929
  • blueprint08 desk.jpg
    blueprint08 desk.jpg
    197.5 KB · Views: 2,925
  • console animation.gif
    console animation.gif
    1.7 MB · Views: 2,973
  • blueprint06 desk.jpg
    blueprint06 desk.jpg
    420.1 KB · Views: 2,959
Last edited:
When you are using the sintra what thickness do you normally use? I have never used it before but it looks like it is a great material for adding detail to a build. I would like to build a desk that also resembles some of the components from Star Wars and I wanted to get your opinion. Any information would be greatly appreciated.
 
Here's something you've never seen before. I'm adding details to a computer monitor frame. This monitor sits on my Star Wars-style desk that has a painted control surface all over it.
attachment.jpg

It's just a Samsung monitor, a pretty big one though, 27 inches. It rotates to any angle. Don't worry, I'm not going to use it vertically as shown. That's just WEIRD.
attachment.jpg

The monitor is like any other, It has a boring thin black plastic frame. What if I took these clear corner pieces and attached them to all edges of the monitor with double-sided sticky tape? We're making a monitor frame cover.
attachment.jpg

On the same day I was searching for some interesting greeblie pieces to decorate the frame.... A random person gives me an Anakin Skywalker Podracer kit that has loads and loads of small Star Wars-looking detail pieces. Some kid had painted about 10% of it, and lost the instruction sheet, but it was totally unassembled which is good.
attachment.jpg

I sorted through and picked out the most "flat" pieces that I could glue to the monitor frame covers. Many of these parts were not used because I couldn't glue them flat.
attachment.jpg

The tubes look sufficiently interesting, and hard to attach. A little challenge.
attachment.jpg

Attaching the little doodads to the monitor frame cover. I chose to make the design the same from side-to-side. I added some automotive trim and some random bits of milk carton plastic, and some styrene sheet cut into little bitty rectangles and squares.
attachment.jpg

Finally done attaching detail greeblies to these frame covers and ready for some primer.
attachment.jpg

The frame covers are painted a Star Wars gray color straight out of the automotive primer can. Waiting on them to dry a bit before zipping off the double-sided tape and attaching them to all 4 edges of the Samsung monitor. How do you think this is going to turn out?

Below is a VIDEO of the finished project after being attached to the edges of the monitor.

frame00a.jpg


frame00b.jpg


frame01.jpg


frame02.jpg


frame03.jpg


frame04.jpg


frame05.jpg


frame06.jpg
 
Last edited by a moderator:
Watching a video of some geeks at the Star Wars convention analyze Thursday's new teaser frame-by-frame. This is a photo of the computer monitor in my Star Wars Movie Set Den. Here, you can see the custom frame for the monitor.

attachment.php

It's a gray frame that sticks onto the monitor edges. No, I'm not into that movie at ALL. ;)
 

Attachments

  • frame trailer RPF.jpg
    frame trailer RPF.jpg
    174.9 KB · Views: 2,445
I took a picture of my unfinished paper Stormtrooper helmet sitting in front of the Millennium Falcon window shades.
attachment.php

I had a little LED flashlight inside it, looks different. You can see all the little paper tabs.
 

Attachments

  • helmet lit.jpg
    helmet lit.jpg
    477.8 KB · Views: 2,330
Looking "up" a wall... You can examine the wall panels and the light "gutter". The light is off to see the detail on the lens and baffles.
attachment.php

The entire top lighting "gutter" fixture is fitted with a single LED rope light (behind the lens). The materials for the lights consist of upside-down vinyl guttering, vinyl gutter mounting brackets (unseen, modified), siding J-channel to hold side panels made of thick posterboard with mini-blind pieces hot glued on, Corroplast semi-transparent "lens", and flat black baffles made from 2 pieces of siding J-channel glued together into an "M" shape and then hot glued upside-down. To go around 3 sides of the room, I had to make and glue and paint 160 of these flat black baffles. The ceiling is also painted flat black.

Here is a shot of the back wall with the gutter lights turned on...
attachment.php

The photo makes the top gutter lights look blue, but they are not really blue at all. The LED rope light in it emits a pure white light. I don't buy incandescent rope lights because they emit a yellowish light.
 

Attachments

  • walltopRPF.jpg
    walltopRPF.jpg
    191.1 KB · Views: 1,870
  • back wallRPF.jpg
    back wallRPF.jpg
    133 KB · Views: 1,909
Last edited:
Do you have a flickr or other image account since a lot of pictures are missing from the beginning of your build? Thanks!
 
I tried to get the forum host to find and re-post my missing photos. Nothing happened. They were all hosted here at the RPF. So I don't know why he cannot locate my lost images on a website backup and restore them.
 
Last edited:
I've been trying to figure out how to disguise two things on my back wall near my light switch. There's a white motion sensor box on the wall (left). And there's a regular brassy door knob (right).
IMG_20160705_103436710[1].jpg
I may have figured out what to do with the door handle. Cover it. Below is what a door handle kit looks like on the website I bought it from. A set of handle covers is just $15. These are used by handicapped folks to make doors easier to open.
door handle.jpg
I like to study movie stills and get ideas from the Star Wars set decorators. I will create something similar, something simple and hopefully durable.
doorknob idea 1.jpg doorknob idea 2.jpg
I may shave away some of the plastic and add some metal bits to the plastic handle cover. The handle paint will have to be durable because it gets touched every day. I use my Star Wars Movie Set Den as a home office and computer room daily.

If you have any ideas for me, I'd encourage replies!
 
Today I had to pack up some of my Star Wars construction supplies. The reason? Company was coming over and my spouse didn't want to tolerate my Star Wars supplies sitting on the living room floor for a third straight year. Surprisingly, I was able to box most of it up into 6 neat containers. I wish I had done this much earlier so these could live in the garage. uploadfromtaptalk1470983034058.jpg
Tubs of greeblies
 

Your message may be considered spam for the following reasons:

If you wish to reply despite these issues, check the box below before replying.
Be aware that malicious compliance may result in more severe penalties.
Back
Top