You are using an out of date browser. It may not display this or other websites correctly.
You should upgrade or use an alternative browser.
You should upgrade or use an alternative browser.
Star Wars movie set den build
- Thread starter Amazing DJ
- Start date
vaderdarth
Master Member
Wow, this is incredible. ")
Amazing DJ
Well-Known Member
Tonight I made some end caps and have glued them onto each end of this control panel. Also, I grabbed some stuff out of my greeblie box. Just arranging stuff to see what looks good. The parts will actually be mounted on the OTHER side of this panel...
I figure I'll make the greeblies be all black for the most part. They will mount on a white translucent sheet with most of it painted black except for some "lights" areas and some accent lines of light. The box will be gray, same color as my walls. I do plan to modify most of these greeblies so you can't tell what they "were".
I figure I'll make the greeblies be all black for the most part. They will mount on a white translucent sheet with most of it painted black except for some "lights" areas and some accent lines of light. The box will be gray, same color as my walls. I do plan to modify most of these greeblies so you can't tell what they "were".
Attachments

Amazing DJ
Well-Known Member
Rainy day today, so I'm indoors doing more work on the control panel which will mount under my Death Star portal. It has been primered, in preparation for painting the housing gray. The "controls" on it will be blacked-out for the most part...
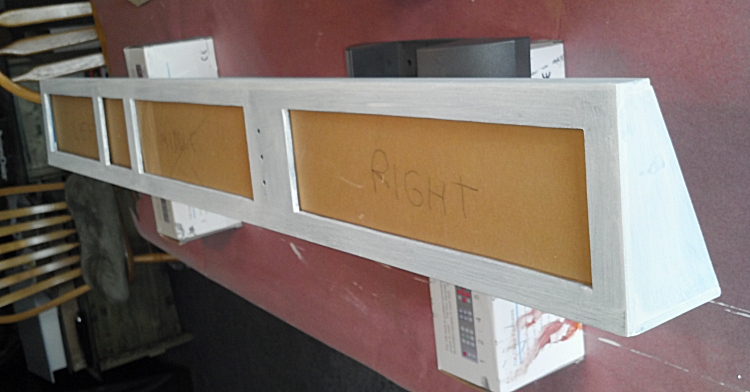
The rectangular lenses are cut, and tacked in place so I can test the greeblie layout...
Next, I will pop out the lenses and paint most of the lens surfaces black.
The rectangular lenses are cut, and tacked in place so I can test the greeblie layout...
Next, I will pop out the lenses and paint most of the lens surfaces black.
Attachments
MAN! Looking good! Can't wait for paint!
Here are a few more screenies for ref:
http://ladymanson.com/galleries/movies/MoviesRS/displayimage.php?pid=103888&fullsize=1
http://ladymanson.com/galleries/movies/MoviesRS/displayimage.php?pid=103919&fullsize=1
http://ladymanson.com/galleries/movies/MoviesRS/displayimage.php?pid=102665&fullsize=1
http://ladymanson.com/galleries/movies/MoviesRS/displayimage.php?pid=102788&fullsize=1
http://ladymanson.com/galleries/movies/MoviesRS/displayimage.php?pid=102763&fullsize=1
Hope these help!
Last edited:
Monkey5150
Active Member
jones-ing for some wips!!!!
Amazing DJ
Well-Known Member
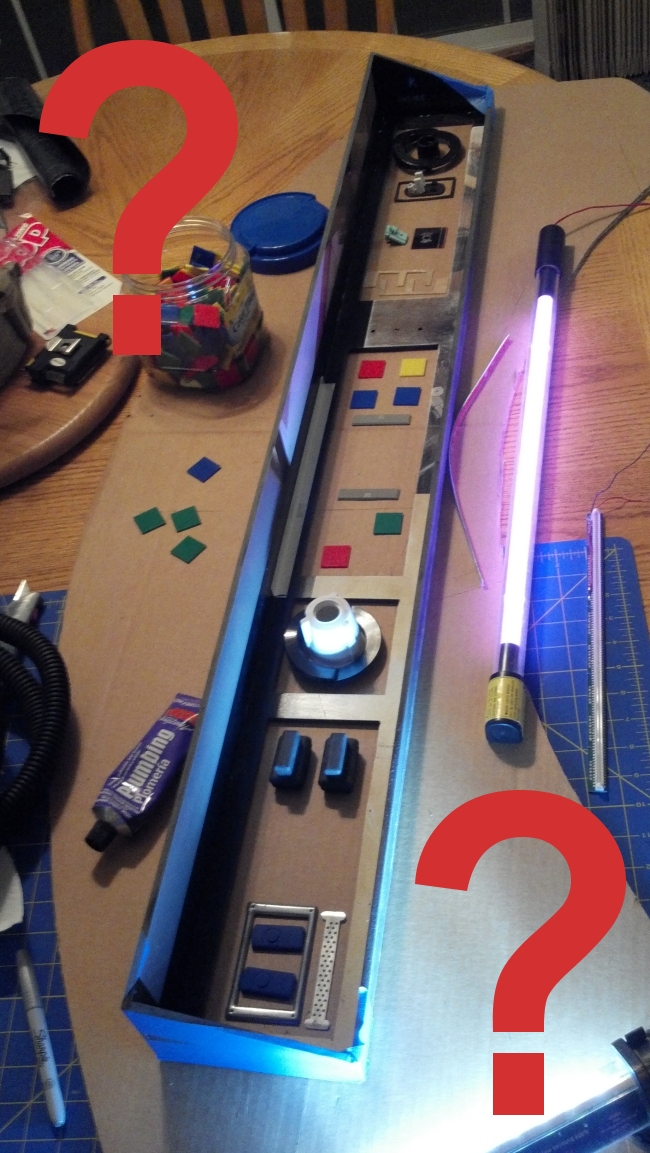
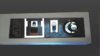
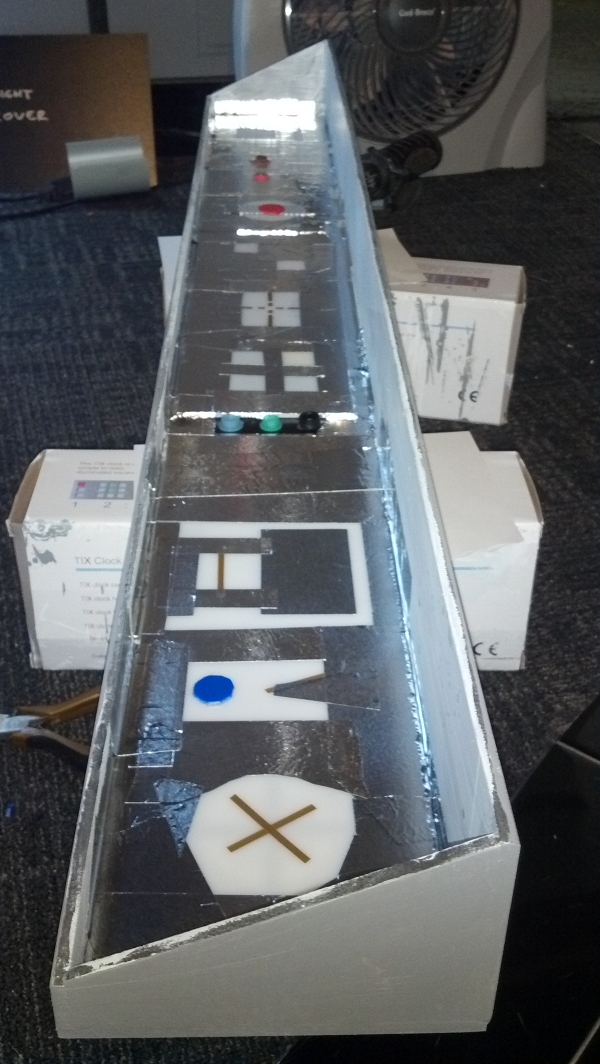
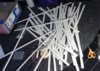
I've been dabbling on the control panel. I want it to be be all black greeblies with lighted highlights. Below, I am marking the masked acrylic so I can cut some portions out for spray-painting black...
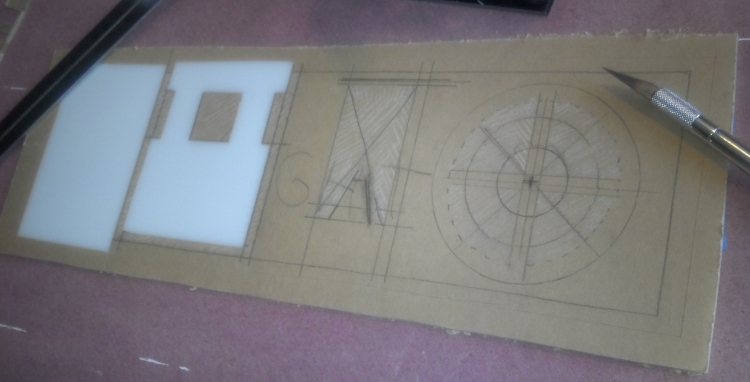
and below, I cut out the portions that will get painted black. And I test-fit the greeblies...
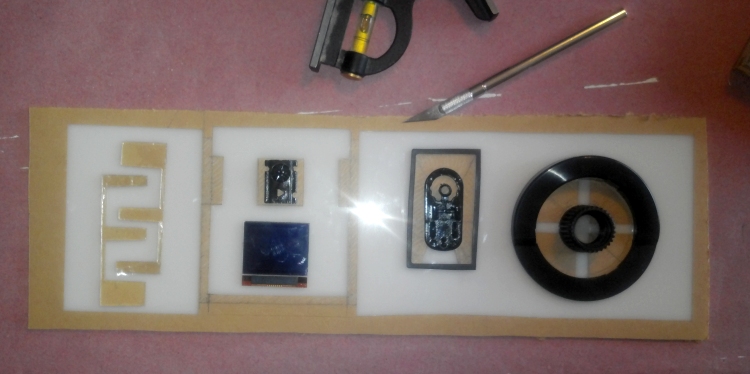
Black paint was then applied to the white acrylic sheet. Below, I've "upgraded" the rightside greeblie to a taller thing with a lens. It's a water filter part that's been chopped with a Dremel cutoff wheel, then had a Hobby Lobby clear epoxy sticker applied on top for a lens. Here is a backlighting test. I held a light behind the panel to have a look. I graphically edited the edges a little bit to see what it will end up looking like...

I did learn that when spray painting a white acrylic sheet, it needs two or three separate coats of black paint. Otherwise, the light will shine through the painted portions from behind. In the next installment, I will build up the other 2 sections of this 4-foot long control panel.
and below, I cut out the portions that will get painted black. And I test-fit the greeblies...
Black paint was then applied to the white acrylic sheet. Below, I've "upgraded" the rightside greeblie to a taller thing with a lens. It's a water filter part that's been chopped with a Dremel cutoff wheel, then had a Hobby Lobby clear epoxy sticker applied on top for a lens. Here is a backlighting test. I held a light behind the panel to have a look. I graphically edited the edges a little bit to see what it will end up looking like...
I did learn that when spray painting a white acrylic sheet, it needs two or three separate coats of black paint. Otherwise, the light will shine through the painted portions from behind. In the next installment, I will build up the other 2 sections of this 4-foot long control panel.
Attachments
Last edited:
Amazing DJ
Well-Known Member
Aaaand here is the completed and lighted control panel under the Death Star!

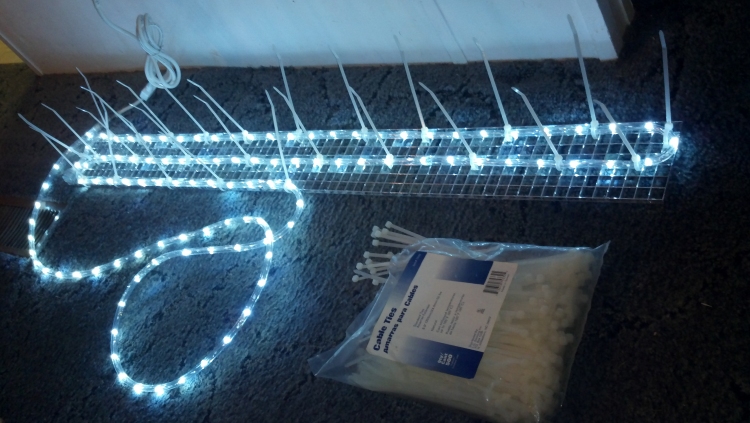
This is my first time using the little 1" square colored "button" tiles on anything. I figured out how to light it. It's got an LED rope light in there. It was zip-tied to a 5" x 46" scrap of ceiling grid framework. There will be some detail shots later, if anyone is interested to see how the white panels were masked and blacked out.
This is my first time using the little 1" square colored "button" tiles on anything. I figured out how to light it. It's got an LED rope light in there. It was zip-tied to a 5" x 46" scrap of ceiling grid framework. There will be some detail shots later, if anyone is interested to see how the white panels were masked and blacked out.
Attachments
WOW, very cool effect!
Loving the view of the Death Star. Is there anyway you could do pinhole lights for the stars or any of the lights on the Death Star? This is such a cool project!
Loving the view of the Death Star. Is there anyway you could do pinhole lights for the stars or any of the lights on the Death Star? This is such a cool project!
FakeBritishAccent
Sr Member
This is ABSOLUTELY FANTASTIC. I just spent the last 40 minutes pouring over your WIP pics and drooling. The worst part is, since you've detailed the steps you've taken so well, it all seems like something I can do as well!
Now all I need is a house :lol
Great job, sir! I can't wait until you put up finished pics.
-Jonaas
Now all I need is a house :lol
Great job, sir! I can't wait until you put up finished pics.
-Jonaas
Very nice! Really completes the look.
FANTASTIC!
Amazing DJ
Well-Known Member
Thanks for the comments, my fellow Star Wars freaks!
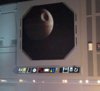
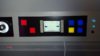
Here is a closer pic of the backlighted panel.
See the green glass in the middle? Thanks, Hobby Lobby. I patterned that after the view inside Luke's Binoculars. It's a piece of green art glass. Then I stuck a "frame" to the edge of the green glass made of silver vinyl. The middle of the glass has a detail not shown by the camera photo - graticule line markings made from behind the white acrylic.
Oops, the rightside edge of the control panel has some light leaking around the side because I haven't devised a permanent way to hang the panel yet. It's fun trying to solve each little issue, inventing solutions.
Attachments
Amazing DJ
Well-Known Member
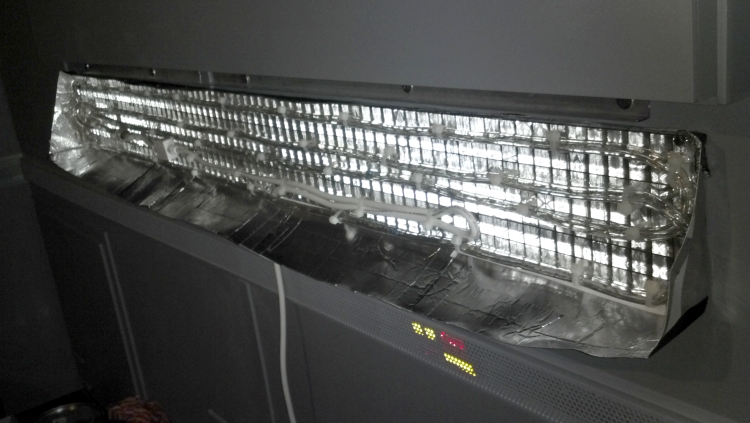
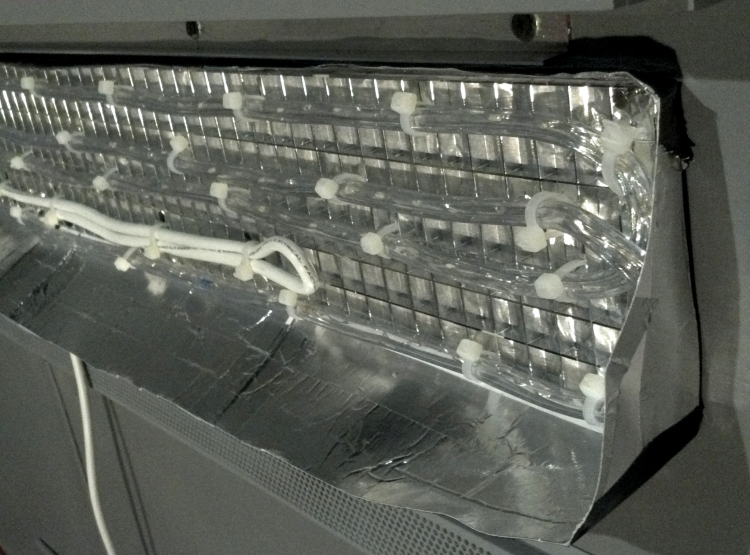
I'll show you more of the construction methods for the lighted "control" panel. Note this is not a screen accurate piece. I'm not duplicating the exact details seen in Star Wars, but I feel I've captured the spirit of some of the wall panels. Some are 3-section black with some colored light controls on them. Below I'm building up the backlight. You can see I've chopped up a piece of office ceiling light grid {Lowe's} and I am using zip-ties to hold an LED rope light {Wal-Mart $12} to the grid.
I've set the panel over the top of the backlight to see what the light will look like. Behold!
In some places, the light shone through the black paint. So I had to black out the black portions even more with silver tape. No light gets through this tape. It acts as a reflector, and intensifies the light that bounces around inside the control panel.
The LED strip is mounted to the wall. I've put metal tape on the backside of it to also reflect light forward. Here, it is "off". Unfortunately, I had light leaking out the edges of the panel onto the surrounding walls. That looked bad, so I added these "blinders" to the sides of the backlight panel. They are made from heavy paper stock with silver metal tape applied. None of this gets hot since the light source is low-current LED's.
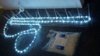
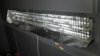
Below is a close-up of the LED rope light so you can see how easy it was to fabricate. Just zip-tie it anywhere.
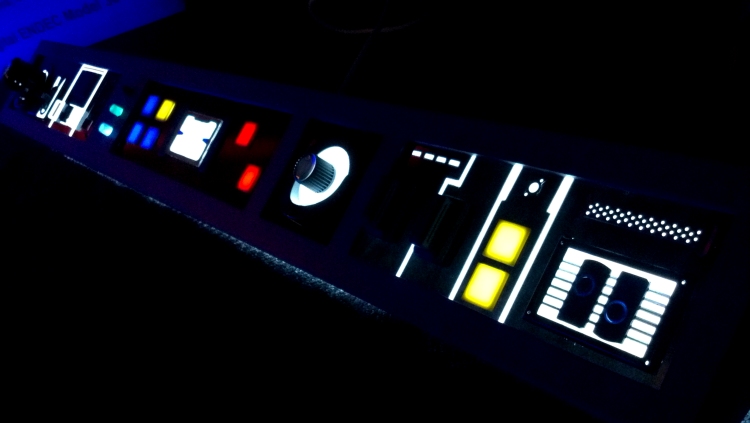
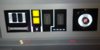
Below is a close-up of the left side of the finished panel. I tried to use parts that the light could shine through in interesting ways.
And I'd like to show you how you can easily build something out of junk, total junk. Call these "greeblies".
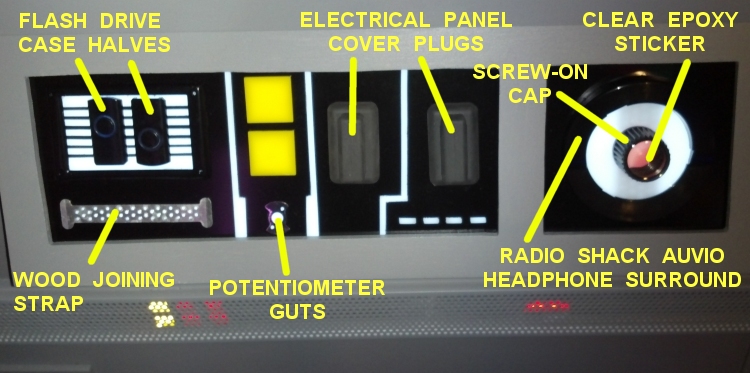
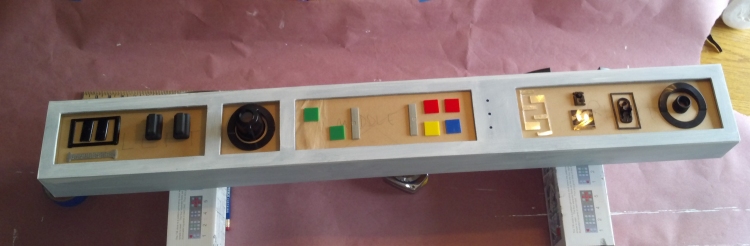
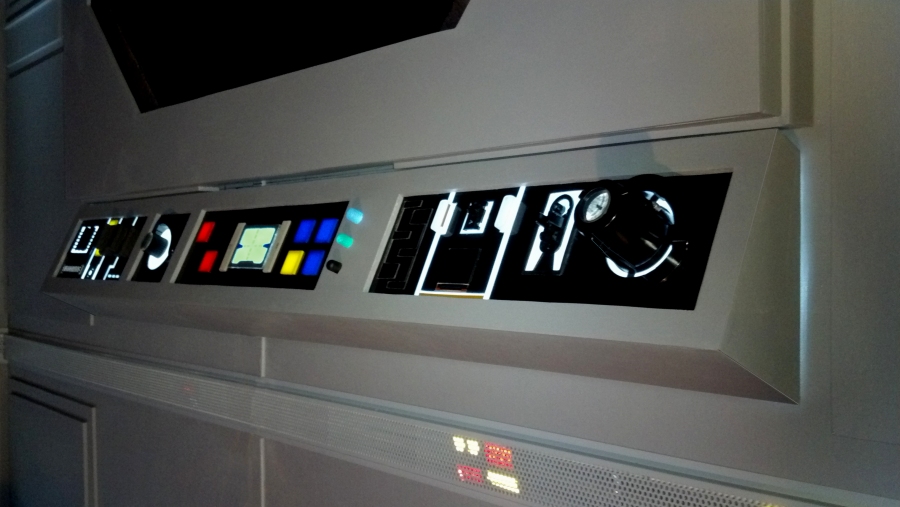
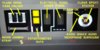
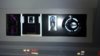
Below is a close-up of the middle of the finished panel.
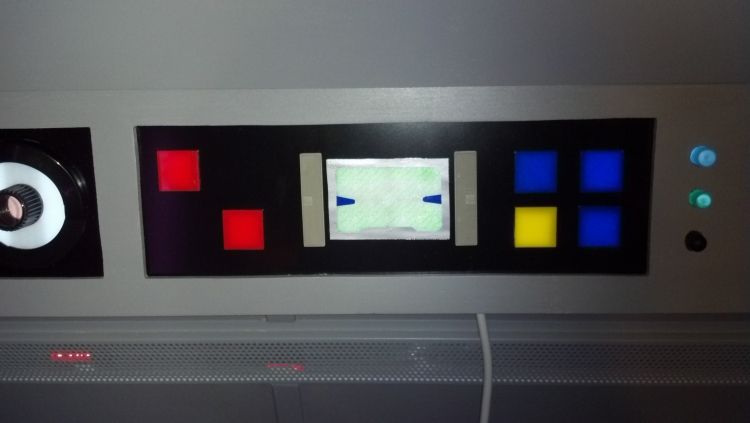
Middle of the panel labeled. More recycled items simulating control surface fakery. I like the green glass screen, real glass glued on.

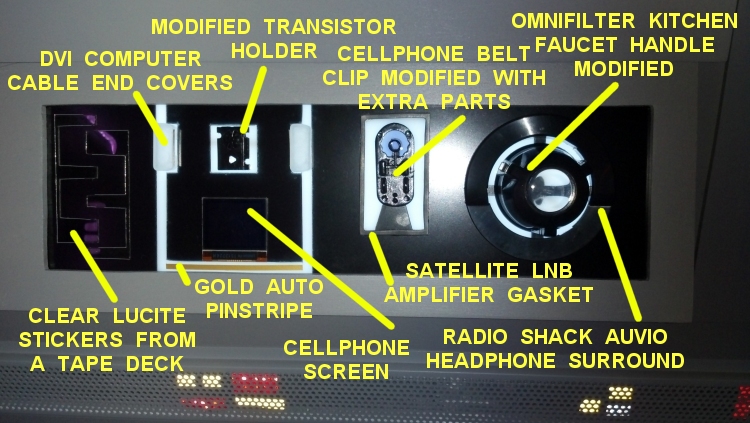
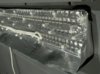
Below is the rightside of the panel close-up
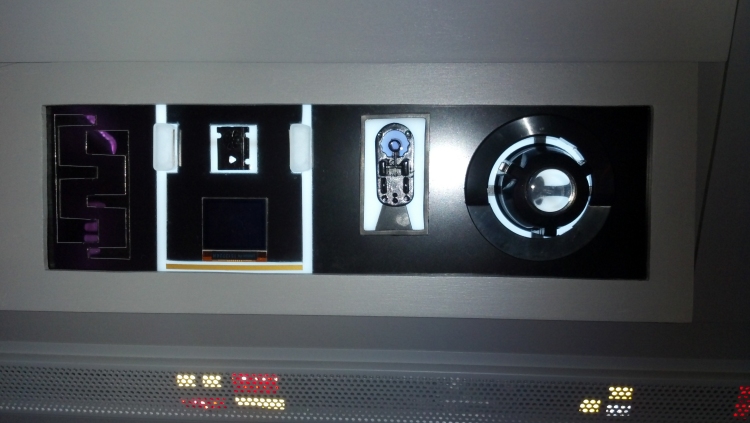
Rightside labeled. If you make something like this, use your imagination for interesting ways to make the light shine through your greeblies.
I've plugged this panel into an x10 appliance module. That way, I can turn it on remotely through an x10 control panel on my desk. Or my computer can turn it on. Did I tellya my computer controls many of the items in my Star Wars Movie Set Den through x10 modules? I'll save that for a later installment. Hey, if you build any lighted panels using these methods, I'd like to see them!
I've set the panel over the top of the backlight to see what the light will look like. Behold!
In some places, the light shone through the black paint. So I had to black out the black portions even more with silver tape. No light gets through this tape. It acts as a reflector, and intensifies the light that bounces around inside the control panel.
The LED strip is mounted to the wall. I've put metal tape on the backside of it to also reflect light forward. Here, it is "off". Unfortunately, I had light leaking out the edges of the panel onto the surrounding walls. That looked bad, so I added these "blinders" to the sides of the backlight panel. They are made from heavy paper stock with silver metal tape applied. None of this gets hot since the light source is low-current LED's.
Below is a close-up of the LED rope light so you can see how easy it was to fabricate. Just zip-tie it anywhere.
Below is a close-up of the left side of the finished panel. I tried to use parts that the light could shine through in interesting ways.
And I'd like to show you how you can easily build something out of junk, total junk. Call these "greeblies".
Below is a close-up of the middle of the finished panel.
Middle of the panel labeled. More recycled items simulating control surface fakery. I like the green glass screen, real glass glued on.
Below is the rightside of the panel close-up
Rightside labeled. If you make something like this, use your imagination for interesting ways to make the light shine through your greeblies.
I've plugged this panel into an x10 appliance module. That way, I can turn it on remotely through an x10 control panel on my desk. Or my computer can turn it on. Did I tellya my computer controls many of the items in my Star Wars Movie Set Den through x10 modules? I'll save that for a later installment. Hey, if you build any lighted panels using these methods, I'd like to see them!
Attachments
-
 2013-07-06_15-54-54_996.jpg362.3 KB · Views: 3,452
 -
 2013-07-06_20-03-49_469 words.jpg177.9 KB · Views: 3,353
 -
 2013-07-06_20-01-58_876 words.jpg253.4 KB · Views: 3,297
 -
 2013-07-06_20-04-15_265 words.jpg183.3 KB · Views: 3,304
 -
 2013-07-01_01-22-22_613.jpg95.6 KB · Views: 3,303
 -
 2013-07-06_20-04-15_265.jpg129.1 KB · Views: 3,291
 -
 2013-06-30_22-08-32_311.jpg213.1 KB · Views: 3,571
 -
 2013-07-06_20-03-49_469.jpg131 KB · Views: 3,334
 -
 2013-07-06_20-01-58_876.jpg155.7 KB · Views: 3,273
 -
 2013-07-06_18-48-39_924.jpg275.8 KB · Views: 3,325
 -
 2013-07-06_18-47-47_56.jpg183 KB · Views: 3,370
Last edited:
Phenomenal! Such a great room.
GREAT JOB! That LED light strip gives me some ideas! Wonderful job so far!
Monkey5150
Active Member
knocked it out of the park!!!!!
Demonmaker
New Member
Gave me some great inspiration, thank you. Any final updates to the completed build?
Amazing DJ
Well-Known Member
Tonight I am working on a way to improve the dimensional look of the walls. In the movie, they used lighting to bring out the designs in the walls. See this screen capture from the movie?

I like the look of the long white "trough" light washing down the walls, so I'm going to build a variation of that. It will go around my room on three sides. And it will be cheap and low power consumption. So far, here's the unlikely materials list:
* lightweight PVC house gutter
* gutter hangers mounted upside-down
* drywall screws
* silver metal foil tape inside the gutter to reflect light
* LED bright white (not cool white or yellowy) rope light from Wal-Mart
* sheet of translucent corrugated plastic for a light diffuser "lens"
* vinyl edge "bathroom" moulding in an "F" shape from Lowe's
* recycled plastic mini-blind slats
* white posterboard
* glue and zip-ties
* gray paint (always shades of beautiful gray)
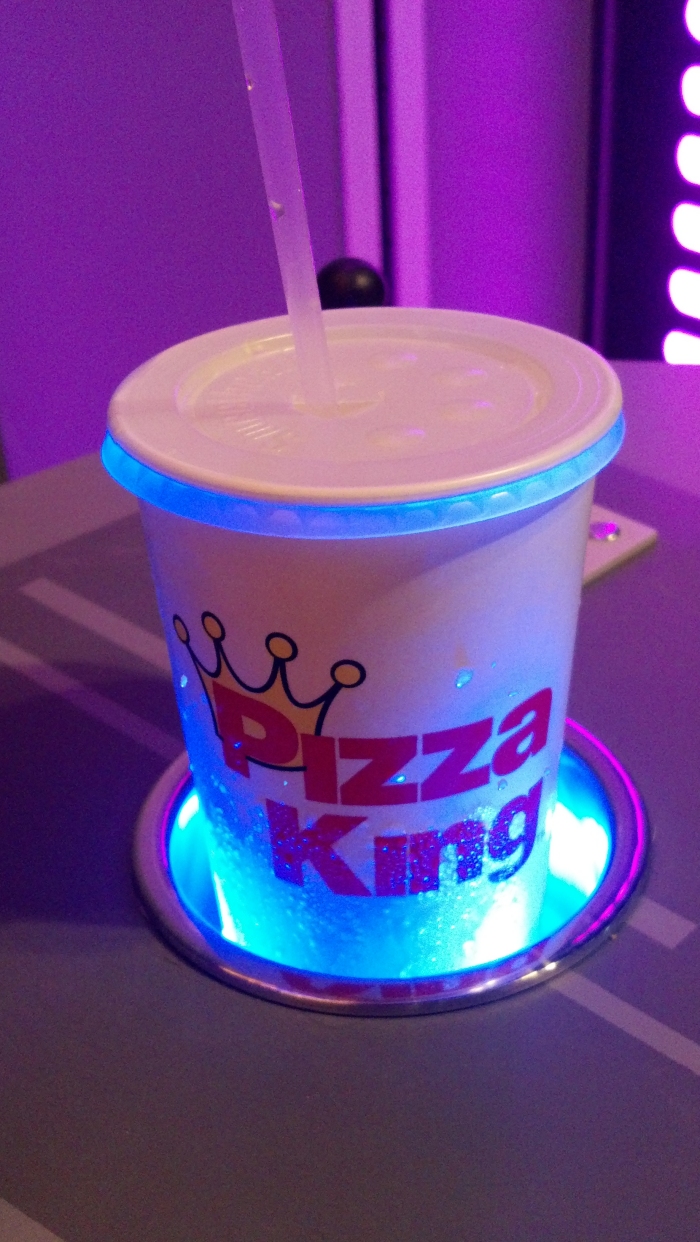
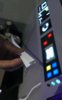
First, I gotsta get my drink on. Here in the cornfields of Indiana, we have Pizza King. What's in your Star Wars desk lighted cup holder?
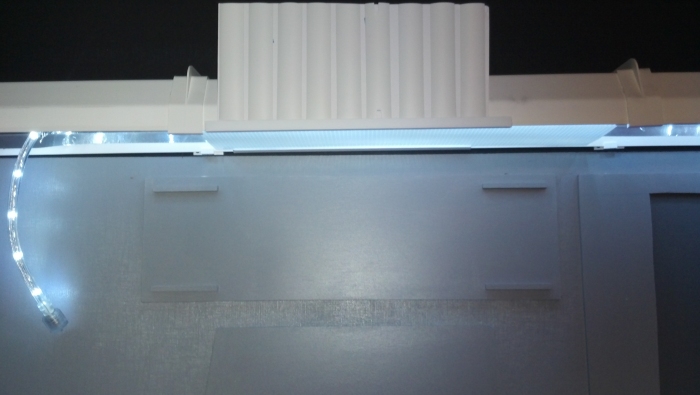
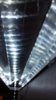
Now the lighting tests can begin. The upside-down gutter is hung from the wall. That thing needs disguised a LOT so it does not look gutter-y.

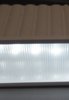
The underside has been silver-taped. A rope light is temporarily hung to see what it looks like.
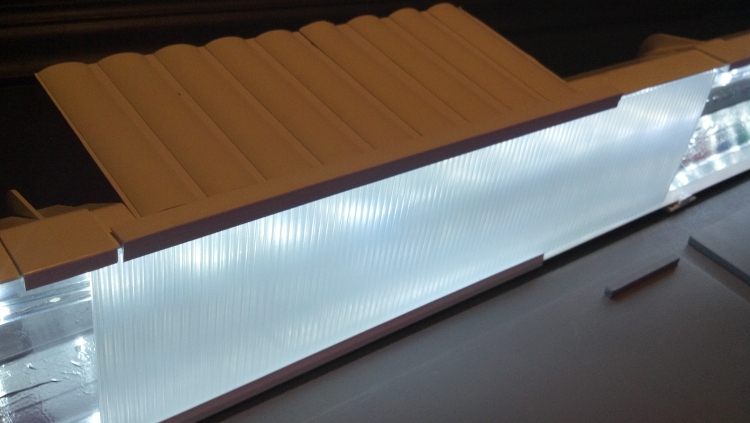
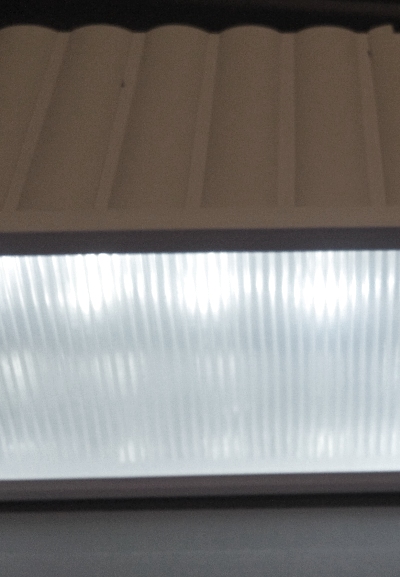
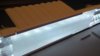
I've cut a small scrap of lens to see what that looks like with a little chunk of thin edge trim.
Much of my room decoration is made from recycled materials. How about I rip up an old mini-blind and use the slats to enhance the front edge?
It's fun to experiment with shapes and materials. In the center of the pic is a proposed light section. At the top, the slats are attached to a piece of posterboard and held in place by the vinyl edge trim. It happens to fit in there perfect. I could construct many feet of that and use it to hide the whole front edge of the gutter from view.
Here I'm holding up a piece of vinyl trim so you can see the end profile is in an "F" shape. This stuff is cheap at $2.30

I think I will build out this light scheme around three sides of the room. All the white stuff will be painted dark gray. And to finish it off, let's see...
* I will probably apply a vinyl "mask" to the lens. The "mask" will divide the lighted area into rectangles so it looks somewhat like the screenshot.
* Or I might develop some weird little black "shutters" that hang down from the light. Seems like that would be easy, yet time-consuming to build all that detail. What would you use for the "shutters" and how would you attach them?
I like the look of the long white "trough" light washing down the walls, so I'm going to build a variation of that. It will go around my room on three sides. And it will be cheap and low power consumption. So far, here's the unlikely materials list:
* lightweight PVC house gutter
* gutter hangers mounted upside-down
* drywall screws
* silver metal foil tape inside the gutter to reflect light
* LED bright white (not cool white or yellowy) rope light from Wal-Mart
* sheet of translucent corrugated plastic for a light diffuser "lens"
* vinyl edge "bathroom" moulding in an "F" shape from Lowe's
* recycled plastic mini-blind slats
* white posterboard
* glue and zip-ties
* gray paint (always shades of beautiful gray)
First, I gotsta get my drink on. Here in the cornfields of Indiana, we have Pizza King. What's in your Star Wars desk lighted cup holder?
Now the lighting tests can begin. The upside-down gutter is hung from the wall. That thing needs disguised a LOT so it does not look gutter-y.
The underside has been silver-taped. A rope light is temporarily hung to see what it looks like.
I've cut a small scrap of lens to see what that looks like with a little chunk of thin edge trim.
Much of my room decoration is made from recycled materials. How about I rip up an old mini-blind and use the slats to enhance the front edge?
It's fun to experiment with shapes and materials. In the center of the pic is a proposed light section. At the top, the slats are attached to a piece of posterboard and held in place by the vinyl edge trim. It happens to fit in there perfect. I could construct many feet of that and use it to hide the whole front edge of the gutter from view.
Here I'm holding up a piece of vinyl trim so you can see the end profile is in an "F" shape. This stuff is cheap at $2.30
I think I will build out this light scheme around three sides of the room. All the white stuff will be painted dark gray. And to finish it off, let's see...
* I will probably apply a vinyl "mask" to the lens. The "mask" will divide the lighted area into rectangles so it looks somewhat like the screenshot.
* Or I might develop some weird little black "shutters" that hang down from the light. Seems like that would be easy, yet time-consuming to build all that detail. What would you use for the "shutters" and how would you attach them?
Attachments
-
 star wars pizza king.jpg526.5 KB · Views: 3,035
 -
 gutter 01.jpg156.3 KB · Views: 2,913
 -
 gutter 06.jpg121.4 KB · Views: 2,902
 -
 gutter 02.jpg168.7 KB · Views: 2,971
 -
 gutter 03.jpg113.4 KB · Views: 2,899
 -
 gutter 04.jpg250.3 KB · Views: 3,002
 -
 gutter 05.jpg113.3 KB · Views: 2,871
 -
 choke room 05.jpg25.7 KB · Views: 2,948
Last edited:
Similar threads
- Replies
- 61
- Views
- 5,216
- Replies
- 4
- Views
- 863
- Replies
- 13
- Views
- 2,022