sparkyvision
New Member
A long time ago I had a plaster prop of the boomerang phaser from Voyager / DS9 / TNG films. I bought it off eBay, and I have no idea what happened to it. Since I wanted it again, and since my daughter got a 3D printer for Christmas (so really, *I* got a 3D printer for Christmas) I decided to try and print it.
I got a model from Thingaverse and set to work, using the bright pink PLA that we bought for her to use. Very Barbie.
This was my first time trying to 3D print a prop, and boy, did I learn a few things later on down the road. Number one would be to Bondo fill / sand each piece separately, as this makes final filling and sanding vastly easier. The other is that gluing PLA together is a pain, as it doesn't react well (or really at all) to cyanoacrylate glues. I managed with the somewhat-well-known baking soda trick, but in the future, I think I'll use something different.
Anyway, got it printed, and assembled, and glued, then decided to go ahead and give it a quick coat of paint to see how it looked. The answer is, not great.
So, started applying Bondo, and quickly switched to upol Fanstastic Glazing and Spot putty. The harsh xylene smell of 2-part Bondo is...just awful. I hate it so much, and I don't want to go outside every time I want to mix up some filler. So, the upol stuff is fine.
Lots of sanding, painting again, filling, etc followed.
Looking smoother.
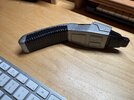
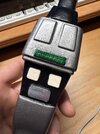
At this point, I had to find some paint. Thanks to some older threads here, I found a paint code that I had mixed up at the local NAPA auto store and put into a rattle can for $30. Not bad, and it looks *spot on*, color-wise. I also did a Plasti-dip handle because I like making something that feels like what the characters would use. The Plasti-Dip isn't great at adhering around the edges, which might be something I have to fix down the road. But anyway, I got it home and taped off.
And painted.
I absolutely love this custom color, and if I do a PADD or something else Starfleet-y, I'll have quite enough of this color left over. The paint code is WA8311, Chevrolet Silver Sand Gray Metallic. It looks perfect to my eye. Really happy with how it came out.
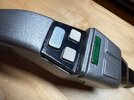
After this, I had to apply glossy black to the emitter section. Turns out, this was a nightmare. I bought some Krylon super-duper whatever paint, and it wrinkled immediately upon application. I sanded off, tried again, same result. I didn't take any pictures of this, but it was a hassle. I had to sand it all off down to the plastic, re-prime, then paint again. I'm not even sure what happened the first time, but the second coat of glossy black did not go well, Enterprise.
Now, it's currently drying from fixing some spots on the main body where I had some black overspray, then I'll give the emitter a (hopefully) final coat of glossy black, and then do the detail work on the controls and find some blue holographic sparkle tape to put on the underside before sealing the whole thing (minus grip) with something to protect the paint. More progress pictures to come.
I got a model from Thingaverse and set to work, using the bright pink PLA that we bought for her to use. Very Barbie.
This was my first time trying to 3D print a prop, and boy, did I learn a few things later on down the road. Number one would be to Bondo fill / sand each piece separately, as this makes final filling and sanding vastly easier. The other is that gluing PLA together is a pain, as it doesn't react well (or really at all) to cyanoacrylate glues. I managed with the somewhat-well-known baking soda trick, but in the future, I think I'll use something different.
Anyway, got it printed, and assembled, and glued, then decided to go ahead and give it a quick coat of paint to see how it looked. The answer is, not great.
So, started applying Bondo, and quickly switched to upol Fanstastic Glazing and Spot putty. The harsh xylene smell of 2-part Bondo is...just awful. I hate it so much, and I don't want to go outside every time I want to mix up some filler. So, the upol stuff is fine.
Lots of sanding, painting again, filling, etc followed.
Looking smoother.
At this point, I had to find some paint. Thanks to some older threads here, I found a paint code that I had mixed up at the local NAPA auto store and put into a rattle can for $30. Not bad, and it looks *spot on*, color-wise. I also did a Plasti-dip handle because I like making something that feels like what the characters would use. The Plasti-Dip isn't great at adhering around the edges, which might be something I have to fix down the road. But anyway, I got it home and taped off.
And painted.
I absolutely love this custom color, and if I do a PADD or something else Starfleet-y, I'll have quite enough of this color left over. The paint code is WA8311, Chevrolet Silver Sand Gray Metallic. It looks perfect to my eye. Really happy with how it came out.
After this, I had to apply glossy black to the emitter section. Turns out, this was a nightmare. I bought some Krylon super-duper whatever paint, and it wrinkled immediately upon application. I sanded off, tried again, same result. I didn't take any pictures of this, but it was a hassle. I had to sand it all off down to the plastic, re-prime, then paint again. I'm not even sure what happened the first time, but the second coat of glossy black did not go well, Enterprise.
Now, it's currently drying from fixing some spots on the main body where I had some black overspray, then I'll give the emitter a (hopefully) final coat of glossy black, and then do the detail work on the controls and find some blue holographic sparkle tape to put on the underside before sealing the whole thing (minus grip) with something to protect the paint. More progress pictures to come.