Long thread title but it tells you everything. As I didn't want to clog up pre-existing threads, I was only left with one choice...Yes! Another PKD thread! I've dropped hints about this build since I joined this site but have never really went on about it as---well, everyone and their mother knows just about everything there is to know about the PKD's now.
This took ten years to finish not because I was really lazy about it, but as I learned something new, I kept going back to this project and applied my new skills to areas I thought needed improvement. A lot of info about the prop came up during those 10 years and I kept coming back to this and continued reworking it. New prop kits, new makers, new info, new materials, new (affordable) equipment; it really surprises me now just how much has been made readily available in just the last decade.
This project originally started as an nth generation recast of an older kit I acquired (from a sketchy source, mind) I thought I would rework. When I realized mods I needed to make were too extensive to bother with, I decided I'd make them from scratch: it'd be easier. And I did just that. First, out of wood and then onto plastic and this went on for a number of years, working on it on and off. After those years, I realized I had just a handful of parts and was looking for other options to handle the more complex pieces that I certainly couldn't make from scratch with just hand tools.
I bade my time, regularly checking the Junkyard here, and whatever cropped up on eBay I could get reasonably. The project got a huge boost when a member here was selling off his PKD project (Nicksdad, if I recall correctly). His project kit included: B-casts of a Monsters-In-Motion PKD kit, various parts from other kits, and a Tanaka Works S&W .38 special... I HAD to snap it up.
And off I went modifying and fixing up these various pieces to make them more like the real thing. I was thinking on keeping it plastic and painting it up to look like metal, I just need to fix up the current pieces and make from scratch what was missing. Easy. My mind was set...
...That is, if it weren't for the fact I was teaching myself pewter casting at the time.
The initial pieces:


A couple years go by, things go relatively the same; I'm working on pieces on and off between other things, life butting in, I'm still working on parts, life continues to butt in, and I'm still sourcing various pieces together; pulling photos from Rich Coyle, Sidkit builds, and early blueprints from Tomenosuke from their blog on their blaster kits. Then, Tomenosuke acquires the rights to mass produce the blaster rather than working underground and releasing very few kits at a time. Shortly thereafter, people start making mods to make these pieces better. Soon enough, I snap up a steel Tomen replacement barrel (Teddz, I think).
Problem: my existing kit parts don't really fit with the barrel.
Solution: I frankenstein the barrel to the base gun in a ****** way and retrofit all my pieces to make it work and not look crooked...Easy.
A little bit more time passes as I have to rework my existing pieces again because I'm insane. Then, from Tomen, the water gun PKD comes out and mod kits are soon offered for that. I snatch one kit up from Soulinertia and start salvaging, retro-fitting, assimilating what I need from his parts into mine. I cobble them together and finally I can get around to casting these up in pewter.
The pewter molds:

It takes a lot of effort for me to get good pewter casts (I don't know how Sidkit does it) but I managed to do it. The pewter didn't pick up the details in the mold as well as I would've like, particularly the stamped letters, but overall, I am happy. They're just fairly ugly and needed some elbow grease. But, yes, overall: I am happy...
....I'm also at this time teaching myself how to lathe and mill aluminium (my cast lightsaber project).
Cut to now, after messing around with some pewter black...


Modified parts: Cylinder covers, upper receiver, receiver cap and switch, grip frame, butt plate, bolt assembly, front trigger, and trigger guard--- All cast pewter.
Scratch-Made parts: Front barrel post, sight rod, cylinder release/safety switch--- Machined aluminium. Magazine and grips--- Resin.
Kit parts: Magazine well--- Resin.
Real-world vintage: Binding post and gun screws in the top of the upper receiver.
All this work and it's still not accurate. Then again, it was never going to be---probably never meant to be---but it is mine. Knowing it won't ever be fully accurate opened it up for me to add my own touches, my own flourishes, my own textures. For instance, my filthy cast grips. They were originally a set of test grips for matching the color of the real things, but I fell in love with the textures that the filth brought. This gun is packed with small alterations based on those feelings; its own filth, its own stories. Some of which I wanted to document here.
It might not be right to the real thing, but it is right for me. Despite its short-comings, this prop has become one of my most valued pieces in my collection as it is now a catalog of my personal growth and skill progression over the last decade. Looking at what I have now, compared to what it started as, I am so far removed from where I was, I have a hard time reconciling the fact I made this at all. I want to make a stand for it next, but after that, I honestly don't know what I'm going to do with myself then.
Moral of the story: Goonies never say die.
This took ten years to finish not because I was really lazy about it, but as I learned something new, I kept going back to this project and applied my new skills to areas I thought needed improvement. A lot of info about the prop came up during those 10 years and I kept coming back to this and continued reworking it. New prop kits, new makers, new info, new materials, new (affordable) equipment; it really surprises me now just how much has been made readily available in just the last decade.
This project originally started as an nth generation recast of an older kit I acquired (from a sketchy source, mind) I thought I would rework. When I realized mods I needed to make were too extensive to bother with, I decided I'd make them from scratch: it'd be easier. And I did just that. First, out of wood and then onto plastic and this went on for a number of years, working on it on and off. After those years, I realized I had just a handful of parts and was looking for other options to handle the more complex pieces that I certainly couldn't make from scratch with just hand tools.
I bade my time, regularly checking the Junkyard here, and whatever cropped up on eBay I could get reasonably. The project got a huge boost when a member here was selling off his PKD project (Nicksdad, if I recall correctly). His project kit included: B-casts of a Monsters-In-Motion PKD kit, various parts from other kits, and a Tanaka Works S&W .38 special... I HAD to snap it up.
And off I went modifying and fixing up these various pieces to make them more like the real thing. I was thinking on keeping it plastic and painting it up to look like metal, I just need to fix up the current pieces and make from scratch what was missing. Easy. My mind was set...
...That is, if it weren't for the fact I was teaching myself pewter casting at the time.
The initial pieces:
A couple years go by, things go relatively the same; I'm working on pieces on and off between other things, life butting in, I'm still working on parts, life continues to butt in, and I'm still sourcing various pieces together; pulling photos from Rich Coyle, Sidkit builds, and early blueprints from Tomenosuke from their blog on their blaster kits. Then, Tomenosuke acquires the rights to mass produce the blaster rather than working underground and releasing very few kits at a time. Shortly thereafter, people start making mods to make these pieces better. Soon enough, I snap up a steel Tomen replacement barrel (Teddz, I think).
Problem: my existing kit parts don't really fit with the barrel.
Solution: I frankenstein the barrel to the base gun in a ****** way and retrofit all my pieces to make it work and not look crooked...Easy.
A little bit more time passes as I have to rework my existing pieces again because I'm insane. Then, from Tomen, the water gun PKD comes out and mod kits are soon offered for that. I snatch one kit up from Soulinertia and start salvaging, retro-fitting, assimilating what I need from his parts into mine. I cobble them together and finally I can get around to casting these up in pewter.
The pewter molds:
It takes a lot of effort for me to get good pewter casts (I don't know how Sidkit does it) but I managed to do it. The pewter didn't pick up the details in the mold as well as I would've like, particularly the stamped letters, but overall, I am happy. They're just fairly ugly and needed some elbow grease. But, yes, overall: I am happy...
....I'm also at this time teaching myself how to lathe and mill aluminium (my cast lightsaber project).
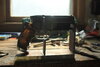
Cut to now, after messing around with some pewter black...
Modified parts: Cylinder covers, upper receiver, receiver cap and switch, grip frame, butt plate, bolt assembly, front trigger, and trigger guard--- All cast pewter.
Scratch-Made parts: Front barrel post, sight rod, cylinder release/safety switch--- Machined aluminium. Magazine and grips--- Resin.
Kit parts: Magazine well--- Resin.
Real-world vintage: Binding post and gun screws in the top of the upper receiver.
All this work and it's still not accurate. Then again, it was never going to be---probably never meant to be---but it is mine. Knowing it won't ever be fully accurate opened it up for me to add my own touches, my own flourishes, my own textures. For instance, my filthy cast grips. They were originally a set of test grips for matching the color of the real things, but I fell in love with the textures that the filth brought. This gun is packed with small alterations based on those feelings; its own filth, its own stories. Some of which I wanted to document here.
It might not be right to the real thing, but it is right for me. Despite its short-comings, this prop has become one of my most valued pieces in my collection as it is now a catalog of my personal growth and skill progression over the last decade. Looking at what I have now, compared to what it started as, I am so far removed from where I was, I have a hard time reconciling the fact I made this at all. I want to make a stand for it next, but after that, I honestly don't know what I'm going to do with myself then.
Moral of the story: Goonies never say die.
")