So as I continue the quest for ANH found props I realized that one that was missing from my collection was a vintage restraining bolt. After a healthy amount of searching and working with Troy (Seneca) to try to identify the right Arriflex lens (and at a less than mortgage payment type price) I arrived on a busted lens someone was selling for parts on eBay.


Then came disassembly. This thing was loaded with tiny screws that you’d need a very small jewelers flat head screw driver to remove.

After getting a bunch of the screws out the part that I really didn’t know was the top glass lens (at least the top in the pic above). I grabbed it with a pair of pliers that I’d wrapped in a rag to protect it and it twisted right out.

Then came some little screws that are practically massive compared to all the rest.

Once those were out I removed one more tiny screw from that brass ring, turned that counter clockwise a number of times using the little cut tabs and the middle section lifted off and the front lens and ring came right out.

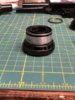
Then some sanding with 400, then 600 grit sand paper just to get the black paint off the center ring in order to get to the bare metal as seen in the prop underneath. Followed that up with a round of #0000 steel wool to clean it up and it’s almost ready to restrain some droids.


Next step will be to add some black tamiya paint that I have left over from the macro build to cover over the numbers on the focusing ring.

After that I’ll probably use some JB steel stick or something similar to fill those three little screw holes and put the small lens back in the top and should be all set.

Thanks to Troy for all his help in looking at dozens of Arriflex lenses (note: when searching you’re looking for the Schneider Arriflex lenses, they’ll have the correct recessed line around the center section that you won’t sand in order to get the look on our model 3PO up there). Also thanks to Erick (erlomd) for sharing his experience with cameras and lenses.
I’ll post some more once I get the next few steps done and wrap it all up.
Would love to see what others have done with their restraining bolts and definitely open to other ideas for how to complete this sweet little prop.
Then came disassembly. This thing was loaded with tiny screws that you’d need a very small jewelers flat head screw driver to remove.
After getting a bunch of the screws out the part that I really didn’t know was the top glass lens (at least the top in the pic above). I grabbed it with a pair of pliers that I’d wrapped in a rag to protect it and it twisted right out.
Then came some little screws that are practically massive compared to all the rest.
Once those were out I removed one more tiny screw from that brass ring, turned that counter clockwise a number of times using the little cut tabs and the middle section lifted off and the front lens and ring came right out.
Then some sanding with 400, then 600 grit sand paper just to get the black paint off the center ring in order to get to the bare metal as seen in the prop underneath. Followed that up with a round of #0000 steel wool to clean it up and it’s almost ready to restrain some droids.
Next step will be to add some black tamiya paint that I have left over from the macro build to cover over the numbers on the focusing ring.
After that I’ll probably use some JB steel stick or something similar to fill those three little screw holes and put the small lens back in the top and should be all set.
Thanks to Troy for all his help in looking at dozens of Arriflex lenses (note: when searching you’re looking for the Schneider Arriflex lenses, they’ll have the correct recessed line around the center section that you won’t sand in order to get the look on our model 3PO up there). Also thanks to Erick (erlomd) for sharing his experience with cameras and lenses.
I’ll post some more once I get the next few steps done and wrap it all up.
Would love to see what others have done with their restraining bolts and definitely open to other ideas for how to complete this sweet little prop.