Master Tej
Active Member
WOW, I just finished reading through the entire build, and I am entirely completely wonderfully amazed! This is absolutely fantastic, though I'll admit I never thought the Falcon had that much mystery to it . . . "Ship of Riddles" indeed. Here are a few things I noticed/thought of while reading through the thread:
The Dice. What I've heard, more than once If I'm not mistaken, is that these were a reference to a pair of dice on the dash of Harrison Ford's car in American Graffiti (sorry, don't know his character's name) and so were put hanging in the Falcon as a fun easter egg. I can't immediately confirm that, but that's what I've heard, and I really appreciate their inclusion in your build.
At one point in the thread, I thought I saw that you had placed the Blast Shield "But with the blast shield down I can't even see" Helmet in the main hold, but I haven't seen it in your recent renders. Is it still there?
The Nav Chairs do not have the cup shaped pieces on the top behind the headrests in the cockpit, while the one in the main hold does. I'm not sure if this was done purposefully, but I was pretty sure they were in the ANH cockpit. Also, speaking of those chairs, I noticed that there is a ridged disc on them and the gun well chairs that would sit right about between an occupant's shoulder blades. This disc, in case you did not notice, is also found on the backpacks of some of the Sandtroopers, and is commonly referred to as the "radar dish". I don't currently have an image, but I can get one.
One thing I thought would be really fun to add, although of course this is just my opinion and up to you, would be the medal from the throne room somewhere. Just, like, hanging on a pipe or sitting on a crate, because I feel Han wouldn't feel the need to place it prominently but would still have it in the Falcon, assuming he didn't decide to sell it for some repair money.")
I know you said you aren't going to bother much with the tech bay attached to the main hold (Han and Leia kiss scene) right now, but I do have one recommendation for what you've already made. The piece of equipment Leia is working on in that particular kiss scene has a horizontal bar running through it in the middle of its construction. I would recommend making it larger, as it seemed rather thin to me when you posted your constructions of that area. Of course, if you are basing what you made off of measurements and/or references, as you seem to always do, then never mind. If you need pictures to explain what part I'm talking about, I can get them.
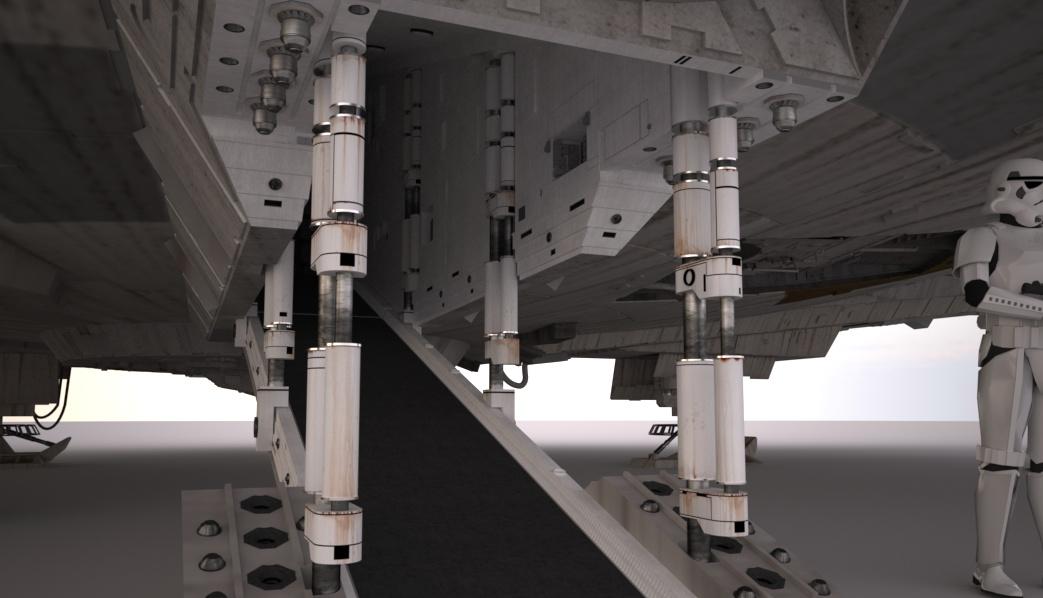
When you posted your animation of the ramp lowering and opening a few pages back, I noticed that a tiny space remains between the top of the ramp and the bottom of the docking ring in that particular area when the ramp is up. I'm sure you've noticed it, but are you going to find a way to close it so the theoretical inhabitants would't suffer the effects of the vacuum of space?
You decided quite a bit back to make an interior version that fit into the Falcon exterior both for fun and to help the plans of a full size build. Looking at my innacurate Complete Cross Sections book and the Millenium Falcon illustration within, I noticed that they suggest there would be a cargo hold in the space between the main hold and cockpit, that large area aft of the starboard mandible yet forwards of the boarding ramp. If there was a cargo space there, perhaps a door to that could be on the side of the hallway leading to the cockpit that is never seen in the films to my knowledge, the "left" side if you were walking into the cockpit? Of course, that side of the hallway may be seen in some shot somewhere, or you may not be willing to take that much creative license since it's not in the films, but I thought I'd throw that out there.
Also a bit back was a discussion about the window that the heroes use that overlooks Bay 327 on the DS1, the window where Leia says "You came in that thing?". It was determined that the window could not be in that position due to Luke's comment to 3PO that they were right above him. Perhaps the window could be kept in the same location as the movies, and that could instead be an error on Luke's part (he was being directionally challenged?) or just a general approximation of "Oh yeah, we're on the floor above you".
What was the final determined angle of the boarding ramp? From what I was reading, it sounded like you managed to find an angle for the boarding ramp that didn't have to involve stairs, although was still steeper than the incorrect movie boarding ramp. What was that angle?
"Drive Safely"? Um, what? I loved that included there, but was that in a model? Not that I think it should be removed, but I was just wondering. Also, the numbers below those words, are those the Falcon's serial numbers?
You were also discussing that top hatch a few pages back, and how it couldn't fit both Luke and Lando. Perhaps it was expanded in the years between ANH and ESB? Just a thought, a way that maybe that inconsistency could be accounted for.
If you read all of this, great, you're awesome! Starkiller, thank you SO much again for making this build. I have absolutely completely loved finding and reading through this, particularly because I didn't have to wait for updates and could just speed through the 62 pages. Sorry if I hit you with a lot of questions at once, but I've got a word document with all of those and wanted to make sure I asked them. Hopefully they can help you in some way. Thank you so much again for taking the time and effort to bring this glorious model to life, and say Hi to that girlfriend for us!
- Master Tej -
The Dice. What I've heard, more than once If I'm not mistaken, is that these were a reference to a pair of dice on the dash of Harrison Ford's car in American Graffiti (sorry, don't know his character's name) and so were put hanging in the Falcon as a fun easter egg. I can't immediately confirm that, but that's what I've heard, and I really appreciate their inclusion in your build.
At one point in the thread, I thought I saw that you had placed the Blast Shield "But with the blast shield down I can't even see" Helmet in the main hold, but I haven't seen it in your recent renders. Is it still there?
The Nav Chairs do not have the cup shaped pieces on the top behind the headrests in the cockpit, while the one in the main hold does. I'm not sure if this was done purposefully, but I was pretty sure they were in the ANH cockpit. Also, speaking of those chairs, I noticed that there is a ridged disc on them and the gun well chairs that would sit right about between an occupant's shoulder blades. This disc, in case you did not notice, is also found on the backpacks of some of the Sandtroopers, and is commonly referred to as the "radar dish". I don't currently have an image, but I can get one.
One thing I thought would be really fun to add, although of course this is just my opinion and up to you, would be the medal from the throne room somewhere. Just, like, hanging on a pipe or sitting on a crate, because I feel Han wouldn't feel the need to place it prominently but would still have it in the Falcon, assuming he didn't decide to sell it for some repair money.
I know you said you aren't going to bother much with the tech bay attached to the main hold (Han and Leia kiss scene) right now, but I do have one recommendation for what you've already made. The piece of equipment Leia is working on in that particular kiss scene has a horizontal bar running through it in the middle of its construction. I would recommend making it larger, as it seemed rather thin to me when you posted your constructions of that area. Of course, if you are basing what you made off of measurements and/or references, as you seem to always do, then never mind. If you need pictures to explain what part I'm talking about, I can get them.
When you posted your animation of the ramp lowering and opening a few pages back, I noticed that a tiny space remains between the top of the ramp and the bottom of the docking ring in that particular area when the ramp is up. I'm sure you've noticed it, but are you going to find a way to close it so the theoretical inhabitants would't suffer the effects of the vacuum of space?
You decided quite a bit back to make an interior version that fit into the Falcon exterior both for fun and to help the plans of a full size build. Looking at my innacurate Complete Cross Sections book and the Millenium Falcon illustration within, I noticed that they suggest there would be a cargo hold in the space between the main hold and cockpit, that large area aft of the starboard mandible yet forwards of the boarding ramp. If there was a cargo space there, perhaps a door to that could be on the side of the hallway leading to the cockpit that is never seen in the films to my knowledge, the "left" side if you were walking into the cockpit? Of course, that side of the hallway may be seen in some shot somewhere, or you may not be willing to take that much creative license since it's not in the films, but I thought I'd throw that out there.
Also a bit back was a discussion about the window that the heroes use that overlooks Bay 327 on the DS1, the window where Leia says "You came in that thing?". It was determined that the window could not be in that position due to Luke's comment to 3PO that they were right above him. Perhaps the window could be kept in the same location as the movies, and that could instead be an error on Luke's part (he was being directionally challenged?) or just a general approximation of "Oh yeah, we're on the floor above you".
What was the final determined angle of the boarding ramp? From what I was reading, it sounded like you managed to find an angle for the boarding ramp that didn't have to involve stairs, although was still steeper than the incorrect movie boarding ramp. What was that angle?
"Drive Safely"? Um, what? I loved that included there, but was that in a model? Not that I think it should be removed, but I was just wondering. Also, the numbers below those words, are those the Falcon's serial numbers?
You were also discussing that top hatch a few pages back, and how it couldn't fit both Luke and Lando. Perhaps it was expanded in the years between ANH and ESB? Just a thought, a way that maybe that inconsistency could be accounted for.
If you read all of this, great, you're awesome! Starkiller, thank you SO much again for making this build. I have absolutely completely loved finding and reading through this, particularly because I didn't have to wait for updates and could just speed through the 62 pages. Sorry if I hit you with a lot of questions at once, but I've got a word document with all of those and wanted to make sure I asked them. Hopefully they can help you in some way. Thank you so much again for taking the time and effort to bring this glorious model to life, and say Hi to that girlfriend for us!
- Master Tej -