spidermanna
New Member
Sorry, had to step away for a few days to fix a fence down in Florida, but back now and almost done making these tutorials (probably be more helpful if they contained more links and diagrams and things builders could actually use. When I looked through DentedHelmet.com looking for ANYTHING on making gloves, I found nothing. I’m not saying its not there, but I FOUND nothing so I had to start from scratch (same with the boots). Making the gloves is not expensive or tremendously difficult but requires a LOT of patience, trial, and error—I made a lot of mistakes and made a lot of prototypes and I understand why most people choose to buy these instead of making them. Anyway, I’ll do my best to explain (or at least present a lot of pictures)…
Said I wouldn’t show the prototypes and the first pic is of a prototype. I suck at this! Anyway, I bought some gloves off Amazon and sort of reverse engineered them until I got a good pattern (I’ll get to that). I was hoping there would be an easy way to hold the layers of fabric together to make them easier to stitch since I know some people can make gloves super fast (like literally a couple minutes or less) but no such luck. I will say that I used a stretchy cotton fabric that was like 10% spandex or something as you don’t want these to be rigid in anyway—you want them to stretch—HOWEVER, you will need to add some interfacing (stabilizer) to the inside of the glove to add strength to the fabric if you use weak cotton like I did!
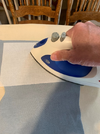
My second prototype-- That works. The flat and finger bits are made of nylon. Dye all the fabric in gray unless you are fortunate to find that color of fabric—good luck…
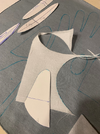
Washable fabric marker is your best friend here. This is for the right glove (I only did pics of the making of the right glove after I made the left one and thought, “Hey I should take some pics of the process”). Make sure to mark which thin pieces go with finger as they are not the same length!
The prototyping taught me that it was critical to use iron-on interfacing on the inside to add extra strength and prevent tearing. Once the gloves are sewn together, you can cut a lot of it out as it will make the gloves very un-stretchy! The interface keeps the fabric fairly stiff when you are trying to both pin it together and stitch it together as the cotton fabric is really, really flimsy. Again, a good sewing person (wanted to say sewer) wouldn’t have this problem but a novice like me did…
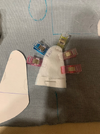
Fingers and tops are all made of nylon and stitched separately and later to the outer part of the gloves in their respective positions. If I did it again, I’d probably use glue on this step as overdoing it on the sewing of the nylon cuts is not good in terms of preventing the fabric from breaking down when the stitching is too close together as mine was (it has the effect of cutting the fabric like a dull knife so maybe use wider zig-zag stitches, not tight straight ones).
Keep the edge stitching very, very tight and close—close as you can, or use glue!
Probably the second easiest part—the thumb. The steps are to sew the nylon to the outside top of the outer fabric, then stitch the underpart over it. Once done, turn it right-side out and you get this. Repeat for the fingers and the other nylon parts…
Here is where the suck part starts. Stitch the finger edges to the part where the fingers come together—this is important because it defines the middle part and you just go up each side of the finger from there. This is the palm side of the glove.
There is a lot going on here! This is the edge. It helps to pin everything you don’t want to accidentally sew out of the way!
Almost half done. Fingers are about half formed…
Mounting the nylon fingers to the top outer side of the glove…
Keep the stitches close to the edge! On the right is that decorative bit towards the back of each finger. Each nylon finger is folded over in the back and sewn down ahead of time and then resewn to the glove itself.
This is what they look like before adding the top part, thumb, and stitching together…
Can never have enough fabric clamps… Stitch the thumb in a circle around the edges and turn inside out—I think…
Yes, inside out. Should look like that. Don’t mess that bit up!
Almost done. Next is the top part…
I think by this point I wisened up to the fact that glue is a good thing so these are both glued around the edges and decoratively sewed down the middle. Only the edges are sewn to the glove—the inner stitching is purely decorative (your results may vary…
The interfacing made this part way easier and more tolerable! My stitching looks like I am drunk but I’m just pretty bad at this!
Almost done. The interfacing will get cut/ripped out later (if you want to wear these on your actual hands)…
Finish closing the outer edge of the glove—by FAR the easiest part!
Turned right-side out. Jazz hands!
Isn’t that a daisy…
The original (and cannon) gloves call for a button clip on the inside and a short amount of fabric up the wrist (think the gloves Mickey Mouse or someone in a Broadway musical would wear). These are covered by the gauntlets so another one of my time and sanity-saving Manna-vations was to add these 100% spandex cuffs which work freaking awesome I must say as they hold the flight suit cuffs down reducing stress of putting the gauntlets on and keeps the amount of fabric in there from making them tighter than they already are…
See, you can’t even see the cuffs…
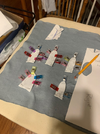
Sparingly doesn’t describe enough my approach to weathering these as I had one chance to screw them up completely and I did not want to take that chance so even though I only rubbed them with a bit of burnt amber acrylic cheapo Walmart paint, it still looks like I wiped my ass with them! I would think that the gloves would literally be the dirtiest, filthiest part of the costume (that was internal) but I opted to keep these pretty clean and look just dirty enough to not look clean (call it fear). The sticky things on the pointer finger and thumb are so I can use my iPhone. I got them on Amazon, like everything else (except the fabric which I got from Jo-Anns—I used to hate that store when I was a kid oddly enough!) They already have some damage on them from stretching and what not and I've had to add a few drops of super glue on the nylon to stop it from frilling up. Small price to pay I guess...
And there they are. Took about about as long as it did to make this tutorial as it did to sewing them together (thanks to the magic of prototyping, trial, and error). Hope ya’ll get some use out of this. I’m almost done…Armor and helmet are left (unless you count the shin tools…)
And yes, that is Tom Servo's hover skirt behind them...