You are using an out of date browser. It may not display this or other websites correctly.
You should upgrade or use an alternative browser.
You should upgrade or use an alternative browser.
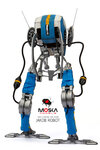
Scratch built “Jakob” robot, from Amazon series “Tales from the Loop”
really wonderful  !!!! I love that robot
Moska
Sr Member
Hi friends.
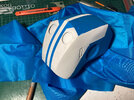
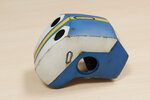
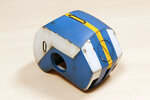
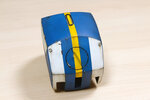
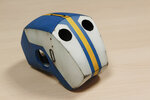
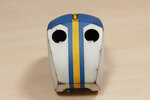
Currently I continue with the painting process. Yesterday I painted the blue areas of the robot's head and was very careful to get the color as close as possible to the blue color of the fabric that I used for the leg covers. The final color is a mix of 85% Vallejo Medium Blue and 15% White. I'm making the chipped paint effects by scraping the blue paint with a metal tool.
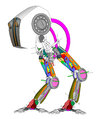
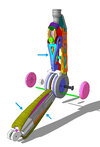
For this type of projects I use the 3D Google SketchUp application to help me. First I build all the pieces in that application and that helps me define their shapes, sizes and to see how they fit together. In this project, as it has so many joints, it was very useful to see how they connect with each other and how the movement of one affects the others.
Going back to the beginning of my project, I will tell you how I have made some of its most significant parts.
When I propose a scratch project, I always start by making a piece that seems to me to have some difficulty. If the result seems good to me, it serves as an incentive and encourages me to face the project with greater conviction and enthusiasm.
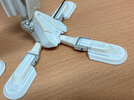
The first piece I made was one of the six fingers. In the images you can see that first finger with some metal parts that I finally replaced with plastic parts. My initial idea was to make a silicone mold to reproduce the six fingers in resin, but the truth is that this process is quite uncomfortable for me and, since I had plenty of time at that time because I was confined at home due to the pandemic, I finally decided make them all in plastic. I needed six fingers, but I did seven to be able to discard the one that seemed worse to me. The discarded finger was very useful for testing the paint and aging finishes before applying them to the model.
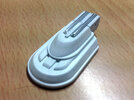
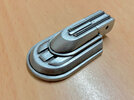
The phalanges of the fingers are thick pieces (4.5 mm) that have a specific curvature. To make them, I glued some strips of styrene (2 + 0.5 + 2 mm) and made a wooden template. The template forces the plastic to take that curvature and then I heat it in my kitchen oven so that that shape is permanently fixed.
I also used this process for other pieces that are marked with blue arrows in the following images.
I made the fork of the phalanges with 1 mm aluminum because those six joints support the weight of the entire model and it was necessary for them to be resistant.
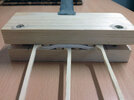
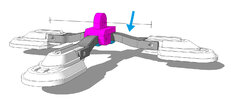
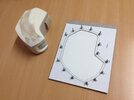
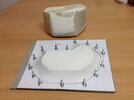
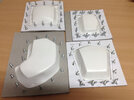
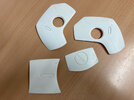
The head also has difficulty because all its faces are curved. First I made a solid head in wood and I was making continuous corrections trying to get the most exact shape. Once I was happy with the result, I made a frame for each side using a thick and fairly rigid cardboard, enough for a few uses. A 1.5 mm styrene sheet is inserted into these racks and heated in the oven until it is sufficiently soft. It is then removed from the oven and pressed onto the corresponding face of the wooden head. The plastic cools quickly and the shape and curvature of that face is captured.
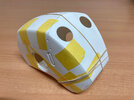
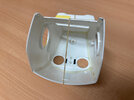
When I had all the faces of the head, I carefully cut the pieces and glued them together to get the final plastic head. The joints of these pieces are reinforced on the inside with a plastic rib to achieve a larger joint surface. In addition, I also applied a thick cord of epoxy resin adhesive on all the joints. The head was thus very strong and resistant.
This is all for now. I hope you like the project and that my explanations are useful to you.
Greetings.
Rafa
Currently I continue with the painting process. Yesterday I painted the blue areas of the robot's head and was very careful to get the color as close as possible to the blue color of the fabric that I used for the leg covers. The final color is a mix of 85% Vallejo Medium Blue and 15% White. I'm making the chipped paint effects by scraping the blue paint with a metal tool.

For this type of projects I use the 3D Google SketchUp application to help me. First I build all the pieces in that application and that helps me define their shapes, sizes and to see how they fit together. In this project, as it has so many joints, it was very useful to see how they connect with each other and how the movement of one affects the others.

Going back to the beginning of my project, I will tell you how I have made some of its most significant parts.
When I propose a scratch project, I always start by making a piece that seems to me to have some difficulty. If the result seems good to me, it serves as an incentive and encourages me to face the project with greater conviction and enthusiasm.
The first piece I made was one of the six fingers. In the images you can see that first finger with some metal parts that I finally replaced with plastic parts. My initial idea was to make a silicone mold to reproduce the six fingers in resin, but the truth is that this process is quite uncomfortable for me and, since I had plenty of time at that time because I was confined at home due to the pandemic, I finally decided make them all in plastic. I needed six fingers, but I did seven to be able to discard the one that seemed worse to me. The discarded finger was very useful for testing the paint and aging finishes before applying them to the model.


The phalanges of the fingers are thick pieces (4.5 mm) that have a specific curvature. To make them, I glued some strips of styrene (2 + 0.5 + 2 mm) and made a wooden template. The template forces the plastic to take that curvature and then I heat it in my kitchen oven so that that shape is permanently fixed.
I also used this process for other pieces that are marked with blue arrows in the following images.
I made the fork of the phalanges with 1 mm aluminum because those six joints support the weight of the entire model and it was necessary for them to be resistant.


The head also has difficulty because all its faces are curved. First I made a solid head in wood and I was making continuous corrections trying to get the most exact shape. Once I was happy with the result, I made a frame for each side using a thick and fairly rigid cardboard, enough for a few uses. A 1.5 mm styrene sheet is inserted into these racks and heated in the oven until it is sufficiently soft. It is then removed from the oven and pressed onto the corresponding face of the wooden head. The plastic cools quickly and the shape and curvature of that face is captured.
When I had all the faces of the head, I carefully cut the pieces and glued them together to get the final plastic head. The joints of these pieces are reinforced on the inside with a plastic rib to achieve a larger joint surface. In addition, I also applied a thick cord of epoxy resin adhesive on all the joints. The head was thus very strong and resistant.


This is all for now. I hope you like the project and that my explanations are useful to you.
Greetings.
Rafa
JNordgren42
Sr Member
I'll say it again. This is just absolutely phenomenal work. I can't wait to see the finished model.
Moska
Sr Member
Hello fellas.
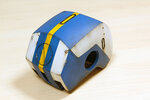
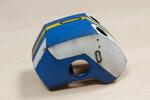
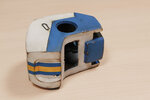
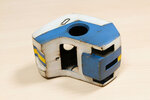
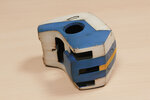
Today I finished the paint job on the robot's head. I have tried to copy the finish showing the actual prop.
In the next few days I will begin the final assembly, finally gluing all the pieces of that joint puzzle that is the body and the legs of the robot. Only when everything is glued will I really know what movement capacity I have achieved to be able to position it in different poses.
Wish me luck.
My best wishes.
Rafa


JNordgren42
Sr Member
Just beautiful. Your weathering is perfection.
Hagoth
Sr Member
Yeah, what he didn't say...No words man, no words


Moska
Sr Member
Hi friends.
Thank you very much for your kind comments.
The truth is that I consider myself a better builder than a painter. The construction process is comfortable and fun for me. I don't feel any pressure when I am building a model because I am confident that I can fix (almost) any mistake and can replace (almost) any broken part.
However, the painting process is something else. That is where it is decided whether the model is good or not. And it is not so easy to correct the errors. Also, despite my years of experience, I don't have a set procedure. I think that each model I have made has been painted in different ways. When the time comes to start painting I do what I think the model is asking me to do and this generates many doubts.
It need more dirt effects or have I applied too many? Is the rust the correct color? Are the weatering effects well distributed in all areas? etc etc…
It is a period in which I feel stressed and that even affects my character and my hours of sleep.
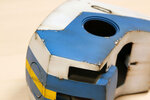
All that said, I think the paint finish on the robot's head has turned out fine. But, without a doubt, it can be improved.
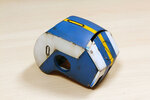
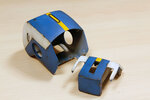
Going back to the construction process, I needed that, when the model was finished, to be able to access the interior of the head to change the battery or replace a blown led. I decided to make the back of the head detachable from the rest. With this, yes, I'am very satisfied because the good fit that I have achieved between the two parties. When the head is closed, the separation between the two pieces is hardly noticeable.
Cheers
Rafa



Hagoth
Sr Member
The removable panel construction looks great and with the two big screws looks the part of being removable. A very natural separation point. Imperfections in the fit (if any) just serve to sell the effect even more in my eyes.
I can identify with your feeling of being a better builder and designer than a painter and as for your paint job, it is far better than what I can do. If you like it that's all that counts. I showed your project pictures to my wife and her comment was "That is plastic? Looks like real metal" So at least to a casual observer I'd say the effect has been sold.
Nicely done.
JNordgren42
Sr Member
I 100% agree with this. I didn't even know that section was removable until Moska posted about it.The removable panel construction looks great and with the two big screws looks the part of being removable. A very natural separation point. Imperfections in the fit (if any) just serve to sell the effect even more in my eyes.
Moska
Sr Member
Hey Hagoth.I showed your project pictures to my wife and her comment was "That is plastic? Looks like real metal"
Tell your wife I'm sorry I tricked her eyes. But tell her also that she has made me very happy with her comment.
AnubisGuard
Master Member
It's the friendly AT-ST walker!
Ego Martini
New Member
Tails From the Loop is my favorite SciFi series - story elements reminiscent of Aesop's Fables and H.P. Lovecraft. When I finished watching "Home" I went on a search for "Tails From the Loop" + "Jakob robot figure" and that brought me here. Great detail on this model - very impressive! I hope this model will be offered for public purchase in the future. I'm sure that Amazon could get behind this project in a big way - it would be a brilliant bit of cross-promotion.
Similar threads
- Replies
- 11
- Views
- 1,247
- Replies
- 6
- Views
- 1,375
- Replies
- 32
- Views
- 3,402

