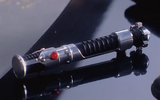
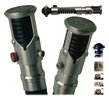
Limited Run Saberz.com Project O1 and Project Q (Obi-Wan and Qui-Gon TPM)

SaberZ O1 initial impressions:

Feels great in hand. Similar to what I remember the Orbital Machining feeling like from a weight and diameter standpoint, which is a good thing.

The finish machining-wise is a bit of a letdown. Many, many surface scratches and tooling marks on the raw aluminum parts, as well as the red button. Almost looks light a Scotch-Brite pad was taken to it in the worst way. It’s pretty unsightly. However, no sharp edges or anything like that you’d worry about cutting yourself on, which is good.

Something that grinds my gears a lot, and I will definitely need to have fixed is this weird enamel type back paint in between the cubes to break them up. It looks really sloppy and half-a**ed, whereas the Orbital version had individual cubes that were each held together with separated hex screws. I believe that SaberZ probably added this paint to each of them by hand personally before shipping them out. These black sections should’ve been neatly anodized the same way the other black parts were. It’s glossy and unevenly applied, whereas the other black parts are bead-blasted matte and neatly anodized. It makes the hand painted application obvious and an eyesore. Would’ve probably been better off using a Sharpe if I’m being honest.

I’m not one for judging install ease and haven’t had the chance to disassemble, so I’ll leave the experts to comment on that. However, the buttons feel nice when pushing them. The purple button is interesting though. It’s an anodized purple ball inside the brass knurled button, instead of a jewel-like piece that we’ve seen from other makers that allow shine-through. Not sure which of those two are accurate. Looks fine though on this one.

All in all, I like it, but the finish on the raw aluminum parts and the hastily painted portions in between the pommel cubes is pretty disappointing. Especially for the price tag.
 
Last edited:
SaberZ O1 initial impressions:

Feels great in hand. Similar to what I remember the Orbital Machining feeling like from a weight and diameter standpoint, which is a good thing.

The finish machining-wise is a bit of a letdown. Many, many surface scratches and tooling marks on the raw aluminum parts, as well as the red button. Almost looks light a Scotch-Brite pad was taken to it in the worst way. It’s pretty unsightly. However, no sharp edges or anything like that you’d worry about cutting yourself on, which is good.

Something that grinds my gears a lot, and I will definitely need to have fixed is this weird enamel type back paint in between the cubes to break them up. It looks really sloppy and half-a**ed, whereas the Orbital version had individual cubes that were each held together with separated hex screws. I believe that SaberZ probably added this paint to each of them by hand personally before shipping them out. These black sections should’ve been neatly anodized the same way the other black parts were. It’s glossy and unevenly applied, whereas the other black parts are bead-blasted matte and neatly anodized. It makes the hand painted application obvious and an eyesore. Would’ve probably been better off using a Sharpe if I’m being honest.

I’m not one for judging install ease and haven’t had the chance to disassemble, so I’ll leave the experts to comment on that. However, the buttons feel nice when pushing them. The purple button is interesting though. It’s an anodized purple ball inside the brass knurled button, instead of a jewel-like piece that we’ve seen from other makers that allow shine-through. Not sure which of those two are accurate. Looks fine though on this one.

All in all, I like it, but the finish on the raw aluminum parts and the hastily painted portions in between the pommel cubes is pretty disappointing. Especially for the price tag.
Hi Nick,

I'm very sorry to hear about your unhappy experience with the saber. We do have a production finishing step which is to go over the main body and shroud with 400-grit sandpaper to reduce the shine of the otherwise polished look of those pieces. This is consistent with the original prop, and that's why we put the step in. However, you shouldn't see tooling marks on any pieces, nor scratches on your red button. We saw this on one or two other early sabers out, and we have since put in a QC step to prevent it. Please email me or DM privately, so I can see what's going on with your particular hilt, and we will absolutely replace any defective parts.

Regarding assembly/installations, we did publish a video showing how the saber comes apart. And we will soon show off our plug-and-play chassis which is just as easy as the Project M chassis to install. You wire up your chassis, install your removable 18650 battery, and slide the entire thing into the Project O1 hilt. Boom. NOTHING needs to be installed in the hilt itself, just as with Project M. And you get the option of removing the battery or using a recharge port. First Obi TPM to do this, I believe.

Oh and one thing, just for everyone's knowledge ... our company is called "Saberz" which is pronounced "sabers." We are not SaberZ nor Saber Z, and not pronounced "Saber Zee." Just Saberz, pronounced "sabers" as in all our videos ;-)

Again Nick, I'm sorry for your trouble, and we will of course make it right if you reach out.
 
Last edited:
This is consistent with the original prop, and that's why we put the step in.
I'm curious if there are pictures of this? I was debating whether to weather mine a bit further this past weekend. But all I've seen are clean/burnished/polished hilts. Same with the Qui Gon saber.

Love my sabers, btw! Aside from the plastic saber toys from 1999, these are my first Qui Gon and Obi TPM sabers.
 
(EDIT - Sorry I misunderstood your question.) Yes you should be able to see sanding marks on both Obi’s and Qui-Gon’d TPM hilts if your source is high enough res. Nothing I can share though :)
 
Last edited:
2BA320D4-419C-4043-949A-F9665ED90DD3.jpegD588DABE-0FBE-41DC-B1F8-89D2EE0CBACF.jpeg20B7D14E-6E61-4D87-9995-C244C01985D3.jpeg6BE15BB2-7C8A-4D07-8741-66B03822B1C5.jpeg3612CF8E-F952-487B-9DE7-E2ECDD1807AE.jpeg74655A60-696C-47AE-97DD-A116E6F16D7E.jpeg0DAE0C89-A055-4DDA-97CA-6A70FCAE7B3C.jpeg30CB8E4F-178F-4C20-8A96-D17FE810B785.jpeg81C416BF-7CE3-4252-A2A5-F6C04512ACA6.jpeg763B9303-3396-4672-888B-1174CB2791B8.jpegDCD1A8EB-CDA5-473E-A6FB-06D791F6FA6D.jpeg29FC6CF9-5C44-4038-B4BA-2D8C055DCEA8.jpeg28807CC7-12E1-4CA7-AFB7-21C2F673A18D.jpeg74B1EE4B-0BBD-4596-B6F9-C68561D6819F.jpeg4F4C639F-3916-4506-9CFC-77B63B9836FD.jpeg7280D308-102F-4C02-8540-9CFFA9C0331E.jpegAFE0B9C6-3D0E-4720-8E5D-BA3BC5EFE053.jpegD272BA4A-C9C4-40AA-BCFE-C160C813E9FC.jpeg
 
Thanks for the pictures. Yes, to my eyes that generally looks like it’s supposed to. There is one tooling registration mark on your shroud that shouldn’t be there, it’s the very faint mark you showed in the fifth picture. If you’d like I can exchange that shroud for you. Again, please contact us (or reply to the email I already sent you) unless you don’t want to proceed with any kind of service.

The surface on the body and shroud you’re showing is accurate to the original prop. And that’s what we are selling - an ACCURATE replica. It was never a perfect polished piece. The first prototypes we had were perfect and polished. We put in this sanding step to make it more accurate. As to the purple hemi - it is also accurate the way it is. It is indeed an opaque part. It was never transparent on the original, nor was it a jewel of any kind. It was in fact a purple metal rivet on the original prop.

I’m not seeing noticeable scratches on your red button but maybe I’m missing something? I can still exchange it if you like. Not a problem. Or not, if you just wanted to post pictures and tell folks you aren’t happy. That’s entirely your prerogative. But please let me know if I can do something. I’m trying to be responsive but I’m not hearing back from you so I don’t know what you want.
 
I never wanted or expected a “mirror” finish, but the finish I received is not in line with what is seen on the Hero prop in my opinion.

The TPM version clearly has a subtle, light polish along with a brushed finish (brushed, not scratched with sandpaper) if you look at this 4K still from the end of the movie before Maul kicks it down the shaft on Naboo. There's a lot of reflection on the surface.

Accuracy notwithstanding, the other imperfections and lack of care when using this sandpaper to get us this end result is obvious. Many stray scratches, unevenness, tooling marks, etc.

I don’t feel like the advertised product is what I received. I never gripe about this kind of stuff, but when this is hyped to be the "best, most accurate" TPM Obi-Wan hilt ever created and corners appear to have been cut, criticism is warranted. If this hilt was $300 and not $600, I would understand the less than subpar finishing and compromises that were taken.

It’s a shame, because otherwise, the hilt feels great and would’ve been a keeper. I will have to commission someone to right these wrongs, costing me more money and time.

I would be happy if I could receive a replacement that hasn't been sanded down, but I'm assuming they've all been finished this way?

VideoScreenshot--DisneyPlus-StarWarsThePhantomMenaceEpisodeI-122’15” 2.jpg
 
Last edited:
In my opinion the hero prop was polished at one point during filming, then dulled over time from handling and abuse.

Polished:
F96CE1BB-D580-4098-9CD8-9E1371535C22.png

Dull:
F06F2941-C066-4BC8-A2E5-693633E160D9.jpeg

From the high res reference photos of the hero prop, the finish in the “dull” state is very consistent with a light pass of steel wool or scotch brite on as-machined aluminum. In fact you can still see some of the deeper machining marks, and even some indicator marks left by the original machinist to mark where certain features go.

My theory is it was used as machined for a while. Then either because it was in need of TLC or just because they needed a close up shot, it was polished. Then, again over time it was worn dull again.

My personal SaberZ hilt is about as close as one could expect to get from something newly manufactured trying to replicate metal patina on something that was clearly handled a lot.
 
Personally I'm a fan of the overall finish of the saber. Everyone is entitled to their opinion but I was never fond of the finish I've seen on any of the other EP1 Obi Wan hilts... They always seemed too shiny to me, even the non polished chrome looking ones. The finish on the products I got matched what I saw in preview images imo and that look was a big reason for me buying them. I will say that looking closely I do see the registration mark mentioned in the 5 image, both in that position(In line with the cutout to the right of the gold button) and below the cutout in between both buttons, however they are both barley noticeable (Less than in the picture), only visible on close very inspection and hard to even photograph.

I will agree that the black paint in between the cubes on the pommel is a bit of a disappointment as it stands out because it is shiny and looks somewhat hastily applied. It's something I will mask off and repaint myself when installing the chassis. Its not a big deal but a little bit of a blemish on something I am otherwise extremely pleased with.
 
Last edited:

Yikes, that looks awful. That's just not the proper way to do brushing on aluminum – the looks like it was done hastily with a low-grit sandpaper, instead of slowly with something gentle like Scotch-Brite.

I also have to agree with one of the above posts that it doesn't look like the the hero prop on screen actually had this finish. Even if it did at some point during (pre?)production, it doesn't seem correct for what made it on film.
 
Hey guys.

Look, I’ll be honest. I thought the finish was really good and accurate to what I’ve seen. And the early reactions I got were the same - most customers said they love everything, specifically including the finish. I am surprised that some of you are this aggravated. But I don’t want you to be unhappy. I want to make it right.

Anyone who has received an O1 and is unhappy with some aspect of the finish, please email support@saberz.com and tell me what finish you would prefer. I’ll send you a fully polished one without the sanding step if you like. Alternatively, we are looking to rework the current sanding process as well so that it’s more uniform. If you want to wait for that, I’ll send you that instead. We are working to change the cube rings to anodized ones. If you want to exchange yours, let me know. Or if you hate the saber and want it gone, I’ll buy it back from you.

But if you’d like a remedy, please EMAIL us, so I can create a list of what we need to do. I appreciate you all want to voice your opinions in public, but if you’d like a new part, please email so I can help you.

And Nick, if you just want to call us SaberZ as an insult, I guess that’s your prerogative too. I’m trying to do right here, but if you’d rather just sound off in public that’s also your choice. You don’t have to email me or respond to my emails. Best wishes.
 
Last edited:
I would be happy if I could receive a replacement that hasn't been sanded down, but I'm assuming they've all been finished this way?
You can. We can make this happen for you. Again, please contact us privately, or respond to the email I’ve already sent you. Unless you’d prefer to not have a remedy.
 
Saberz, is it possible to order the hilt with the same finish as it is seen on screen?
In my opinion, the finish on screen is the same dulled finish, and the hilt never had a shiny polished finish. When lit with studio lights, then processed with color timing and adjustments, things can look much shinier than they really are. Think of the abs in finished film 300 versus the behind the scenes footage of the actors. This is especially true for metallic objects. Or even plastic objects painted silver.

But if you’d like a polished hilt without any sanding, yes we can make that happen. Please contact us privately.
 
Last edited:
And Nick, if you just want to call us SaberZ as an insult, I guess that’s your prerogative too.

… Never meant to insult you by capitalizing the “Z” in your name. I honestly thought that’s how it was supposed to be spelled and didn’t do it after you corrected me either.

I’ll be replying to your email at some point today once I decide what I’d like to with my saber.

Thanks.
 
We are working to change the cube rings to anodized ones. If you want to exchange yours, let me know.

I certainly appreciate the offer but personally am happy to apply paint myself. As I said it isn't a big deal but I felt that while I offered my positive opinion of the overall finish, it would be disingenuous to ignore this small issue that was brought up. I eagerly await news of the chassis:)
 
Thanks!

Personally, I prefer my cube ring with painted black rather than anodized black sections. Why? Well, when you have a part that's got two colors, only one of them can be anodized. So if we want the black sections anodized, then the silver sections need to be bare alloy, without the benefit of protective clear anodizing. So I'd prefer to have all the cubes clear anodized, then the mid sections painted. That's why we went that route. But I'm happy to repaint anyone's cubes, personally, if they want to send them back to me.

Funny enough, that Nick Cline said it must have been my bad painting in the first place. I do actually paint all the Project M hilts personally, which folks have generally liked. I did not paint the cube rings. But I will for anyone who dislikes theirs.
 

Your message may be considered spam for the following reasons:

If you wish to reply despite these issues, check the box below before replying.
Be aware that malicious compliance may result in more severe penalties.
Back
Top