Round2 Producing a 1/350 Star Trek TMP K'Tinga

I received a test shot, but that's all so far. TBH, I was blown away by the sharpness and quality of the detail and molding. After being disappointed by so many other Trek kits, I'd kept my expectations rather low. But, I feel this could be the finest Star Trek model kit ever produced! Regarding accuracy of shapes and proportions, as well as attention to detail, it's likely one of the most authentic attempts ever by a plastic model kit company to faithfully reproduce a filming miniature.

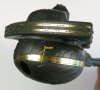
Some of the details that go on the front "bulkhead" of the main body have been necessarily simplified. They tried to make up for this by producing some of these same details using folded photo-etched brass. While I haven't yet gotten the photo-etch add-ons, I can see from photos that they were made a bit too thick. They did this to make it easier to fold the etched brass to make 3D parts for the main body. But, doing this compromised the parts they made for the front of the ship as those needed to be much thinner. As a result, adding the etched window strips to the "bulb" and "Cobra head" creates a raised "stripe" around the windows that's supposed to be painted on. It's a compromise.

I wonder if keeping the original plastic for the head and using dental acrylic to fill in the windows might be more accurate than the photo etch for that area?

Guess I'll find out soon enough :)

Jedi Dade
 
They attempted to punch out the windows. I applaud the attempt. But, because of the limitations of the injection molding process, it wasn't very practical. The "bulb" is curved and injection molding does not allow for undercuts. Thus, the edges of the cutouts all have bevels. This means the back side of each window is even smaller than the front. You will need to carefully cut them all out. Due to the tiny size, this will not be easy!

BTW, because of these limitations I suggested they make the front of the Cobra head flat and thin so it could wrapped around the front edge. They tried this and it appears to work nicely. But, all the windows still need to be opened up a bit. It's that beveled edges compromise again. Such "draft" on all the edges is required when making these kinds of parts.
 
Given the kind of surgery many of us have performed on earlier Trek kits, figuring out the windows seems like a relatively doable challenge.
 
Oh - not afraid of the cutting... just want the end result fo the cutting to be more accurate than when I started cutting. If the PE result s in a raised edge instead of a recessed on I might just consider opening up the back side of the styrene windows instead and cleaning them up with files... and possibly dental acrylic to finish it off... make sense?

Jedi Dade
 
Actually, that might work! Unfortunately, the photo etch doesn't line up with the joint where the window parts meet the rest of the bulb. Instead, they put the seams farther up (and farther down), directly under (and over) the edges of the large plates that adorn that area. I wish they had cut it instead right at the edge of the "stripes" that cover the windows.

At any rate, if you sand the plastic window sections down a full .01 inch, you could then apply the brass parts and fill in the remaining gaps (top and bottom) with some 010 styrene strip. This would cause the brass parts to become flush with the rest of the bulb. You could also pre-paint the brass parts and then mask off that section when painting the rest of the bulb.
 

Attachments

  • Bulb_PE_seamlines.jpg
    Bulb_PE_seamlines.jpg
    105.6 KB · Views: 231
It seems the kinda poked the pooch on that one.

Comparatively, a non issue.
 
Last edited:
My package just arrived.

They give you what appears to be an extra copy of part #103, the clear part that goes behind the grill on the hanger/impulse deck.

As shown in the videos the same piece comes in red with the lighting kit.
 
Congratulations on the new kit. I'm still waiting for the call from my LHS that they have received my copy.
 
This thread is more than 5 years old.

Your message may be considered spam for the following reasons:

  1. This thread hasn't been active in some time. A new post in this thread might not contribute constructively to this discussion after so long.
If you wish to reply despite these issues, check the box below before replying.
Be aware that malicious compliance may result in more severe penalties.
Back
Top