You are using an out of date browser. It may not display this or other websites correctly.
You should upgrade or use an alternative browser.
You should upgrade or use an alternative browser.
ROTJ - Darth Vader lightsaber from a real Graflex
- Thread starter Lichtbringer
- Start date
Sym-Cha
Master Member
In this thread (post #354) you'll find the template for the smaller holes in the rear tube :
http://www.therpf.com/f9/more-details-vader-rotj-saber-please-archive-165/index15.html
And I'm afraid to mention this but also the MPP ROTJ has a diamond knurled top-screw in the shroud :

Whereas these did not come standard with any MPP as far as my knowledge goes.
-Chaim
http://www.therpf.com/f9/more-details-vader-rotj-saber-please-archive-165/index15.html
And I'm afraid to mention this but also the MPP ROTJ has a diamond knurled top-screw in the shroud :
Whereas these did not come standard with any MPP as far as my knowledge goes.
-Chaim
Lichtbringer
Master Member
Thanks, Markus. ")
Yeah, after making the scope for the palace guard blaster i felt the need to do something different. And as i had these parts prepared and ready to go since a long time, i couldn´t keep my hands of when the Graflex arrived. :cool
I´ve also started working on the simrad, but that is another story. :love
Just wanted to make something for my own collection, for staying on track.
The templates i used are the only version i´ve ever seen, iirr they are from Kennys site - no idea if there are any newer or more accurate ones out there.
For the small holes i plan to use the pic that Chaim posted,

counterchecked with this one (also from that thread):

But not on this lower cell - for the drilled version i will use a not that nice one (which i first have to find :confused).
Yeah, after making the scope for the palace guard blaster i felt the need to do something different. And as i had these parts prepared and ready to go since a long time, i couldn´t keep my hands of when the Graflex arrived. :cool
I´ve also started working on the simrad, but that is another story. :love
Just wanted to make something for my own collection, for staying on track.
The templates i used are the only version i´ve ever seen, iirr they are from Kennys site - no idea if there are any newer or more accurate ones out there.
For the small holes i plan to use the pic that Chaim posted,
counterchecked with this one (also from that thread):
But not on this lower cell - for the drilled version i will use a not that nice one (which i first have to find :confused).
Lichtbringer
Master Member
That really is a great quality Graflex, you don't see many like that! Looking good
Thanks, äääääh, which one? The ANH-Luke, or the ROTJ-Vader?
Lichtbringer
Master Member
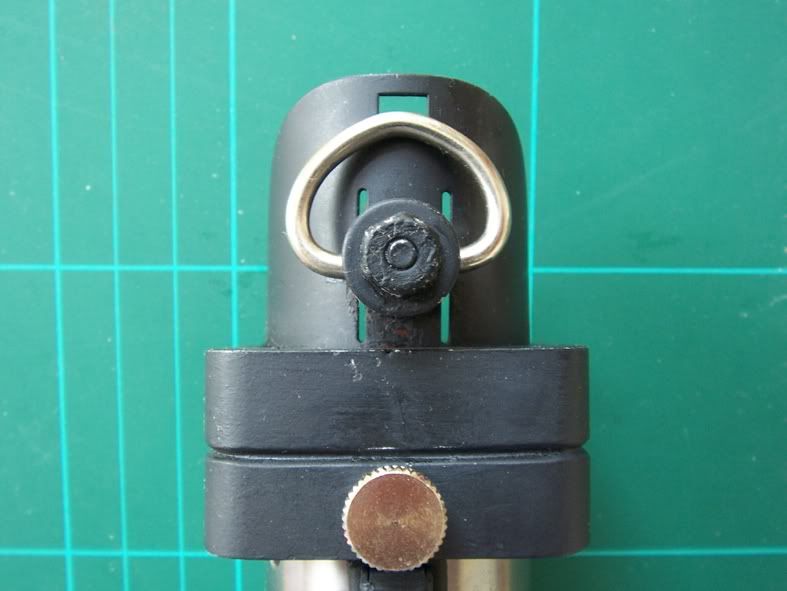
And a little progress .....
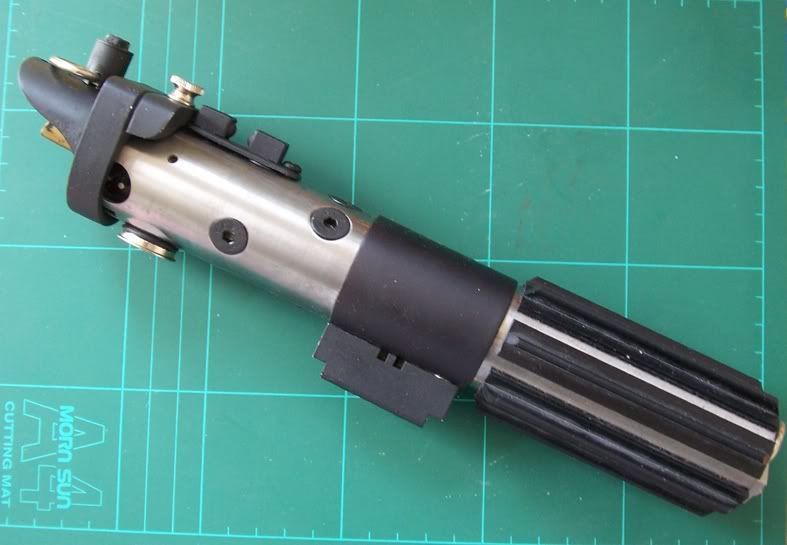
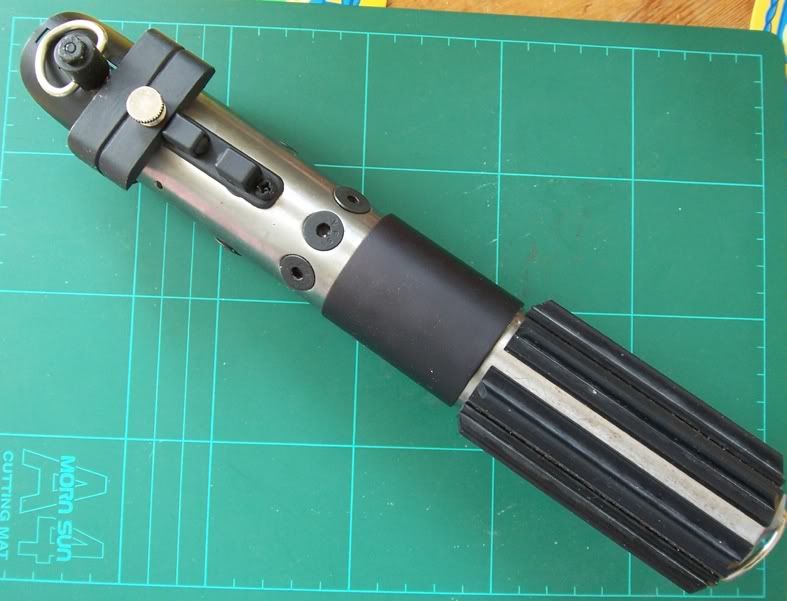
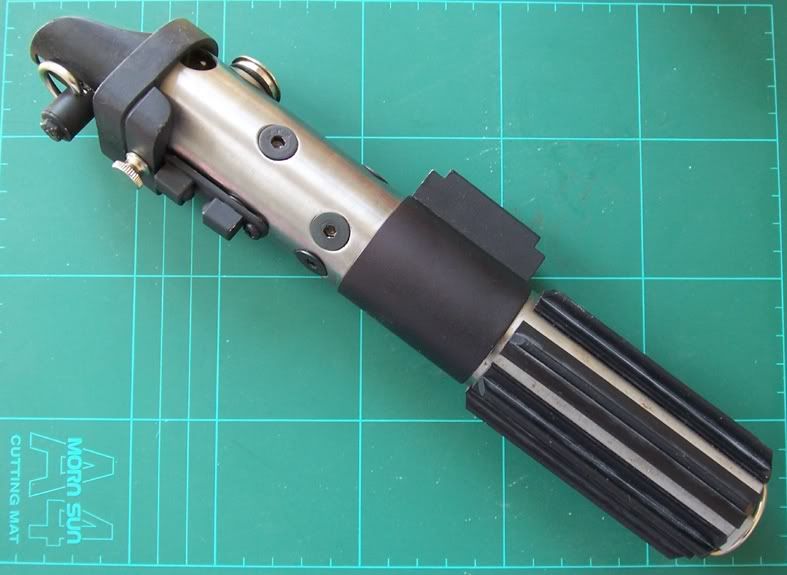
The button to replace the glasseye that was included in my set of parts ..... was not as accurate/nice as i would have liked it. Looks like a part to assemble furniture. I assume the set was collected before every detail was discussed here.
So i made my own part. Starting with the recall of the pics i´ve seen from made parts that screw in the glasseyes hole-threading, i made the hole/thread in the center

rewatching the real part pics reminds me that the original part was not in the center, more to the top.
So i turned the new part with a off center thread. That way it will be screwed into the center and still be visible as off center to the top.

And compared to the part that was included in the set


And this is the way it looks now, mounted to the saber

Wow, the macros are bad looking :eek - it doesn´t look that beaten in real

The button to replace the glasseye that was included in my set of parts ..... was not as accurate/nice as i would have liked it. Looks like a part to assemble furniture. I assume the set was collected before every detail was discussed here.
So i made my own part. Starting with the recall of the pics i´ve seen from made parts that screw in the glasseyes hole-threading, i made the hole/thread in the center
rewatching the real part pics reminds me that the original part was not in the center, more to the top.
So i turned the new part with a off center thread. That way it will be screwed into the center and still be visible as off center to the top.
And compared to the part that was included in the set
And this is the way it looks now, mounted to the saber
Wow, the macros are bad looking :eek - it doesn´t look that beaten in real
Hey Michael
I felt inspired to dust off my own DV saber kit and started my V.2 build :thumbsup
I checked my HDD and I only found the "REFLEX" templates (sanitized/ unsanitized).
But these are not absolutely accurate reg. the hole placement...IMHO for the bolt, that goes under the catch is way off.
Plus the hole for the bolt on the underside of the Graflex ("in line" with the control box) is too far to the right as well.
What do you think?
Markus
Last edited:
Lichtbringer
Master Member
Hey Michael
I felt inspired to dust off my own DV saber kit and started my V.2 build :thumbsup
Great, but don´t blame it on me. :cool
I checked my HDD and I only found the "REFLEX" templates (sanitized/ unsanitized).
But these are not absolutely accurate reg. the hole placement...IMHO for the bolt, that goes under the catch is way off.
Plus the hole for the bolt on the underside of the Graflex ("in line" with the control box) is too far to the right as well.
What do you think?
Markus
As mentioned at the beginning ..... i´m no saberguy. So i don´t expect my build as accurate as some of the more saber-related pals here would have made it.
But - i used the unsanitized template from Ob1kennys site, and when i compare the MOM pics with my build (hold in the same direction), they seem to be pretty accurate. Depending on angles and distortion it looks on some pics as if a bolt/hole could be moved 1-2 mm in one direction, on the next pic it looks as if the bolt/hole could be moved 1-2 mm in the other direction - on balance it seems to look good.
Sym-Cha
Master Member
Here's the template which shows the MoM version :

This is my first purchased DV ROTJ ligtsaber made by GraflexReborn #GR0031:
And some details :

Not really screen accurate since it's not made of a real graflex and thus lacks certain of the original graflex details, acceptable though
My graflex based DV ROTJ lightsaber is yet another work in progress,
some kit parts are not screen accurate. Still looking for the exact same
replacements parts as seen below :
-Chaim
This is my first purchased DV ROTJ ligtsaber made by GraflexReborn #GR0031:
And some details :
Not really screen accurate since it's not made of a real graflex and thus lacks certain of the original graflex details, acceptable though
My graflex based DV ROTJ lightsaber is yet another work in progress,
some kit parts are not screen accurate. Still looking for the exact same
replacements parts as seen below :
-Chaim
Lichtbringer
Master Member
Here's the template which shows the MoM version :
-Chaim
Aye, that´s the one i used.
Lichtbringer
Master Member
I think i can say "I´m on track". :lol

From left to right: for Bobas ROTJ EE-3, for a E-11, the cutoff sfrom my ANH-Luke, the new batch for 4 sets of lightsaber handles (this ROTJ-Vader, the ESB-Luke, my ANH-Vader, .....).
As the lower part of the MOM Vader was build on a predrilled cell, i decided to use my lower cell to build it up as the wampa cave saber first, also due to it´s great condition. That way i can use it now for the Vader, and later for the Luke ESB.
Started with cutting and notching the ESB grips

Drilling the bigger hole in the notch, and the small in the front

All drilled

With inserted M2 bolt - i will try to find some black ones.

And prepared with small pieces of double sided sticky tape, to arrange them for drilling the body.

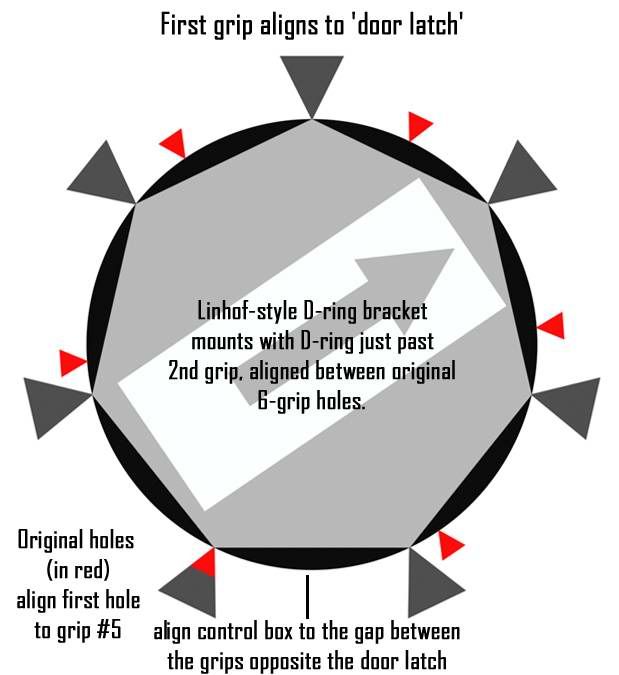
Marking the tube - with this roundtable you can mark/drill/mill a place, then rotate it with turning the handle to every wished degree (360° divided by six grips = 60° for each marking, later for 7 grips = 51,42°)

And with the temporary assembled t-track

Done:

Adding a Kobold clamp with sticky tape for marking the bottom

And drilled again some ugly holes in the nice Graflex lower cell :cry

Now it is in a condition that this great vintage piece can immediatly be used for the Luke ESB.
From left to right: for Bobas ROTJ EE-3, for a E-11, the cutoff sfrom my ANH-Luke, the new batch for 4 sets of lightsaber handles (this ROTJ-Vader, the ESB-Luke, my ANH-Vader, .....).
As the lower part of the MOM Vader was build on a predrilled cell, i decided to use my lower cell to build it up as the wampa cave saber first, also due to it´s great condition. That way i can use it now for the Vader, and later for the Luke ESB.
Started with cutting and notching the ESB grips
Drilling the bigger hole in the notch, and the small in the front
All drilled
With inserted M2 bolt - i will try to find some black ones.
And prepared with small pieces of double sided sticky tape, to arrange them for drilling the body.
Marking the tube - with this roundtable you can mark/drill/mill a place, then rotate it with turning the handle to every wished degree (360° divided by six grips = 60° for each marking, later for 7 grips = 51,42°)
And with the temporary assembled t-track
Done:
Adding a Kobold clamp with sticky tape for marking the bottom
And drilled again some ugly holes in the nice Graflex lower cell :cry
Now it is in a condition that this great vintage piece can immediatly be used for the Luke ESB.
Last edited:


Lichtbringer
Master Member
I always enjoy following your build threads, and this one is no exception.
The saber is coming together beautifully.
Great work as always. :thumbsup
Thanks. I always hope to write not to boring for any potential readers.
Lichtbringer
Master Member
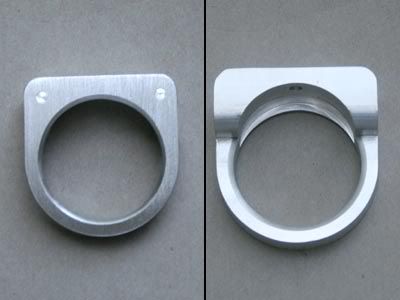
I think the part that goes at the bottom where the glass eye was should be a Scuba part if I'm not mistaken? I believe it comes off a regulator.
Maybe, yeah. It looks good - the other thing i´ve read was it could be a part of a tire valve. Some of them look also close to your part, and the function may be also close?
Lichtbringer
Master Member
I also found this in my parts box but I have no idea where I got it....
Thanks for making me feeling bad and beeing envious. :cry
If you find doubles of these parts in your boxes ....... shoot me a line/pm/ email/fax/telex ...... :love
Lichtbringer
Master Member
After taking the ESB-grips off, i started cutting the needed set of grips for the ROTJ Vader

Milling them flat and to the correct length

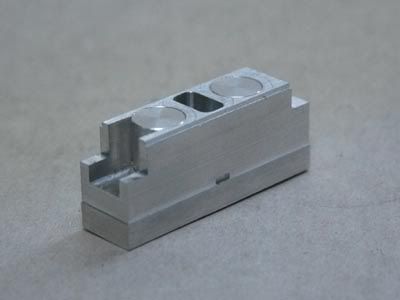
After that i decided to make the clamp part much sturdier as just the bolts through the thin clamp. I turned a plug


It has a press fit in the end of both cell-halves - and it was drilled and tapped for the clamp bolts.

And while i had the POM/Delrin mess on/around the lathe, i also made a plug for the end of the lover cell from a small offcut, also a press fit to avoid any rattle. It has a milled slot to have room for the d-ring rivets, and a threading to pull it out if needed. It´s purpose is to provide the material for a safe hold of the philipshead bolts.

Here it is pressed on it´s place, with the reinserted spring

Some other offcuts from alu and brass were tested in the tube to give the saber a realistic and well balanced weight

First assembling to feel it´s balance

Milling them flat and to the correct length
After that i decided to make the clamp part much sturdier as just the bolts through the thin clamp. I turned a plug
It has a press fit in the end of both cell-halves - and it was drilled and tapped for the clamp bolts.
And while i had the POM/Delrin mess on/around the lathe, i also made a plug for the end of the lover cell from a small offcut, also a press fit to avoid any rattle. It has a milled slot to have room for the d-ring rivets, and a threading to pull it out if needed. It´s purpose is to provide the material for a safe hold of the philipshead bolts.
Here it is pressed on it´s place, with the reinserted spring
Some other offcuts from alu and brass were tested in the tube to give the saber a realistic and well balanced weight
First assembling to feel it´s balance
Similar threads
- Replies
- 7
- Views
- 1,458
- Replies
- 43
- Views
- 3,685