Rogue One Imperial Ground Crew WIP

I Athena I

Active Member
RPF PREMIUM MEMBER
Hello all! I (along with my dad) are starting work on my first 501st costume, an Imperial Ground Crew from Rogue One. For those of you who don't know this costume is Jyn Erso's disguise from Rogue One. I wanted to start this thread, to share my build but also to share any of this costume's information that I have had to search for, there are threads about this costume but not many. We've done a lot of research, so here goes!
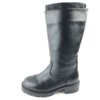
Here are a few Screenshots, followed by the costume's display, and the visual dictionary:
 

Attachments

  • Jyn Erso Wallpaper  copy 2.jpg
    Jyn Erso Wallpaper copy 2.jpg
    78.8 KB · Views: 335
  • 1.jpeg
    1.jpeg
    174.3 KB · Views: 527
  • CyjrPD8UsAAO7qT-1.jpg
    CyjrPD8UsAAO7qT-1.jpg
    319.3 KB · Views: 1,991
  • Kent_Deezling.png
    Kent_Deezling.png
    698.8 KB · Views: 484
To start here is where we got a few things, and this is the link to the CRL.

We found out a lot of info on the Imperial Gunners Forum, and also in particular Jen (who is pictured in the CRL screen name on Imperial Gunners, jen0farc)

In the order of the CRL:
The helmet is still a work in progress we have one from 850 Armour Works on Etsy, and we have one coming overseas that is poured out of resin. Just waiting to see both before we decide which one.

The suit was purchased at Fighter Pilot Black flightsuit Star Wars Imperial Tie uniform jumpsuit - Skycostume. It is a tie fighter suit with HEAVY modifications (see future post)

The Imperial Cog patches were purchased at https://www.endorfinders.com/costume-accessories/rogue-one-35-pvc-patch. Per the CRL they should be, but it is not required, rubber.

The Chest Armour/ Backpack was purchased in the junkyard but it is Jawachopshop's armor on Facebook Jawachopshop.
Unfortunately from what I hear they are no longer making anything anymore, that could be wrong. But 850 Armour Works on Etsy makes it too Weapons, helmets, and armor for our galaxy by 850ArmorWorks.
See future post for finished photos.


Blue acrylic piece for the Chest Armor. The prop house cut it with their CNC Laser. https://www.amazon.com/gp/product/B07N7B5VRR/ref=ppx_yo_dt_b_asin_title_o03_s00?ie=UTF8&psc=1

TIE Greeblies were purchased from Elvis Trooper Home of The Elvis Trooper Obi1kenny.

Side Buckles on Etsy Death Trooper / Shore Trooper hard rubber shoulder straps and buckles.

Batons were purchased with the Jawachopshop Armor on the junkyard, we are not sure where they came from, and we had them finished at the prop house my dad uses for his TV show. (He is a property master)
 
Last edited:
The Gloves were also on Endor Finders https://www.endorfinders.com/costume-accessories/rogue-one-trooper-gloves.

The Knee Pads that I got is this set: Destroyer G/Series Grom Pack Kids Skate Pad Set Black Knee/Elbow/Wrist on eBay New Set Destroyer G/Series Grom Pack Kids Skate Pad Set Black Knee/Elbow/Wrist 885525801895 | eBay. I used the elbow pads, because I'm so little they fit perfect.

The Boots that I got are LL Bean Black Leather Boots on eBay LL Bean Women Leather Mid Calf Winter Boot Lined Black Size 6.5 Canada | eBay.

The Belt is Anovos' Imperial Officer Belt STAR WARS™ Imperial Officer Belt and Buckle Accessory - ANOVOS Productions LLC

The Belt Boxes are from Esty Rogue One / Solo Era Imperial Belt Boxes.

The Communications Pad is from ShapeWays Ground Crew Commpad Lens by mattnelson521 on Shapeways.

The Lenses on the Communications Pad are here in Blue https://www.newark.com/eao/51-933-6/lens-round-blue/dp/86H7347. The problem is we can't find the blue anywhere! They are all sold out unless you want to buy a pack of.... I can't remember but its alot. Here is the Red on Amazon EAO 51-933.2 LENS, ROUND, RED (1 piece) - Electronic Components - Amazon.com.

And that should do it for this round next I'll post the details on the flight suit.


~I Athena I
 

Attachments

  • s-l1600.jpg
    s-l1600.jpg
    188.5 KB · Views: 257
Last edited:
The Suit:

First off The CRL states that the suit is a charcoal gray, but I would debate that heavily. They went off of the display of the costume which is not what she wore in the movie, there are quite a few differences between the display and screenshots from the movie, plus the room the costume was in was dark and there was a spotlight on it so of course in photos it will look a little on the gray side. The display is good for some details its not good to figure the color. I have watched the movie so many times and to me its black. Even the visual dictionary is black (I am aware that's doesn't count for much because its not a shot from the movie but still). All that being said I do agree it would look good faded slightly, so that it doesn't look new, we are fading it a tiny bit in the sun.

Anyway, here is what I did for the suit there is quite a bit to do on it luckily my grandmother was in town and she has been sewing her whole life! I didn't have to go at it alone, phew. Here is the suit before:
1026734


And this is what has to be removed, 2 Cog Patches, 2 pockets one on either arm, and all four pockets on legs.
1026735


So that's what I started with to remove. Next I'll show you the Stitches going down the center, per the CRL there should be 8 rows of topstitching on either side of the zipper so that's what I did. I went to Hobby Lobby and got some lightweight black fabric so that I could make a panel one the suit rather than sewing directly to the suit (this gives it a better look, and its way easier to do without taking the whole suit apart). I also found this image on the RPF from another member which helped.
1026736


So here is what the two panels looked like on the sewing machine so you can get an idea of spacing. I used gray upholstery thread to make the stitching stand out a bit more. Because of using upholstery thread, in order for it to sew properly I needed the fabric to be thicker so I doubled up on the fabric.
1026737
1026740


Next I sewed it to the suit with black thread stopping before the elastic band and starting after the elastic band. Note: When I took off the pockets on the thigh I had to open the seam which came in handy when sewing on the panels.

1026750
1026751


1026752


As you can see in the pictures above in the inner thigh area there is no stitching, but since you can't see it very well instead of trying to complicate it with the panel I just sewed some more topstitching.

1026753


And here is what I did for the bottom of the suit and where it meet the collar at the top. For the bottom I just folded it under (you won't see it, it will be tucked in). And the top I folded it under and hand tacked it.

1026754

1026755
1026756


Next The Communications Pad window I did end up having to take it off, then I ripped out all of the seems and I used some leftover panel fabric to make the outline of the window, its hard to explain see pictures. And then I did the topstitching.
1026761
1026762


It didn't fit absolutely perfect but once the Comm Pad is painted we'll just use some top stick and it will be just fine!
1026763


Next is the pocket that's on the same side, here is a reference photo followed by the finished pocket.
1026778
1026779


1026780


Next is the topstitching and the imperial cogs, there's some on the hand cuffs, on top of the shoulders, around the armpit area, down the back seam of the arm, down the back seam in the butt area, down the outside of the leg, and some topstitching on the back of the suit. There is another seam per the Hot Toys doll across the back, but I don't think you'll see it with my backpack on, I'm still going to put it on just haven't done it yet. To attach the cogs I tacked them first the sewed them on with machine.

1026766
1026771
1026769


1026770
1026772


Next there are these angled panels on the chest, I am small so you won't see them when the chest piece is on but I put the top part of them on anyway. They are not perfect but.... The first picture is of the visual dictionary.

1026773
1026775


The other thing I have to look at is the collar, but from what I can tell once my helmet is on you won't see it.

1026781


That should do it until I do another test fit with the armor.

1026782
1026783


~I Athena I
 

Attachments

  • IMG_6618.jpeg
    IMG_6618.jpeg
    1.5 MB · Views: 281
Last edited:
Next The Armour, the Batons, and the communications pad. The Batons were professionally finished at a prop house here in California, and the armor my dad finished. The foam is not attached in the armor yet those pictures coming soon.

1028079
1028080
1028081


1028082
1028083


1028087
1028084


1028086
1028088


Foam used:

1028089


Communications Pad:

1028091


~ I Athena I
 
This is one of my favorite Star Wars movies so...


1028672


I think to get more info I would try to contact Lucasfilms. Have you tried the visual dictionary that DK Books comes out with for every Star Wars movie? I think they would have some information in there.
 
Next some more progress on the backpack and chest piece.

1028755
1028756
1028757


1028758
1028760


1028759
1028761
1028762


1028763


Foam/ shoulder straps has been added, and the batons are attached. The batons are screwed in, my dad installed magnets etc. but we were worried that during trooping someone would pull them off, so he just screwed them on. As you can see from the next photo there is lighting on the backpack and on the chest piece, so that will be added next.

1028764
1028765


~ I Athena I
 
Last edited:
And here is the Anovos belt with the belt boxes attached, when we purchased it they only had XL so it still needs to be sized.
1028766
1028767


~ I Athena I
 
The lighting for the armor arrived, dad did a test tonight. It doesn't show up great lit up in the lighting we had, but it looks great in person!
1029279
1029280
1029281


~ I Athena I
 
Last edited:
I am Having a great time building this with my Daughter, her first 501st costume very excited!!! And nice that she sews, that jump suit was a pain for her but it came out great, we'll do a test fit this weekend, still waiting on 3 different helmets to get here, hoping one works....Thanks for all the kind words!!
AL
 
Lighting is installed in the armor, but we can't get the camera to capture it properly when its lit up. But trust me the color is great! Here are some photos of it not lit up.

1029566
1029568


1029569
1029570


We are going to do a test fit tomorrow!


~ I Athena I
 

Attachments

  • IMG_6609.jpeg
    IMG_6609.jpeg
    1.6 MB · Views: 235
Last edited:
This thread is more than 4 years old.

Your message may be considered spam for the following reasons:

  1. This thread hasn't been active in some time. A new post in this thread might not contribute constructively to this discussion after so long.
If you wish to reply despite these issues, check the box below before replying.
Be aware that malicious compliance may result in more severe penalties.
Back
Top