Rogue One Death Star Datatape Cartridge - Round two!

Aditrap

Active Member
Creating a new thread since I think the old progress one was deleted in the lost land of 2020.

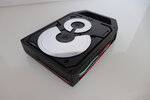
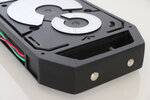
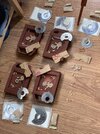
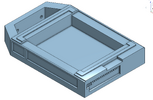
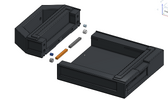
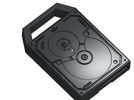
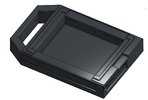
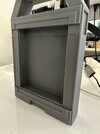
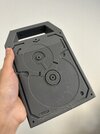
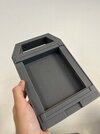
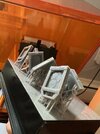
I made this one in 2020 using Birdie's design and master chassis, but since the first run I haven't been able to work on much. However, I’ve recently been able to access some new tools and been wanting to practice design so I think this might be a project I want to work on again. I don't trust myself to start the revamp in a timely fashion so posting a progress threat to hold myself accountable, lol.

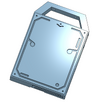
A few planned updates:
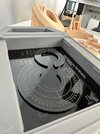
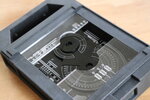
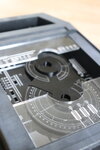
  1. Redesigned main body for better accuracy around the bottom section of the data tape.
  2. Redesign the back side to better fit the silver acrylic plates.
  3. Recesses in certain areas where glue must be applied for a better look.
  4. Toying with the idea of making the main body in solid 3D Printed resin since I have access to a few different materials now.
  5. Slight tweaks to the laser-cut pieces with iteration since I had to outsource last time.
I won’t be opening an interest list until I have some progress in the right direction and to see if 3D printing (SLA) is even a viable option. Also curious to see if I can print one using SLS for fun, though the grainy texture is probably not what we want. I’ll be posting soon with some initial designs.

The first four attachments are the first version I made, and the second is from the first project run with a few tweaks of its own so I guess this is more like round three. A handful of more images from V1 here.

Edit - Opened up interest list!

Small Initial Run of V2s - Finished pieces are $275 + Shipping, Kits are $175 + Shipping

Finished - Accepting deposits early August
1. Claimed
2. Claimed
3. Interest -
4. Interest -SpawnDe
5. Interest -Hollap1no

Kit - Accepting deposits mid August
1. Claimed
2. Interest - MandoJedi
3. Interest -
4. Interest -
5. Interest -
6. Interest –

Future Run Interest

*Ecoli
*the Pawn (x2 Pieces)
*BrundelFly
*Kursosawa
 

Attachments

  • 0071bb2a-1b4b-49d3-bfb9-aeac059436fd_rw_1200.JPG
    0071bb2a-1b4b-49d3-bfb9-aeac059436fd_rw_1200.JPG
    320.3 KB · Views: 166
  • 4211eda3-ec2e-4e9c-988c-08c7dac29615_rw_1200.JPG
    4211eda3-ec2e-4e9c-988c-08c7dac29615_rw_1200.JPG
    248.4 KB · Views: 138
  • 09889d92-fcdf-499a-b1f9-f2a9df4a6a23_rw_1200.JPG
    09889d92-fcdf-499a-b1f9-f2a9df4a6a23_rw_1200.JPG
    284.7 KB · Views: 133
  • d1f4a64d-0286-4db3-8a1c-a58bd9a47601_rw_1200.JPG
    d1f4a64d-0286-4db3-8a1c-a58bd9a47601_rw_1200.JPG
    298.1 KB · Views: 153
  • IMG_7044-1.jpg
    IMG_7044-1.jpg
    2.1 MB · Views: 169
  • IMG_7045-1.jpg
    IMG_7045-1.jpg
    1.5 MB · Views: 191
Last edited:
Progress! Have gone back and forth between the original run and casting and some additional reference material that I found. Toying with the idea of making a fully printable version in addition to one that accepts the laser cut acrylic but might explore that later. Planning on putting some finishing touches on the body and then running a test print, I just got a Form 2 I'm excited to try it out on.
 

Attachments

  • Screen Shot 2023-02-25 at 2.13.32 PM.png
    Screen Shot 2023-02-25 at 2.13.32 PM.png
    546 KB · Views: 54
  • Screen Shot 2023-02-25 at 2.13.39 PM.png
    Screen Shot 2023-02-25 at 2.13.39 PM.png
    602.8 KB · Views: 51
V1 ready to go! Got the back side all done, and added some features to the front side that should help avoid some headaches I had making the finished versions in the first run a couple of years ago. Printed a tiny 1/6 scale version last night that turned out great, but lacked detail for obvious reasons.

Also split up the file to fit in two parts on a Form 2, so that's printing now. Will see how everything looks when I can assemble a full scale print, and after that I'll look into full-size print feasibility, hollow/solid, and then move onto laser engraving. Progressing faster than I thought, and very excited for this new version. Will continue posting major updates here and some more on @islander_replicas on instagram for the smaller test prints and fit tests. All suggestions welcome!
 

Attachments

  • Screen Shot 2023-02-26 at 4.02.58 PM.png
    Screen Shot 2023-02-26 at 4.02.58 PM.png
    636 KB · Views: 61
  • Screen Shot 2023-02-26 at 4.02.36 PM.png
    Screen Shot 2023-02-26 at 4.02.36 PM.png
    960.8 KB · Views: 56
  • Screen Shot 2023-02-26 at 4.02.23 PM.png
    Screen Shot 2023-02-26 at 4.02.23 PM.png
    795 KB · Views: 55
Done printing, it looks great! I didn't expect it to fit as well as it did to be honest, and printed all parts using the Form 2 build volume, so this project is in theory feasible just on that size printer. I'd have to deal with the seam, but in theory most of the seam on the front of the prop will be covered by the acrylic pieces, the sides are hidden by the design, and the back side is pretty flat so I could just apply some more resin and sand. I want to try a few more orientations to see if that helps, or maybe redesign the part-split in a few areas, but still great!

Weighs about .8kg and I do love a heavy prop, so I might skip testing a hollowed out version for now. Noticed some errors with my original design that I have to tweak a bit so I'll fix those up next. I have been using the miniature print as a keychain too so I'm going to add all the acrylic details to the model and have a fully printed one too, but this doesn't make sense for the end pieces as resin won't work in place of clear and aluminum backed acrylic used in the first run.
 

Attachments

  • IMG_0798.jpg
    IMG_0798.jpg
    1,006.2 KB · Views: 79
  • IMG_0799.jpg
    IMG_0799.jpg
    1.5 MB · Views: 77
  • IMG_0800.jpg
    IMG_0800.jpg
    1.4 MB · Views: 70
  • IMG_0802.jpg
    IMG_0802.jpg
    1.1 MB · Views: 73
Aaaaand we have acrylics! Testing out a few of the pieces on scrap until I get the measurements right. Ended up redoing all the engravings and outer edges to match the CAD file, but also to better match a few additional reference images I was able to get this time around. The back plate in the picture below (front side) is V1 but I've made some changes since taking these that I think will look great.

Next steps are finalizing sizing, fit, and design for all these, and in the meantime I'll order the blue and silver acrylics for the final pieces.

I've made some changes to the chassis to make print orientation and support removal cleaner, but the bottom half still takes ages + a lot of material to print, so I'll probably have to revisit the hollow version if I plan to make over 5, but will post the results of that when they come. Thanks everyone for keeping up!
 

Attachments

  • IMG_0826.jpg
    IMG_0826.jpg
    1.4 MB · Views: 68
  • IMG_0825.jpg
    IMG_0825.jpg
    1.3 MB · Views: 66
Hello! Still working on the first finished full-scale version for this one. I have one chassis assembled and ready for primer, just have to find some time (and a warm day) to prime it. I just ordered some silver on black, frosted clear, and blue on white acrylic that should (fingers crossed) do the trick for the final piece. Also, don't currently have any pictures unfortunately, but the difference that adding a supporting slot for the clear acrylics makes a massive difference over the first time I made these, and am stupidly excited of how everything is fitting together. I also have the round pieces now, so I just have to model some of the caps for those, and then source the aluminum rods for the handles.

While I wait for the acrylics (and weather), I redesigned the acrylic pieces to solid models for a print-in-place hard drive, so enjoy a picture of these tiny keychains. Thanks all for keeping up!
 

Attachments

  • IMG_0845.jpg
    IMG_0845.jpg
    1.3 MB · Views: 73
First prototype done using scrap acrylics! Looks great, I have to tweak a few lines here and there but it's looking good. All the other bits have come in the mail, just haven't had enough time to set up a jig to cut the clear acrylic tubes and metal rods. Still playing around with print orientations and other bits, and will update when I laser cut some of the final pieces.
 

Attachments

  • IMG_9832.JPEG
    IMG_9832.JPEG
    1.6 MB · Views: 93
  • IMG_9835.JPEG
    IMG_9835.JPEG
    421.8 KB · Views: 104
Hi all! Very brief update - I've been traveling a bunch and haven't been able to do much other than prep some of the smaller pieces (metal rods, acrylics, new caps for the clear rods). My current setup makes it incredibly tough to prime and paint the bodies black at scale, so I'll give it some thought to see if I can provide enough finished versions this time around, kits should be entirely reasonable though. Next update will likely be the first finished piece with all the new upgrades, stay tuned!
 

Your message may be considered spam for the following reasons:

If you wish to reply despite these issues, check the box below before replying.
Be aware that malicious compliance may result in more severe penalties.
Back
Top