Rocketeer 3-D modelling info

FilthyChakaar

New Member
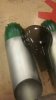
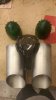
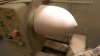
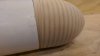
Hi! I've been working hard on a scratch built Cirrus X-3. Bodies are almost done.

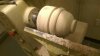
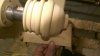
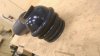
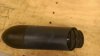
I'm dangerous with a wood lathe and was able to smack out the cones and engines super easily, largely based off Valor's scratch built thread here:
http://www.therpf.com/f9/scratch-build-rocketeer-cirrus-x-3-rocketpack-193723/

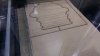
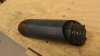
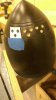
I made laser cut stencils to use while turning to hold up to the form and gauge my curves, periodically. The engine isn't exact, but it's a jumping off point. I'll show pics once it's off the lathe.

Thanks so much, Valor, your work is so awesome and made me smack myself in the head and go, "Why didn't I think of that!"

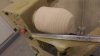
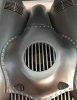
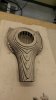
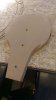
Running into the same problem, however, with how to build the center section. My sculpting skills are bad, and I want it to be perfectly symmetrical.

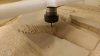
I do have access to a large amount of cool CNC mills and routers. Since it has no large undercuts or fine detailed shapes, its a perfect candidate for CNC routing to get the rough shape!

Looking for anyone capable and willing to 3D model the middle section for me! I'd be willing to pay, or trade some pulls of it once it's milled and sanded and casted.

Sent from my HTC One_M8 using Tapatalk
 

Attachments

  • uploadfromtaptalk1400962008579.jpg
    uploadfromtaptalk1400962008579.jpg
    45.6 KB · Views: 167
  • uploadfromtaptalk1400962022212.jpg
    uploadfromtaptalk1400962022212.jpg
    47.1 KB · Views: 165
  • uploadfromtaptalk1400962092013.jpg
    uploadfromtaptalk1400962092013.jpg
    27.8 KB · Views: 169
  • uploadfromtaptalk1400962304361.jpg
    uploadfromtaptalk1400962304361.jpg
    47.9 KB · Views: 351
Last edited:
I'm sorry, I was not clear at all!

Yes, that is a stencil for lathing the engine nozzles and those are almost done, pictures to come soon!

I'm looking for 3D modelling done on the large metal center section of the pack that connects the two cylindrical engines.


Sent from my HTC One_M8 using Tapatalk
 

Attachments

  • uploadfromtaptalk1401061339764.jpg
    uploadfromtaptalk1401061339764.jpg
    54.5 KB · Views: 183
Last edited:
Bottom half of engines are turned.... Not sure I'm satisfied with the shape yet though. Might be too wide on the bottom?
Sent from my HTC One_M8 using Tapatalk
 

Attachments

  • uploadfromtaptalk1401333286186.jpg
    uploadfromtaptalk1401333286186.jpg
    54 KB · Views: 161
  • uploadfromtaptalk1401333314443.jpg
    uploadfromtaptalk1401333314443.jpg
    49.9 KB · Views: 149
  • uploadfromtaptalk1401333323915.jpg
    uploadfromtaptalk1401333323915.jpg
    49.4 KB · Views: 164
  • uploadfromtaptalk1401333345790.jpg
    uploadfromtaptalk1401333345790.jpg
    37.9 KB · Views: 172
  • uploadfromtaptalk1401333355759.jpg
    uploadfromtaptalk1401333355759.jpg
    33.6 KB · Views: 278
Last edited:
Worked on my nosecones a bit too. Used a template and center punches to keep my drill bit from wandering.
Then sanding, sanding, and more sanding.
Sent from my HTC One_M8 using Tapatalk
 

Attachments

  • uploadfromtaptalk1401339520343.jpg
    uploadfromtaptalk1401339520343.jpg
    41.5 KB · Views: 157
  • uploadfromtaptalk1401339529146.jpg
    uploadfromtaptalk1401339529146.jpg
    55.7 KB · Views: 164
  • uploadfromtaptalk1401339539156.jpg
    uploadfromtaptalk1401339539156.jpg
    52.4 KB · Views: 247
Last edited:
Playing with a file found on thingiverse by xbpenland.

Used Autodesk 123D to make the layers and lasercut this out. I'll use this to check the scale, and if I'm satisified I'll CNC wood router the real form out of MDF.

Sent from my HTC One_M8 using Tapatalk
 

Attachments

  • uploadfromtaptalk1401720735344.jpg
    uploadfromtaptalk1401720735344.jpg
    56.5 KB · Views: 199
Last edited:
Hi FC,

I know your scale may be different as you've been referencing Valor's custom build thread, but if there are any screen pack measurements you need let me know! Great start.

- Douglas
 
Thanks, Douglas!Good to know, I might just take you up on that offer here soon!

Sent from my HTC One_M8 using Tapatalk
 
Looking at it again, the shape of the object you found online looks pretty far off the real pack's curvature and proportions. You might have an easier time starting that one from scratch (or finding someone to 3D model it, as you said!).

I think there was someone offering modeling services in the junkyard, though the thread may have fallen off or been lost in the junkyard upgrade. Worth a search!
 
Some updates. After a failed attempt at brush on molds, kinda succeeded casting nose cones. They're a little wonky, but think I can fix with some Bondo. Also, after many, many hours of machining and tweaking, I have a vacu-form mold for my center section! Just needs lots and lots of sanding.
 

Attachments

  • uploadfromtaptalk1403829675551.jpg
    uploadfromtaptalk1403829675551.jpg
    57.5 KB · Views: 129
  • uploadfromtaptalk1403829689155.jpg
    uploadfromtaptalk1403829689155.jpg
    46.9 KB · Views: 133
  • uploadfromtaptalk1403829784244.jpg
    uploadfromtaptalk1403829784244.jpg
    42.6 KB · Views: 117
  • uploadfromtaptalk1403829806694.jpg
    uploadfromtaptalk1403829806694.jpg
    56.9 KB · Views: 124
  • uploadfromtaptalk1403829824874.jpg
    uploadfromtaptalk1403829824874.jpg
    65.8 KB · Views: 123
  • uploadfromtaptalk1403829839164.jpg
    uploadfromtaptalk1403829839164.jpg
    67.1 KB · Views: 118
  • uploadfromtaptalk1403829900990.jpg
    uploadfromtaptalk1403829900990.jpg
    55.4 KB · Views: 131
Did some quick test vaccuforms tonight. Not super happy with the shape. I think I'll take some sandpaper to the mold for a while, and change up the curves a bit.
Also, laser cut the fan grill. I offset the edges down a bit with the laser etcher, and I think if I do it just a wee bit more, it should pop in perfectly flush with the body.
 

Attachments

  • uploadfromtaptalk1404194203415.jpg
    uploadfromtaptalk1404194203415.jpg
    57.4 KB · Views: 120
  • uploadfromtaptalk1404194293316.jpg
    uploadfromtaptalk1404194293316.jpg
    45.8 KB · Views: 148
  • uploadfromtaptalk1404194301559.jpg
    uploadfromtaptalk1404194301559.jpg
    51.3 KB · Views: 127
  • uploadfromtaptalk1404194319695.jpg
    uploadfromtaptalk1404194319695.jpg
    68.9 KB · Views: 140
So sorry it's been forever since I updated this ..... It was just such a mad scramble to finish up for SDCC. Now I'm back, and have had a little while to settle, and I've been procrastinating, but here's the rest of the photos and progress on my costume.

SPOILER! I must come clean with you all .... It was never meant to be part of a Rocketeer costume. The sole purpose of building this pack was to make a Rocketeer mashup with everybody's favorite bounty hunter - Boba! Thus, RocketFett was born. I'll follow up soon with a separate thread on the whole costume!

2014-07-25 15.59.53.jpg
 
I used a buttload of silicone casting rubber to slush-mold the engines. I really didn't want to try another brush-on mold, I think I need a little more practice with that first. They came out pretty perfect though! I glued a bunch of assorted computer parts and bolts and 5hr engery bottles and greeblies to a piece of pvc and used some rubber tubing to make connectors for the braided hose. Wasn't looking for any kind of movie accuracy, just wanted to make it look like a complicated piece of machinery.
2014-07-15 12.09.06.jpg

2014-07-16 11.32.10.jpg
2014-07-20 15.56.58.jpg
 
Then it was time to start piecing things together! I didn't take nearly as many pics here, because I was in the last couple weeks before it had to be done.... There's a small support structure I built out of 1/2 inch MDF that atttached the two tubes together with brackets. I also laser cut all the little fins, the vents along the tubes, the grate in the center of the pack, and the rudders. After that, it was just a matter of piecing things together and popping hundreds of rivets in the whole thing!
And, if you're wondering what the little boxes are for - I wanted a more Fett feel the pack, so I made some angled boxes that matched the Fett Jetpack angled look, instead of the normal Cirrus X-3 egg shaped bumps.
2014-07-14 20.37.20.jpg2014-07-14 18.06.16.jpg2014-07-14 21.55.22.jpg2014-07-16 23.54.08.jpg2014-07-16 23.55.00.jpg2014-07-14 18.06.09.jpg
 
After that the pics get even scarcer, sadly.... I had a rough time getting the bottom center pipe bracket. I tried the same method I saw on Valor's build thread, of squashing a piece of pvc and cutting to size, but gosh thats a funny collection of odd angles. Ended up using a lot of magic-sculpt to smooth it out. Luckily, the acrylic of the center bowl-shape was easy to manipulate with a heat gun. Bending it ever so slightly to meet the pipe was a breeze.

A friend sewed the back pad for me, which I velcroed to a square frame, connected to the pack by big bolts. The straps have grommets in them that run right through the bolts themselves. Super sturdy!
2014-07-25 15.59.07.jpg2014-07-25 15.59.48.jpg2014-07-25 15.59.57.jpg2014-07-17 20.32.16.jpg

Lastly, don't judge my funny paint job! I painted this at 3 in the morning, in about 3 hours, barely waiting for layers to dry, and barely got it dried before carpool left for San Diego! The last part was done on a hotel balcony! I plan to go back and re-do it. I like the colors, but the execution was sloppy. A lot of my damage just looks like runny blobs (which it was, using liquid latex in a hurry to mask)
 
Last edited:
Back
Top