Rey Scavenger Backpack Build Thread

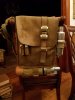
Here's a look at my V4.0 pack so far.

The pack itself is finished, apart from needing a bit of grime applied to it.

Obviously step two is to finish the greeblies... that's happening now.

Then it'll be on to making another shoulder pad. I did make one using the Kohl's Chindi rug and the material itself is just right... but I made it smaller than I liked, so I'll be trying again.

18740551_10212703970770489_5291130534223408614_n.jpg18740770_10212703970090472_2549376025031026871_n.jpg18765900_10212703970890492_4293290164520172963_n.jpg18767765_10212703970610485_6730863756873218863_n.jpg18813504_10212703970330478_2873634590616784858_n.jpg18836022_10212703969890467_3229825070647729147_n (1).jpg
 
Sweet! You were right, that greeblie really does look better when the leather isn't notched out. :rolleyes
The leather looks so soft, too!
I'm glad the Kohls rug is working out for you!
 
Thanks!


The leather I think is the perfect weight. It was an oiled hide, but I hit it with some Acetone first and then distressed it wilt some sandpaper and it got that wonderful texture that i think is very close to what they used.

THIS pack I'm happy with. :)

The "clip" greeblie from Dejarik Creations actually came with a separation underneath it. It was only connected to the body at each end. So I took a coping saw and cut the bottom one. After putting a bit if sandpaper in there to smooth the cut out, it slid right over the leather. Perfect fit. :D
 
so that was a pre colored hide? I do think this is the best so far. I like the thinner size, the messenger bag is a little too deep.
 
Yep.... pre coloured.

I can take a pic of the SKU tag on what's left of the hide when I get home if you like. It came from Tandy.

I used 3" for the depth, the width is 11" and the height is 14"
 
Here are some updated pics of my V4.0 build.

*The new shoulder pad is done and looks awesome!

*The greeblies are all painted...now I just need to weather down their extreme shininess.

*Need to add a bit of grime to the pack to rough it up a bit.

Other than that this puppy is done, and I'm very pleased with this version.

18765906_10212728516784124_9033143937942851177_n.jpg18839350_10212728517424140_4102966005161196880_n.jpg

18928174_10212731562540266_1327548686_n.jpg18813657_10212728515704097_184641840445048928_n - Copy.jpg18835777_10212728515824100_1548466180637873247_n.jpg18839148_10212728517024130_1822083547329639454_n.jpg18892992_10212728516144108_2671515497877756232_n.jpg
 

Attachments

  • 18813176_10212728516624120_1233949585190410730_n - Copy.jpg
    18813176_10212728516624120_1233949585190410730_n - Copy.jpg
    69.6 KB · Views: 308
Gloss black rattle can base and rattle can aluminum top coat. I'll get a pic of the exact product when i get home.

I *was* going to airbrush them and use Alclad b/c I thought that was the only way to get a super shiny finish. But this came right out of the spray can and looks awesome. :D
 
I've rub 'n buffed the first couple I've finished, but I may need to get some of that paint! That looks very realistic!

I've just finished sewing the top strap to the top of the bag; I'll post pics asap!
 
I've started placing and sewing the shoulder straps to the back of the pack. It is feeling like the easiest part so far.
I have the attachments for the bottom of the straps attached. They are 2" up from the bottom, and 1.5" from the side.
20170620_101916.jpg

Also been working on the shoulder pad. I need to acquire the right color of paint to dye it (translucent burnt sienna does NOT work!) But other than that it is ready to assemble.

20170530_202100.jpg 20170530_202105.jpg
 
I said I was going to finish my backpack by the end of this month, and I've made considerable progress in that direction. Shoulder straps finished, and the back is being sewn to the gusset!
20170626_135427.jpg


20170626_140815.jpg

More pics to follow!
 
Last edited:
I did a few minor improvements to my own pack... like adding the (mostly ripped out) stitching along the front flap.

That is one detail that i had neglected in all of my other previous builds... so i suppose it was time for me to add it.


19964717_10213143801205975_678605364_n.jpg19970483_10213143810886217_1003621651_n.jpg19904682_10213143799325928_937242446_n.jpg
19987532_10213143806646111_650179805_n.jpg19987560_10213143800165949_558639219_n.jpg19989122_10213143800005945_1921623801_n.jpg
19989147_10213143799525933_1845148769_n.jpg
 
That's my next thing to do. That, and adding the little loop for the chained canister.
(I can't get over how 'metal' your greeblies look!)

I took a little break from the details to finish the shoulder pad, but stay tuned, everyone! Details and weathering to follow!
 
Back
Top