Revisiting the Training Remote

Re: Build Diary: Revisiting the Jedi Training Remote

I also have a few doubts about some inconsistencies between the MR replica prop, the original prop and some fan built replicas.

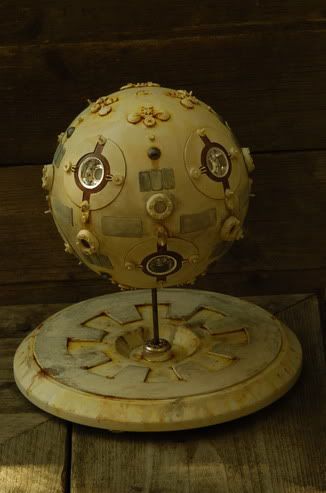
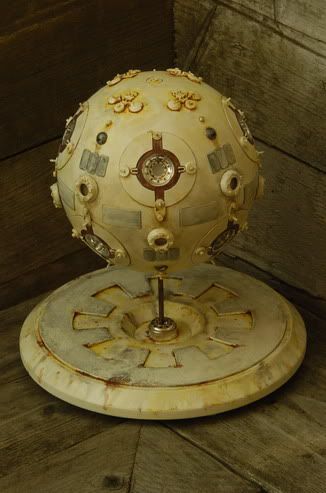
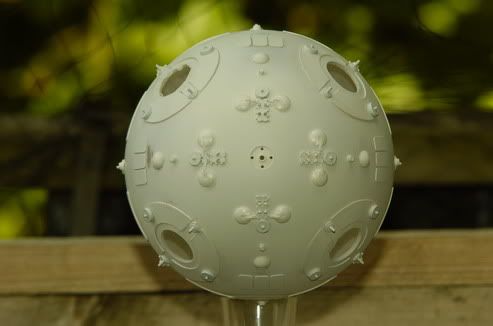
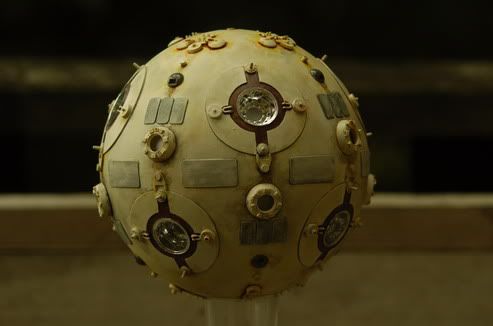
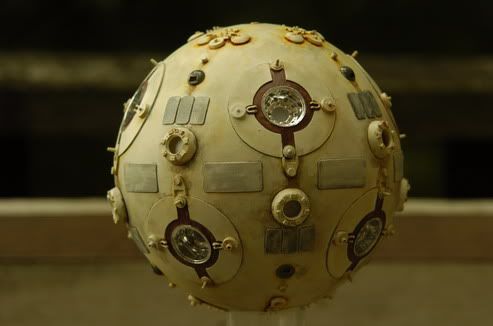
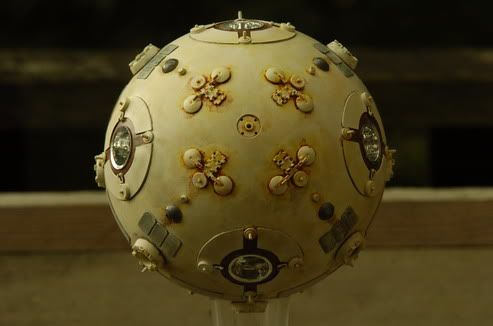
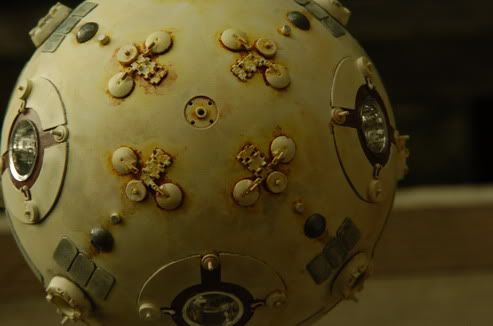
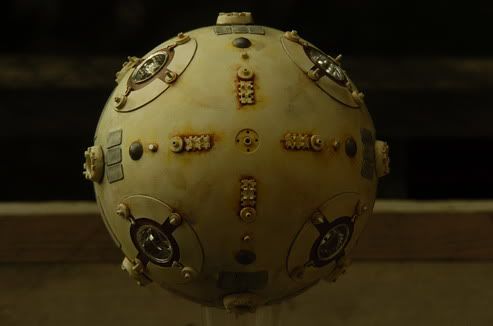
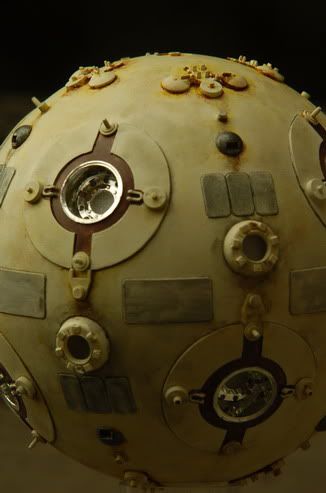
Notice for example that in my 3D model I made some of the small circular greeble around the red circular areas flat cause in the photos I have of the original prop and some other photos of fan built ones they are like that but in the MR replicas model they all have the long peg in the middle of those disc shaped parts.

I'm talking about the areas marked with orange circles in the attached thumbnails. Look at the three pictures, one is what I believe is a fan built prop copy, the other is MR replicas copy and the other one is the original prop and notice the differences (look at the file names to know which is which just in case).

I know that this is not anything new to you guys here. I've seen you discuss these differences in forums such as these and I know that it is not the only difference from the original and the MR replica prop etc.

I know about the small greeble that looks like an U that goes also around the red circular part. I know that MR version is not right so I modeled one that is more like the original U shaped one and I know too that that greeble is supposed to be white not red.

In addition I believe that the bottom of the MR replica one is not correct either cause it is supposed to have a larger circle of styrene and the MR doesn't have this so I fixed this in my 3D model too even though you can't see it in my render cause it is beneath but it is there.

I'm not sure why MR put all those pegs in those circular greebles. I'm not sure if that is because they are a mistake or if they are different because they are broken in the now old prop that have been handled from place to place which I suspected but I'm not sure so I did a best guess.

So you see that is rather amusing that the eternal problem that real model builders have to face of having a hard time trying to find good quality reference material and/or blueprints or trying to figure out what the "standard" should be also affects us CG 3D model builders cause we are also trying to construct our models tridimensionally with real life measures, proportions and accuracy so they look like the originals and sometimes we just have to make an educated guess.

The duplicity of this issue is due to the big analogies that are existent when building CG 3D models cause many times (not always) they are simulations of real life things.

I would like to have some input from you guys in relation to these differences. Which one do you think is right in relation to those small cylinders (the pegs)? :confused
 
Re: Build Diary: Revisiting the Jedi Training Remote

If you read this thread carefully you'll notice that MR used the wrong U-brackets.
The circular tank parts around the truck rims are all broken off on the original prop. On most fan build remotes these parts are still intact.
The size of the remote is 6 inches.
But your 3D model looks great. Are you going to 'print' it on a 3D printer?

BTW here my remote using the Tamiya 1/48 tank parts. Not finished yet, but getting there:

_DSC9258_resize.jpg


From the top
_DSC9263_resize.jpg
 
Last edited:
Re: Build Diary: Revisiting the Jedi Training Remote

I believe the MR is shortened/idealized for the sake of practicality both in shipping display. As mentioned most of the original pegs have broken off, and if you read the entire thread there is a photo of these kit parts still attached to the sprue.

As for the reference material be careful the first fan made shot was an early version. The Panter parts are of a different scale.

Almar that remote is looking FINE. I really like those Tamiya parts. Do you plan on using all of them?
 
Re: Build Diary: Revisiting the Jedi Training Remote

Don't worry about the U shaped greeble cause I already knew about it and I had fixed it. Look at my previous image and notice that I didn't do that like in the MR. I did it more like in the original prop photos.

Also I noticed another error in the first model to the left which is the bottom hatches that are replicated at the bottom like in the top and in the real prop they are not there, only the circular greeble and the tank tracks should be there.

And about the pegs, that confirms my suspicions that those pegs were indeed broken on some of those photos. Now I know that they are all supposed to be pegs instead of the way I had it.

This is very easy to fix in my model.

I also noticed that they are a bit longer than in my models and also slightly larger in diameter if I'm not mistaken and I have edited them to make them look more like they should be (look at the new attached rendered image).

About the 3D printing idea, well no I wasn't thinking of that but you know it is not a bad idea.

Now I think that if I were to do something like that it would have to be modified somewhat cause I think that some of the parts would need a thickness that they don't have such as the main sphere which in a 3D model is usually hollow and also for some other parts that would need an inner "wall". Very easy to do.

Also some other parts like some of the hatches on the top and others have to be given a bottom cause I deleted that in order to reduce polygons that are unnecesary for rendering to improve rendering speed for either stills or animation.

But adding those extra walls is really not difficult at all. I could fix that in about a couple hours of work or less.

Another issue that needs to be decided is the issue of printing it either as a whole or as separate parts that are glued afterward which in my opinion would make it look more realistic and more true to the original.

And in that respect there is the question of printing only one or two parts of each to then replicate with molds or printing all of them in 3D which is faster but more expensive.

It is entirely possible to do but I think that it is a better idea to convert it to something like AutoCAD or Inventor or Rhinos or some other good CAD format and that needs to go through the conversion process but recently I converted the remote to a 3DS format and imported it in another 3D program as a test and it came out very nicely in the other program with only some vertexes to weld and it was great so Blender did a very good job in the export department.

Anyway thank you guys for your input cause that helped me create a better model. I know that it is not perfect but it is definitely getting better.

And Almar your model is looking very beautiful, I like it a lot.
 
Last edited:
Re: Build Diary: Revisiting the Jedi Training Remote

Yes, planning on using them all. Tomorrow I'm going to try to cast the Tamiya U-brackets. This will be a pain in the @$$ but at least I have the right materials now.
 
Re: Build Diary: Revisiting the Jedi Training Remote

When I cast the brackets I tried it 2 ways. First I laid them flat on a piece of tape, but this part will not lay perfectly flat. The mold looked rough because there wasn't a crisp edge, and the rubber bled under the part. This was a happy accident... the casts were easily cut away from the excess resin since they were barely attached. Also, you could aim then straight up when making your mold... this is harder to get a bubble free cast, but it preserves the notched edge from the square ends on both sides. You need this notch to grab the lip of the styrene.
 
Re: Build Diary: Revisiting the Jedi Training Remote

Straight up.....? Might give that a try also. I laid them flat this time. Right now I'm waiting for the smooth cast to harden. It depends on how they come out. We'll see.
 
Re: Build Diary: Revisiting the Jedi Training Remote

Almar, my apologies. I was describing the Bandai part and you are working with the Tamiya. That part is much more challenging to cast, especially if you are preserving the small loop at the top. When casting vertically make sure its like this... U or you will have a heck of a time getting them out of that mold. Trust me.:angel
 
Re: Build Diary: Revisiting the Jedi Training Remote

Finally finished mine and I wish to thank all the guys that helped out with this project. The info on this forum was very helpfull.
As I mentioned before, I used the Tamiya 1:48 Panther G kit for this model and not the Bandai. Except for the tank hatches, those are from the Bandai kit.
Some of you might think I went a little overboard with the weathering but that's the way I like it.
Check it out........

_DSC9342_resize.jpg


_DSC9343_resize.jpg


_DSC9346_resize.jpg


_DSC9347_resize.jpg


_DSC9349_resize.jpg


_DSC9350_resize.jpg
 
Re: Build Diary: Revisiting the Jedi Training Remote

Terrific, It looks OK to me. It looks genuine and that's the idea.
 
Re: Build Diary: Revisiting the Jedi Training Remote

Excellent job, Almar! The paint job is phenomenal!:cool:thumbsup

I'm just hoping I can start mine soon...:rolleyes
 
Re: Build Diary: Revisiting the Jedi Training Remote

Thanks for the kind words guys. I'm really happy with how the remote turned out. Right now I'm working on some sort of display for the ball.

But as I mentioned before, all the praise should go to Brundelfly and Nighteyes who made fantastic tutorails, and to everyone who had the patience to identify all parts used.
 
Re: Build Diary: Revisiting the Jedi Training Remote

That is one FINE remote you've got there. I really like the look of the Tamiya bits, and that weathering sure does give you the feel that its been around the galaxy and back. And you can be proud to have all original kit part panzer pegs. I believe only the scratch builds get to boast this feature.

Whatever you decide for a display make sure it is weighted. Can't tell you how many times mine saved me. Sure dropped it on some concrete anyway... but still.
 
Last edited:
Re: Build Diary: Revisiting the Jedi Training Remote

Could you post total how many of which kind of kits you used and also how much your remote weighs?????

I read through a great deal but was confused by how many tanks models versus the truck models etc.

It would be of great help in the floating remote project.

So far the list I've put together is:

Bandai Panther G 1/48 or 1/48 Tamiya Panther G Tank Model (8 of them or one and cast parts) About $10 to $20 each on Ebay for the Tamiya.

The Bandai Panther is the one used for the film. The Tamiya parts are slightly smaller and a little more detaield.

Airfix 1/72 Panzer IV About $10 on Ebay

Hasegawa M4 Sherman Tank about $10 on Ebay

AMT Kenworth T600A (Has 4 rims only so might need 2 and must have at least 1 for axel brackets) $40 to $100 on Ebay

AMT Midnight Express (Has many rims)

Thanks
 
Last edited:
Re: Build Diary: Revisiting the Jedi Training Remote

You also need this one from Hasegawa,

_DSC8582_resize.jpg


Instead of using the Tamiya Panther G, you should use the Bandai Panther G. That's what they used for the movie.
 
Re: Build Diary: Revisiting the Jedi Training Remote

Okay I have adjusted the list.

If it could be checked for any needed corrections that would be great.

Is the Bandai more expensive?? I'm wondering why the Tamiya was used???


On the Kenworth the only ones coming up are the white ones that were posted earlier here and were stated as being the wrong one?????


Also is the Midnight Express the 1/25 Peterbuilt???


Thanks again
 
Last edited:
Re: Build Diary: Revisiting the Jedi Training Remote

Could someone with a JTR built from the actual models weigh it???

I'm trying to see if it would work for the floating globe project

Also does anyone know how much the MR weighs???

Thanks
 
This thread is more than 6 years old.

Your message may be considered spam for the following reasons:

  1. This thread hasn't been active in some time. A new post in this thread might not contribute constructively to this discussion after so long.
If you wish to reply despite these issues, check the box below before replying.
Be aware that malicious compliance may result in more severe penalties.
Back
Top