Remember that Vader MOM ROTJ tutorial? FINISHED (pg 1 - post #24)

Re: Remember that Vader ROTJ tutorial from back in the day???

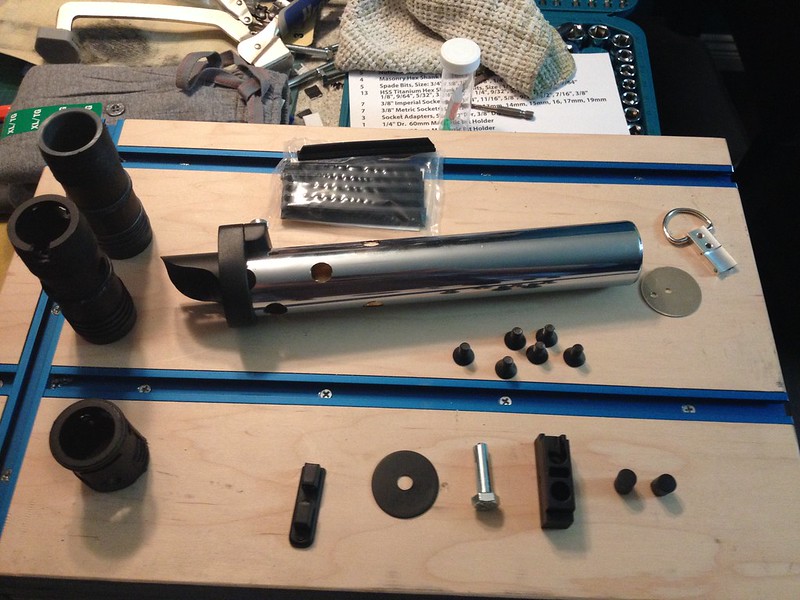
The control box is a thick chunk of sintra. The grips were made from Evergreen or Plastruct styrene strips. The emitter spike thing was... a cheap bookcase hardware part from Menards, although I've seen better looking, nice thick rivets at hardware stores that would have worked better. The grips and control box are currently held on with masking tape. The shoulder was pulled with a Honeck shoulder puller. The stand was made from more Menards parts.

That's all I can think of for now.


I'm running into a few issues with this build... what did you use to close up the back of your sink pipe? I ordered some metal disks, but they were but shy of fitting in... If I can't find something better, I'll have to hammer the rim of the pipe down a bit more... I've just had crap luck with that in the past...

And the same goes for the front end... the disk you have the emmiter coming from... what did you end up using? a washer? I don't know if I've seen one that size... and again, the disks I ordered, though 1 3/8 inch diameter, were a TAD too small...

Thanks for any info!
 
Re: WIP - Remember that Vader ROTJ tutorial? Now a build thread!

I'll be following this thread, this saber is on my wishlist.

-R-
 
Re: Remember that Vader ROTJ tutorial from back in the day???

Still working away at this scratch built monster saber...

So the tutorial is missing the second part of the control box build... but when looking at pics of the final saber, I wasn't that impressed with the look anyway... so I figured I would attempt my own.

So going off some rough measurements from Sym-Cha... I grabbed some styrene, sandpaper, files and a drill...

I say this again... not a model guy... so this was a HUGE pain in the ass...

I split the build in 4 parts, stacked (2 parts in the pic are already glued together...

http://farm4.staticflickr.com/3759/9959849746_efbc166f1e_b.jpg

After sanding the crap out of it, I sprayed it with sandable primer to see where I was at...

http://farm4.staticflickr.com/3769/9959934343_81a9fed3d1_b.jpg

http://farm8.staticflickr.com/7339/9959802925_42e1b80984_b.jpg

The gaps are pretty obvious... so I guess I'm going to put a little epoxy putty on it tonight and see if I can't fix it.

This is usually the point I get too picky and ruin things... guess I'll see.

I'm running into a few issues with this build... what did you use to close up the back of your sink pipe? I ordered some metal disks, but they were but shy of fitting in... If I can't find something better, I'll have to hammer the rim of the pipe down a bit more... I've just had crap luck with that in the past...

And the same goes for the front end... the disk you have the emmiter coming from... what did you end up using? a washer? I don't know if I've seen one that size... and again, the disks I ordered, though 1 3/8 inch diameter, were a TAD too small...

Thanks for any info!

This is one of those times I wish I'd started my prop book years ago. I now keep a record of my projects, materials, techniques, paint colors, glues and so on in a nice graph notebook I got from Staples. Pretty darn handy.

I don't remember what I did for the emitter end. I think I probably cut out a disk of styrene and glued it to the PVC connector that goes down the tube, and then filed and sanded the edge so it'd match up with the s-curve of the tube. Drilled a hole for the brass plated emitter spike and glued it in place.

For the pommel end, I just stuck in a chrome hole plug from the hardware store, probably from the plumbing area. Not accurate; you can even see that the end of it protrudes from the pipe instead of sitting below flush with it, but I thought it'd be close enough for me.

I thought about rubbing down all the chrome surfaces with a fine Scotch Brite pad or steel wool to give the brushed effect of a real Graflex, but I didn't. Yet, at least. Probably won't. But the chrome surface is one more inaccuracy that I choose not to worry about overmuch.

Your build is coming along really well! Even though the pieces are sort of easy to make, I remember procrastinating because I didn't want to fiddlety futz around making the control box or the shroud piece. Keep up the good work!
 
Last edited:
Re: WIP - Remember that Vader MOM ROTJ tutorial? Now a build thread!

I FINALLY got around to finishing this!

I was pretty much just going to let this saber die... I ended up getting a MOM ROTJ that had Kenny's parts from that run way back. When I saw his accurate parts against these parts from the tutorial, I lost interest in finishing. All the measurements were off.

14143885249_50f559bab9_c.jpg


Then a couple weeks ago I was watching an episode of "Tested" in which Adam Savage showed off his Blade Runner blasters. One of them was the first he had made, that was all wonky and out of sorts, but it was also one of his favorites. I got inspred to finish this tutorial saber, as it's the first one I ever came across, and ignited my interest in this whole hobby. So I rummaged through my box of scraps, found the old wonky shroud, and started finishing it.

14143889389_b0ce92f42e_c.jpg


I had taken more pics of the build, loosely following the rest of the tutorial, but I seem to have lost them.

14350742943_2572cd0efd_c.jpg


]
14117286569_a3d8e80fdf_c.jpg


One of the first things I did was resize the control box a bit. I made it too long. If I used it I would have to compensated for the extra mm, and it just wasn't going to fit on the pipe.


I got a Kobold off Blastech (I think... Parks?), and I bought a door latch off another member here. I think the T-track is Blastech as well... honestly not sure.

14330535515_5d38ca31d5_c.jpg


14307405886_d861acaff7_c.jpg


So when all was said and done, I was surprised by how much I liked it. When I put it next to the Kenny parts ROTJ, it's obvious where it's problems lie. I can see a million things wrong/wonky with it, but that's part of it's charm I guess. Shroud is too thick (No way I could fix that without destrying it), the bolts stick out too far (again, probably would have ruined it trying to fix with a hand drill)... it goes on an on, but when all together, it's still pretty cool, and I have no issue with it hanging with the other sabers.

14324165383_ba4b7fb56c_c.jpg


Comparison shot....


Glad I got around to finishing it. Fun project if, like me, you're work area is the coffee table in your tiny condo.
 
Last edited:
Re: Remember that Vader MOM ROTJ tutorial? FINISHED

Found some missing build pics, and added on page 1

I still have two other MOM ROTJ's to finish... What I believe is an early Obi Kenny, and one I'm still collecting parts for...

14327221531_9f521a565a_c.jpg


My favorite ugly ass saber.
 
Last edited:
Re: Remember that Vader MOM ROTJ tutorial? FINISHED

Those look great and well done on finishing that original customised saber ... I for one love it, especially since I too have limited space and tools to accomplish whatever to make it believable. Looking forward to your other saber builds.

Chaim
 
Back
Top