Red Manta Space Pirate Costume Build

Chrysoprasis

New Member
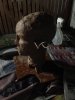
So I noticed this awesome new character from the behind the scenes video of The Force Awakens and new instantly that I had found my next build. I only have these 2 reference photos and I have no idea what his name is or anything or even how to find out more information about him. If you guys have any information about this character I would really appreciate it. I am going ahead with the build despite all the limited information.

Screen-Shot-2015-07-10-at-11.06.16-PM-700x293.png
vanity-fair-star-wars-02.jpg

I am going to sculpt the mask and cast it in latex and then make the boots and gloves out of foam.
 
I have the armature built for the mask sculpt. I just made it with some wood scraps I had laying around and some drywall screws. I also screwed on a couple of pieces of heavy gauge aluminum wire on to support the wing shapes on the sides of the head. They will allow me to flex them into position and adjust them, but I hope will be strong enough to support the clay. It's about 8 or maybe 6 gauge wire. I have a bunch of old water based clay sitting around from school so I will use that for the sculpt. I also bought some white hydrocal to make the mold
.IMG_2128.JPGIMG_2127.JPG
 
Last edited:
I started packing my sculpture tonight. It is still really sloppy'cause I am just getting the rough shape of my head in. I will start taking measurements next and make sure my proportions are correct.

IMG_2183.JPGIMG_2184.JPG
 

Attachments

  • IMG_2183.JPG
    IMG_2183.JPG
    53.5 KB · Views: 330
  • IMG_2184.JPG
    IMG_2184.JPG
    48.1 KB · Views: 152
Had to make a wire clay cutter today so I didn't make much progress. I did adjust my proportions a bit though. I used calipers to take measurements of my own head and now I need to let it dry. ThenI can spray it with a little paint so I know where my original surface is when I get into the full sculpt.
IMG_2187.JPG
 
I did a practice sculpt the other day to feel out the shapes. I don't think I got the proportions quite right and I need to extend the eye sockets up the head, but that is why it's practice. I think the head should be a little more narrow from the front view. Overall I think it looks pretty good and I'm ready to start on the full size. Before I do though, I might try to make up something for the back of the head since there is no reference yet. I will probably try to use some sort of a design that will hide the mechanism that will help me get the mask open so I can put it on and take it off.

IMG_2200.JPGIMG_2202.JPGIMG_2203.JPGIMG_2204.JPG
 
The character is named The Crimson Corsair, he will be the lead in a short story that will be part of the Tales From a Galaxy Far, Far Away anthology.

His story is called The Crimson Corsair and the Treasure of Count Dooku will be written by Landry Walker and should be released in stand alone ebook form November 24th :)
 
I found the article that confirms RVeldhuyzen saying that his name is Crimson Corsair, but I am still somewhat skeptical. It doesn't seem to fit the Star Wars theme to have someone with a superhero type nickname. Star Wars characters have proper names. We don't call Boba Fett the Green Jetpack. I think this article more that likely picked up on some rumors on the internet about a nickname that he has been given by fans.
http://www.dailymail.co.uk/tvshowbi...haracters-identified-ahead-Force-Awakens.html

Besides, the Crimson Character is already a character in the Watchmen universe. He was a very minor character that was going to be expanded on in a graphic novel that was cancelled and never published so not much is known about him, but the name was already out there floating around and I'm sure that some fans just tacked it onto this character because he fits the description.

http://www.turmoilcolour.com/images/cc-bristol-2012.jpg

https://en.wikipedia.org/wiki/Before_Watchmen

I could be totally wrong and thank you for adding to the conversation RVeldhuyzen, but I am going to wait for a more official source before I am settled on the name. I guess in the meantime we can refer to him by that nickname for reference sake.
 
I agree that "The Crimson Corsair" sounds a bit weird and different, but so did "The Inquisitor" in Rebels.
And they announced the short story anthology at New York Comic Con during the Disney Lucasfilm Publishing Panel. If Pablo Hidalgo says that's his name, I tend to believe it :p

You can listen to the full panel here: http://thewookieegunner.com/2015/10...asfilm-publishing-panel-new-titles-and-audio/


They talk about the stories after the 46 minute mark, with The Crimson Corsair and the Lost Treasure of Count Dooku at 46:53 :)
 
So today I made the trek up to the fabric district in LA to pick up the cloth for the costume. Most of the stuff I found pretty quickly, but the coarse dark brown cloth with red stripes for the scarf/poncho thing was really tricky. I ended up getting some dark brown upholstery fabric with a really thick weave and some red textured yarn that I am in the process of stitching in for the stripes. It is a lot of work, but it was impossible to find that exact fabric. So, I got some two tone black/crimson sheer fabric for the shirt. I will stitch pieces to the shirt and fray them once it is sewn for the texture-y bits. I got some thick red chenille for the pants, some dark silver satin for the sash and a random remnant of black lycra for the mask lining and some other odds and ends.
IMG_2207.JPGIMG_2208.JPG
 
Sweet! Its nice to see this character also caught someone else's eye besides mine. I will be following your thread to see how it progresses.
 
I got a little time this weekend to sculpt and so I fixed some of the proportions. I started putting in some of the details, straightening the lines and smoothing out the surfaces. I kinda made up a lot of detail for the back because there is no reference. I added those protrusions in the back near the base of the skull to imitate the shapes near the front along the jaw. I know from the side profile there is a little glimpse of the back and it doesn't have those but it really needed something so whatever. Creative license. It will also help me hide the slits I will need to open the back and get the mask on and off. Let me know what you guys think of the changes!

Oh and I was also wondering if anyone had figured out whether this thing is an alien face or is it just a really organic looking helmet with maybe a human underneath. To me it looks too organic to be a helmet, but I could be wrong. Maybe it's both. An organic alien helmet shaped symbiote paired up with a human wearer. That would make an awesome character story anyway. I hope it is something cool like that and that this guy becomes the new Boba Fett. Like someone with only 3 minutes of screen time that is such a distinctive character that it becomes a crowd favorite.
Pictures in the next post.
 
I finished up the sculpt the other day and textured it. I tweaked things a little bit and straightened out some lines and then just used a big grouting sponge to dab things smooth and erase the fingerprints.

IMG_2269.JPGIMG_2270.JPGIMG_2271.JPGIMG_2272.JPG

This next part got really tricky because I have never made a mold before. I bought a piece of steel roof trim, hammered it flat, and then cut it into squares to make the dividing wall between the two halves of the mold. Then I hammered them close together into the sculpt and hot glued them together. The wings off the sides of the head were really tricky because they are so thin and the metal cards just cut all the way through them. They didn't stay in very well without hot glue and the two halves of the wings risk being misaligned. I built a little wall around the bottom to catch the drippings, make the mold thicker and to be able to fill under the chin. I just used little bits of clay stuck to the wall to make the registration pegs so I can get the halves lined back up cause I'm cheap like that. I sprayed two coats of really light shellac on it before I started with the hydrocal just to make it stronger and kind of seal it so that I didn't smear any of the details while making the mold. I mixed up a thin batch of hydrocal and brushed it on with a paintbrush for a couple of layers to make sure that there weren't any bubbles in the detail areas. Then I used a thicker batch to slather on with squares of burlap and build up the mass. Once I got the whole thing as thick as the outer wall I smoothed it all out and let it dry. I should have been more careful to smooth out each layer, but at one point I had a batch setting very quickly and had to just cake it on as fast as I could so there will probably be bubbles inside. Hopefully they won't cause too much trouble. under the chin was also a really tricky area because the wall on the bottom was too close and I could barely get my fingers under there to make sure there were no bubbles.

IMG_2275.JPGIMG_2276.JPGIMG_2277.JPGIMG_2278.JPG

Overall this has bee a major learning experience for me. I just hope it turns out ok. I will be making the mold for the back half tomorrow and will let you all know how it goes.
 
I have officially finished the mold. I ran into a little hiccup with the second half. I ran out of hydrocal about halfway through and ended up with a batch that was too watery. I stupidly decided to try to put it on anyway and try to soak it up with lots of burlap scraps so it wouldn't go to waste. That led to the clay walls I put up collapsing and all the plaster running all over the back half of the mold and the ground. Thanks to a quick refill of hydrocal from a friend at work I was able to get back on track tonight and got it finished. Now I just have to wait for it to dry out and then I can crack it open to see if it turned out.

IMG_2288.JPGIMG_2289.JPG

The back half is a darker color because my friend gave me ultracal instead of the cheap hydrocal I was using, but it should turn out fine.
 
Back
Top