Biggs, Wedge, or Luke’s
You are using an out of date browser. It may not display this or other websites correctly.
You should upgrade or use an alternative browser.
You should upgrade or use an alternative browser.
Red Leader and Gold Leader Helmets - "All wings report in!"
- Thread starter Somerset
- Start date
DeLucks Designs
Well-Known Member
That came out REALLY nice, congrats!!!
Somerset
Sr Member
So, after a rather long wait I finally got round to painting up another helmet. This is the same Walter 2017 kit as last time, but this time it has been finished to a much higher standard than I could have hoped by Chad HB1098S who kindly sold it to me earlier this year. You can see his thread on the build here: Red 5 X Wing Pilot Helmet
He has fitted the mohawk cap and strip, filled in the seams, given the finish a good sanding and coat of white gloss. So all I needed to do was paint it!
I ummed' and arred' over which design to go with and ended up going with Gold Leader, primarily because he gets a decent chunk of screentime in ANH, the design is interesting but not too complex and I was able to get good reference pictures from the Identities exhibition last year. Also, as on the Red Leader helmet, superjedi has a really good thread from several years ago that I was able to easily follow. so thanks again!
Can’t wait to see the paint job Dean!
Subscribed
el toro
Sr Member
Are you planning to stick the rebel birds on gold leader’s helmet and then paint over with the design?

So, after a rather long wait I finally got round to painting up another helmet. This is the same Walter 2017 kit as last time, but this time it has been finished to a much higher standard than I could have hoped by Chad HB1098S who kindly sold it to me earlier this year. You can see his thread on the build here: Red 5 X Wing Pilot Helmet
He has fitted the mohawk cap and strip, filled in the seams, given the finish a good sanding and coat of white gloss. So all I needed to do was paint it!
I ummed' and arred' over which design to go with and ended up going with Gold Leader, primarily because he gets a decent chunk of screentime in ANH, the design is interesting but not too complex and I was able to get good reference pictures from the Identities exhibition last year. Also, as on the Red Leader helmet, superjedi has a really good thread from several years ago that I was able to easily follow. so thanks again!
View attachment 1081070View attachment 1081068
View attachment 1081069
Somerset
Sr Member
Are you planning to stick the rebel birds on gold leader’s helmet and then paint over with the design?
View attachment 1081175
It's interesting how these rebel crests appear under the paint work of some of the 'hero' helmets. You can definitely see them on Gold Leader, and John D. I guess they were the plain helmets with the blue crest on that the extras would have had in the end ceremony and hangar scenes that were repainted for close ups of pilots in the cockpit. I thought I saw one version of Wedge's helmet that had the same under it's paint work, but can't seem to find it anymore - maybe I imagined it.
However, I chose not to include them on this one, accurate though they may be, I just don't like them!

el toro
Sr Member
You’re right. Wedge’s helmet also has the rebel birds decal. Thanks to the Star Wars Helmets site.


It's interesting how these rebel crests appear under the paint work of some of the 'hero' helmets. You can definitely see them on Gold Leader, and John D. I guess they were the plain helmets with the blue crest on that the extras would have had in the end ceremony and hangar scenes that were repainted for close ups of pilots in the cockpit. I thought I saw one version of Wedge's helmet that had the same under it's paint work, but can't seem to find it anymore - maybe I imagined it.
However, I chose not to include them on this one, accurate though they may be, I just don't like them!
View attachment 1081408
View attachment 1081409 (Red 4 helmet later used in Rebel Assault 2 cutscenes)
Attachments
Frenzy1971
Well-Known Member
Porkins! He get's no respect. Great job!Thanks for the kind words guys! Hopefully will start another in a couple of months. Who do you think should be next?
Somerset
Sr Member
So, same as on the previous helmet I coated the inside with some plastidip to smooth it over.
I used a can of Tamiya Desert Yellow to paint the two areas on top of the helmet. Since I'm colourblind I just kinda go with whatever I have available since I can't really tell the true colour. It might be a bit more of a grey?

Anyway, once that was on and dry, I masked off the grid areas on either side. They're 4x4 but taper towards a narrower edge on hte outside of the helmet. Now, (perhaps blasphemously for the RPF) rather than taking precise measurements for these, I just eyeballed them mainly because I didn't want to take into account the nature of the curves in the overall length. They look good enough to me, although unfortunately they're not as symmetrical as I might have hoped/taken more time. The tape is Tamiya 3mm masking tape for curves (5mm is much too wide).
First one side...

(Note a couple of gaps that I had to go back and re-tape)

Then the other...


I used a can of Tamiya Desert Yellow to paint the two areas on top of the helmet. Since I'm colourblind I just kinda go with whatever I have available since I can't really tell the true colour. It might be a bit more of a grey?
Anyway, once that was on and dry, I masked off the grid areas on either side. They're 4x4 but taper towards a narrower edge on hte outside of the helmet. Now, (perhaps blasphemously for the RPF) rather than taking precise measurements for these, I just eyeballed them mainly because I didn't want to take into account the nature of the curves in the overall length. They look good enough to me, although unfortunately they're not as symmetrical as I might have hoped/taken more time. The tape is Tamiya 3mm masking tape for curves (5mm is much too wide).
First one side...
(Note a couple of gaps that I had to go back and re-tape)
Then the other...
Somerset
Sr Member
Here it is masked up and then coated in Tamiya Dark Green. Possibly a bit too dark, but it looks good enough.


Where there were some masking lines from the earlier coat I had to sand down a little and put on another coat afterwards, but overall I think it looks alright!
I forgot to mention earlier I'd drilled/filed out some holes in the cheeks as the details were a little soft in the cast.
Where there were some masking lines from the earlier coat I had to sand down a little and put on another coat afterwards, but overall I think it looks alright!
I forgot to mention earlier I'd drilled/filed out some holes in the cheeks as the details were a little soft in the cast.
Somerset
Sr Member
And here it is after some touching up of the gridlines with the decals from DeLucks Designs. I used a mixture of green-black and black (so a really dark green) for the six dark segments of the grid. They show up alright in person, but I think my dark green base colour is probably too dark to begin with compared to the prop.I had also left the white areas on the rams horns too large so re-sprayed there to make them smaller. I also recoloured the Vs because they needed to be darker.
Here it is with masking on the grid.


Here are the results.


Didn't quite manage to line up those back two parallelograms on the mohawk - oh well...

Note that since the flying meatballs are just outlines they left the base white below. In the film they're just slightly off white. Since my white paints had dried up I decided to use a dusty faded yellow, but it came out kinda orange! I will have to repaint them when I get the chance.

Also note that the decals on either side don't actually sit evenly. The cat's eye is much more angled on one side.

Next up is weathering!
Here it is with masking on the grid.
Here are the results.
Didn't quite manage to line up those back two parallelograms on the mohawk - oh well...
Note that since the flying meatballs are just outlines they left the base white below. In the film they're just slightly off white. Since my white paints had dried up I decided to use a dusty faded yellow, but it came out kinda orange! I will have to repaint them when I get the chance.
Also note that the decals on either side don't actually sit evenly. The cat's eye is much more angled on one side.
Next up is weathering!
Bad ass, love it!
Somerset
Sr Member
So on with the weathering. Gold Leader's helmet doesn't seem anywhere near as beaten up as Red Leader's (Red Leader probably just chucks his in the back when he's shopping for space groceries...), so I didn't make that many scratches on the forehead portion. All I did was do a few scratches with a hobby knife and a little bit of rough sanding on some of the edges.
For the grime, I think it's a fairly tested formula for many painters now - diluted black acrylic wash all over (with a little extra on some of the dirtier parts) to grunge it up and then sealed with a mist of clear coat.
Then I used to the coloured powders, but you might be able to tell I had something of a mishap here. I use a grey for most of it and a black just to darken specific areas. Well I went and used too much black on the left side of the mohawk so that it was way too dark. I tried to take it down a bit with some light sanding, but decided to just wipe it off with some acetone and start again.
Now unfortunately, since I don't really have anywhere to do this work (and it gets dark outside early now) I was doing this on top of a small foldable table and had left the bottle of acetone on the floor so that it wouldn't fall off if I knocked the wobbly table. Nice idea, but I didn't put the cap on properly, so naturally I then kicked it over and spilled half a bottle of acetone over the floor. Woops...
So at that point I thought it was probably a good time to stop and deal with the spillage... I may at some point go back to finishing that side, but it will do for now.
I attached the inner lining with some high-strength velcro - this time I didn't bother sewing the loop into the lining as the hooks hold it just find without.
The visor is just velcroed in under the lining at the front.
I had to buy a couple of different edge trim thicknesses to get one that could go round both the helmet rim and the lining, but found one that fits.
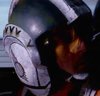
For the pictures below, I've just placed the microphone behind the ear pad, will probably use the velcro again somehow. It's interesting to note that while you can clearly see some of the pilots wearing the racal minilites as it fits over their heads, Gold Leader's mic tip seems to come from behind the ear pad (see in the picture above). I wonder why this is?
I haven't weathered the chin guard yet, and I'm waiting for a slightly longer piece of elastic strap before I attach it. But other than that, I'll call it done until I redo some of the decal colours and weathering.
Many thanks to Walter for making this, Chad for doing the construction and selling it, and Scott for the decals!
For the grime, I think it's a fairly tested formula for many painters now - diluted black acrylic wash all over (with a little extra on some of the dirtier parts) to grunge it up and then sealed with a mist of clear coat.
Then I used to the coloured powders, but you might be able to tell I had something of a mishap here. I use a grey for most of it and a black just to darken specific areas. Well I went and used too much black on the left side of the mohawk so that it was way too dark. I tried to take it down a bit with some light sanding, but decided to just wipe it off with some acetone and start again.
Now unfortunately, since I don't really have anywhere to do this work (and it gets dark outside early now) I was doing this on top of a small foldable table and had left the bottle of acetone on the floor so that it wouldn't fall off if I knocked the wobbly table. Nice idea, but I didn't put the cap on properly, so naturally I then kicked it over and spilled half a bottle of acetone over the floor. Woops...
So at that point I thought it was probably a good time to stop and deal with the spillage... I may at some point go back to finishing that side, but it will do for now.
I attached the inner lining with some high-strength velcro - this time I didn't bother sewing the loop into the lining as the hooks hold it just find without.
The visor is just velcroed in under the lining at the front.
I had to buy a couple of different edge trim thicknesses to get one that could go round both the helmet rim and the lining, but found one that fits.
For the pictures below, I've just placed the microphone behind the ear pad, will probably use the velcro again somehow. It's interesting to note that while you can clearly see some of the pilots wearing the racal minilites as it fits over their heads, Gold Leader's mic tip seems to come from behind the ear pad (see in the picture above). I wonder why this is?
I haven't weathered the chin guard yet, and I'm waiting for a slightly longer piece of elastic strap before I attach it. But other than that, I'll call it done until I redo some of the decal colours and weathering.
Many thanks to Walter for making this, Chad for doing the construction and selling it, and Scott for the decals!
And where are the pics of it w Gold Leader?
Similar threads
- Replies
- 12
- Views
- 1,092
- Replies
- 2
- Views
- 346
- Replies
- 3
- Views
- 574