Seananigans
Well-Known Member
Missing Remington trigger box/mech etc parts big trigger box.stl and 10 more files
I hit the link to the file set and all I get is something that says "transfer Expired"
I will pop a link up in the next few days on here mate.Am late to the party, only just discovered your threads having seen your files on Thingiverse at the weekend. Will you be uploading the rest of the files up there or would you please be able to reupload your STL's again as I get what PakRatJR had:
I'm glad I discovered your threads as I had sliced the Jace1969 files and had printed the pump grip and a fair chunk of the cage.
Your parts are outstanding Sean, bravo Sir!
I will pop a link up in the next few days on here mate.
link below fella..That'll be brilliant, thank you Sean!
link below fella..
No problems mateFantastic, much appreciated.
Thank you so much Sean!
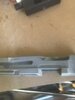
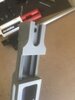
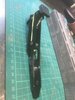
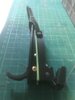
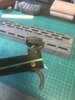
Did you manage to work out the pump action parts?.. here’s a few pics of the trigger assemblyAm late to the party, only just discovered your threads having seen your files on Thingiverse at the weekend. Will you be uploading the rest of the files up there or would you please be able to reupload your STL's again as I get what PakRatJR had:
I'm glad I discovered your threads as I had sliced the Jace1969 files and had printed the pump grip and a fair chunk of the cage.
Your parts are outstanding Sean, bravo Sir!
Missing Remington trigger box/mech etc parts big trigger box.stl and 10 more files

First off, massive thank you for sharing your files. I've been looking for some way to print and build this iconic blaster and this is the most comprehensive set of files that I know of. Awfully generous of you to share your hard work with the community. However, in reviewing your latest download link, I have several questions.
1. I see 3 sets of 'trigger box' files with what looks like the same part repeated 3 times; big trigger box (1), new trigger box parts (2), and trigger box fix (1). big trigger box and trigger box fix also look similar. Which one should we print? Likewise, 'carrier spring remix (1)' and 'remington carrier full size' are the same? There are 2 Thompson grips too it seems.
2. Any possibility of combining the thompson rec half cut and (1) into one single file?
3. Is there any assembly manual for this?
Again, thank you!
Hi, I’m not the best at organising files so some you find are repeats, use the big trigger( ignore the box part) it (the trigger) sits better in the shroud,like Greg says it’s the ‘best grip’ for the Thompson, the carrier spring remix contains a small barrel on the front inside for a spring to be attached To add some resistance when pressed when fitted to the full tigger assembly in the Remington.. if you find Tracey Hutchinson on RPF Facebook I use her account for that group and you will find in-depth pics etc. Ps any questions just use messenger and I will help any way I can. Cheers SeanFirst off, massive thank you for sharing your files. I've been looking for some way to print and build this iconic blaster and this is the most comprehensive set of files that I know of. Awfully generous of you to share your hard work with the community. However, in reviewing your latest download link, I have several questions.
1. I see 3 sets of 'trigger box' files with what looks like the same part repeated 3 times; big trigger box (1), new trigger box parts (2), and trigger box fix (1). big trigger box and trigger box fix also look similar. Which one should we print? Likewise, 'carrier spring remix (1)' and 'remington carrier full size' are the same? There are 2 Thompson grips too it seems.
2. Any possibility of combining the thompson rec half cut and (1) into one single file?
3. Is there any assembly manual for this?
Again, thank you!