You are using an out of date browser. It may not display this or other websites correctly.
You should upgrade or use an alternative browser.
You should upgrade or use an alternative browser.
Probe Droids "R" Us Club
- Thread starter Guy Cowen
- Start date
- Status
- Not open for further replies.
marsattack
Sr Member
The canon has a lot of hours in measuring and testing , then more hours Rob spent modelling it .
here are some pics of the LED style one, I have sprayed this one with undercoat and etch primer , hence the spotted look however its very smooth.


base ,MR style from Phase3, alloy rod and fittings, and I added a few electronics including sensor.

I have a ton of pics to flood this thread and show how we assembled everything, here are a couple more, primed top skirt and bottom of head,


the most difficult for sure is not only cutting the eyes to suit the head , but cutting the eyes so they are correctly placed in height .
once you can do this , then you move on to cutting the kit part correctly as the ILM prop , to be honest we havent seen one yet with correctly cut eyes.
It is no fun doing it, so for those starting on a styrene scratch build and wanting to move a little faster we have perfect stencils to do this for EVERY single eye which will save you many hours and most important many kit parts.
We also have the exact positions for the cubes to be placed around the skirt, and top plating armour and head eyes positions.
We will prepare a kit in the form of files which will include the above mentioned and more, morser karl box, ready to cut by hand OR by laser,
internal armature discs , leg support discs and much more.
We will start working on legs soon but here are a few pics of how the stencils work.....


here are some pics of the LED style one, I have sprayed this one with undercoat and etch primer , hence the spotted look however its very smooth.
base ,MR style from Phase3, alloy rod and fittings, and I added a few electronics including sensor.
I have a ton of pics to flood this thread and show how we assembled everything, here are a couple more, primed top skirt and bottom of head,
the most difficult for sure is not only cutting the eyes to suit the head , but cutting the eyes so they are correctly placed in height .
once you can do this , then you move on to cutting the kit part correctly as the ILM prop , to be honest we havent seen one yet with correctly cut eyes.
It is no fun doing it, so for those starting on a styrene scratch build and wanting to move a little faster we have perfect stencils to do this for EVERY single eye which will save you many hours and most important many kit parts.
We also have the exact positions for the cubes to be placed around the skirt, and top plating armour and head eyes positions.
We will prepare a kit in the form of files which will include the above mentioned and more, morser karl box, ready to cut by hand OR by laser,
internal armature discs , leg support discs and much more.
We will start working on legs soon but here are a few pics of how the stencils work.....
MonsieurTox
Master Member
As far as I'm concerned, I can see how better I could have cut and placed my eyes on my PD head.
Be careful guys, you have some big gaps between your head and the eyes, that's not that much a problem for the saturn domes, but for the canned parts, it will be hard to fill those gaps without doing a mess. My first eye was like that and I realized it wouldnt work, so I remove it and cut another more precisely to get a better fit with no gap (well 0.1 or 0.2mm is acceptable because it can be filled easily, above it will be hard to not mess up the canned parts).
Be careful guys, you have some big gaps between your head and the eyes, that's not that much a problem for the saturn domes, but for the canned parts, it will be hard to fill those gaps without doing a mess. My first eye was like that and I realized it wouldnt work, so I remove it and cut another more precisely to get a better fit with no gap (well 0.1 or 0.2mm is acceptable because it can be filled easily, above it will be hard to not mess up the canned parts).
MonsieurTox
Master Member
The ribbed large saturn parts (the cone and the 2 other large stages) and the smaller stages as well (the ones used on the X-Wing).
Precise fit is the key for those parts, and while the gaps can be filled, the joint will never be very clean and the time spent in sanding carefully between each raised lines is insane in comparison of having the parts with a tight fit from the beginning ! Most of the time, the top of the parts dont need a very good fit since they will be under the armor plate, thats more about the bottom of the parts !
Precise fit is the key for those parts, and while the gaps can be filled, the joint will never be very clean and the time spent in sanding carefully between each raised lines is insane in comparison of having the parts with a tight fit from the beginning ! Most of the time, the top of the parts dont need a very good fit since they will be under the armor plate, thats more about the bottom of the parts !
dsp5500
Well-Known Member
Ok got ya, I put a tiny bead of putty on my parts just to fill very small gaps, they look pretty tight to me. I'll shoot some primer over them tomorrow and take some shots to see how they come out. And yer it's mainly the bottom half you need to worry about as the top sections are mostly covered with armour plating.
MonsieurTox
Master Member
Rob, yours look pretty tight, I was more worried about the last pics posted by Mars :

Sorry if I confused you !
Sorry if I confused you !
qcfoundry
Sr Member
Thanks Jason, Yer they certainly help in making a quality model.
Ive had a few requests for the parts Ive modelled for the Probe Droid so Ive set up a store front on shape ways.
All thats up there for now are the parts needed to make the Probe Droid Gun and the Hinges for the pistons on the leg.
You can get away with using White Strong & Flexible material for the Gun Body, Gun Base and Hinges. There fine just a bit of cleanup to do.
The Upper Mount and Single Ring because of the thin walls need to be made in Frosted Detail at least. Of course the Frosted detail
will give the best results for all parts.
Robs Prop Parts by dsp5500 on Shapeways
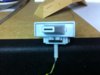
There are two Gun Body's, One is designed to have a 5mm rectangle LED inserted into the barrel the other is just solid.
This was a custom request from Marcel but others may also be adding lights so it's up there.
Here's the breakdown of the Gun
Rob,
Can you help me with your grown parts?
-whats the difference between the "upper mount" and the "single ring"?
-is one of your tree of brackets enough to fully cover 1 PD, or do we need to buy multiple trees?
thx
dsp5500
Well-Known Member
One tree is enough for 1 PD. The upper mount is the ring that the gun sits in, The single ring is the ring by itself. The reason there is two is that my eye saw each ring in a slightly different position on the prop and because there pre cut to match the curve of the armour they both have a different contour. We decided to have the gun rotate so to achieve the rotation of the gun and still have it sitting at the correct height this is the way to install it. Place the ring on top of the armour, adjust by eye but it should fit at the correct spot due to the contour. glue it in place then cut through the armour plating and sand smooth. It easier to do this before you glue the armour to the body. The upper mount ring also has a base for the gun to sit on, this is in the correct position as attached to the ring and allows full 360 deg rotation. If you go this way you will also need to cut a piece of the armour and glue it to the base that sits inside the ring bringing it to the correct height. If you already have the armour installed then just place the ring on top with the base minus the extra piece glued to it. It will still look fine just wont be able to rotate 360 deg.
Pic 1: This is the first version of the gun, The new version has the bottom half of the gun as one piece.
Pic 2: Show the ring glued in place on the armour
Pic 3: Shows the inside cut and sanded flush to the ring
Pic 4: This again is the first gun with LED installed and routed down the tube
Pic 5: Shows the base the gun sits on inside the ring with a bit of plating attached to the bottom.
Attachments
dsp5500
Well-Known Member
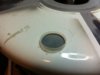
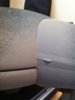
I shot a quick spirt of primer in the middle section of the tapered eye just to see how it would turn out.
This eye has no putty and just the cut then sloppily glued to the head. What i did notice was were the primer is
faded and light towards the top and bottom of the eye due to the contrast of the grey primer and the black
head there look's to be a pronounced gap but where the primer went on solid it match's the contour of the head fine. I'm certain now that once
its cleaned from the glue residue and minor puttying with a bit of sanding all the eys will turn out fine.
Attachments
marsattack
Sr Member
Looks awesome rob, the stencils work great however the "operator"
Will need a steady hand wih the dremel or tool to
Cut.
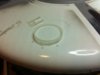
Julien , maybe it's the shade in the pic , but I started today with spray around the eyes also to see if I did have a gap.
After cleaning the glue a bit and only spraying around this one eye (pic1)as I haven't finished with the head eyes it turned out just fine.
Small command module looks like there is a gap but there isn't one .
I don't want to go to far with spray as the armor sticks better to the vac .
Fig2 has no putty .
Also none of my eyes have any putty and were only stuck with CA glue.
Also a shot from underneath just finished wih etching primer .
Need to drill the holes around the sides and bottom half is finished.
I won't be making anymore leg support discs , but rob has the original schematics , the inner pins we made to secure the legs in the future.


Will need a steady hand wih the dremel or tool to
Cut.
Julien , maybe it's the shade in the pic , but I started today with spray around the eyes also to see if I did have a gap.
After cleaning the glue a bit and only spraying around this one eye (pic1)as I haven't finished with the head eyes it turned out just fine.
Small command module looks like there is a gap but there isn't one .
I don't want to go to far with spray as the armor sticks better to the vac .
Fig2 has no putty .
Also none of my eyes have any putty and were only stuck with CA glue.
Also a shot from underneath just finished wih etching primer .
Need to drill the holes around the sides and bottom half is finished.
I won't be making anymore leg support discs , but rob has the original schematics , the inner pins we made to secure the legs in the future.
")
qcfoundry
Sr Member
I've been wondering how to cut these shapes correctly (in the far off future). To those who have already tackled this task, please chime in and tell me if my idea would work.
-take heavy card stock paper and wrap around the cone until the paper lays flat against the plastic cone.
-once the paper has the same angle, cut the excess paper off the "top" and "bottom".
-you now have a cardstock copy of the cone.
-reinforce the paper cone so it stays circular instead oval-ish - do this by cutting a plastic (0.04" plate?) circle and taping it to the smaller end of the cone. then also insert another plastic circle IN the cone that has the average diameter of the smaller end and the larger end of your cone. tape the inside circle into the inner face of the cardstock.
-once you have made one of these slowly cut away at it until you have the selected curve/edge that fits the PD head correctly.
-make a new cone once you screwed up too much.
-wash, rinse, repeat.
i'd rather make 5 of these jigs then screw up trying to get the real cone correct the first try.
thoughts?
marsattack
Sr Member
Lee , guy , thanks for the comments.
Like everything , you see something and you want one, then you want to go that little bit extra.
No doubt after these two, another one will show up better , with more info etc.
Quincy, yep I would do them that way.
However once you have reached the correct shape, the height needs to be spot on too.
1 mm up and your stencil needs to be redrawn.
Lets say that you have achieved the contour, I would then measure the bottom visible length of the cone and then find the correct cone and place the stencil over it.
Once cut you can try very minor adjustments.
One thing we found , most of he eyes are square to the base and not tilted and every eye is differently cut and at a different height.
Those two large eyes, look like they are at the same height but they are not.
The tri ball eyes are different shapes altogether.
So don't just get one stencil and transfer it to the other similar eye.
And Quincy if you screw them up I have a cast of every eye as I screwed up a lot of them too.
MonsieurTox
Master Member
One thing we found , most of he eyes are square to the base and not tilted and every eye is differently cut and at a different height.
Those two large eyes, look like they are at the same height but they are not.
The tri ball eyes are different shapes altogether.
So don't just get one stencil and transfer it to the other similar eye.
Yes Q, Mars is right, none of the eyes are placed the same, the shape are different (some are trimmed a bit shorter, Im thinking about the saturn V cans, the same used for the X wing engines), and of course they're not tilted, but this one is very obvious from the ref pics !
marsattack
Sr Member
Last 2 shots of the skirt, I am not going to touch it anymore other than the bolt holes around the sides.
Everytime I sanded I put on scratches so I am happy with this.
I think rob and I covered every detail , from the round neck edge to the underside inner ring .
Rob has one more detail inside the morser box which I hurried and can't fit it ATM.
Will try later , prior to painting .
I have damaged a lot of parts and redid things as I measured wrong the first time.
So we are now able to suggest a better way of working with the vac pulls.
They look scarier than what they really are, ask as many questions as you want and need to prior to doing anything as this will affect possibly the following step.
- Status
- Not open for further replies.
Similar threads
- Replies
- 5
- Views
- 711
- Replies
- 2
- Views
- 557
- Replies
- 2
- Views
- 1,844