You are using an out of date browser. It may not display this or other websites correctly.
You should upgrade or use an alternative browser.
You should upgrade or use an alternative browser.
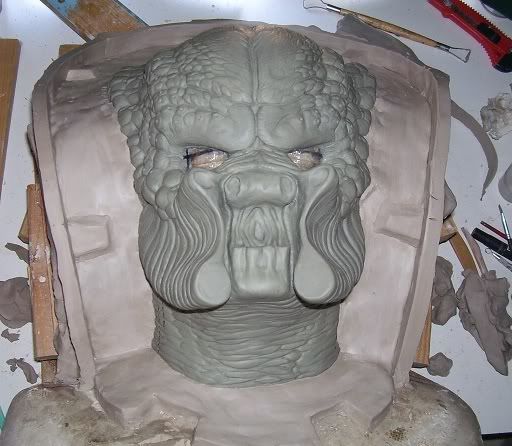
Predator Head Sculpt
- Thread starter Termokk
- Start date
Termokk
New Member
That's insanely awesome work! Any tips for someone just getting starting with sculpting? Any videos or websites you recommend?
Well i dont have any videos off the top of my head, but i will post my pictures of the mold making and casting progress because there seems to be interest. Once i am done i am thinking about doing a tutorial on different textures in clay and how to make them if enough people are interested? I am always happy to answer any questions, i will never say its a movie secret like some others would say.
Too Much Garlic
Master Member
Get yourself some Super Sculpey and start messing around with it and trying to create recognizable shapes, looking at pictures, trying to recreate in 3D what you see, trial and error, but always with the drive to want to achieve something special. Not all can sculpt... but it harms no one to try to find out if you have the skills.That's insanely awesome work! Any tips for someone just getting starting with sculpting? Any videos or websites you recommend?
Post here and ask for critiques. Start small and not like me... throwing yourself right into the advanced stuff... though... that can be fun too. But try to learn the basics first:
Tools.
Concept.
Preparation - wireframe skeleton structure that is strong enough and don't buckle. Twist it so the sculpey has something to grip onto, so it doesn't slide back and forth. Build up wherever you can with tin foil to save sculpey.
Execution.
Don't let negative comments get you down - always hope for constructive criticism... and even the bad can be helpful as it may help you to better the sculpt or get better in the future. Grow thick skin and always be proud of what you create, as anyone can be a critic; not anyone can create.
There are a lot of tutorials over at TheClubhouse


Termokk
New Member
Get yourself some Super Sculpey and start messing around with it and trying to create recognizable shapes, looking at pictures, trying to recreate in 3D what you see, trial and error, but always with the drive to want to achieve something special. Not all can sculpt... but it harms no one to try to find out if you have the skills.
Post here and ask for critiques. Start small and not like me... throwing yourself right into the advanced stuff... though... that can be fun too. But try to learn the basics first:
Tools.
Concept.
Preparation - wireframe skeleton structure that is strong enough and don't buckle. Twist it so the sculpey has something to grip onto, so it doesn't slide back and forth. Build up wherever you can with tin foil to save sculpey.
Execution.
Don't let negative comments get you down - always hope for constructive criticism... and even the bad can be helpful as it may help you to better the sculpt or get better in the future. Grow thick skin and always be proud of what you create, as anyone can be a critic; not anyone can create.
There are a lot of tutorials over at TheClubhouse
Good ideas here, but one comment i have; Super sculpty is not somthing you will want to use if mask making is your intention. Sculpy kinda behaves like funtack. It can be heated in the oven and painted if that is your intention, and in that case its probably the best for a beginer. This sculpture is done in a roma plastelina #2. Its an oil/sulpher based clay and its a fantastic clay. (chavant is great too) They always stay flexible and when ur done making a sculpture and molding it you can re-use it. If you would like to make sculptures that will be molded its your best bet to spend a little extra and get the good stuff. my 2 cents
Termokk
New Member
Well the mold makiing has begun and as promised i will post the process pictures! The first step is the lay the head back to make it easyer to work on. I laid it onto a towel with a garbage bag over it to keep it from getting towel fuzzies. I then shaped out the rough form of the clay wall that will devide the mold with old wooden blocks. I drew some lines to find the best spot to separate the mold to not lock onto the head cast.

Next i built up the clay walls that will make the devision between the two pice mold. Its laguna wed clay and pretty easy to come by. The keys are on the outside edge to make the two pices lock together.

Next is the splash coat of ultracal 30 brushed into all the details to make the detail layer.

Then about 5 layers of ultracal with burlap reinforcments. I smoothed the face kinda flat so it wont wobble when ur working with it.

Next is to flip it over and take off all the wed clay. Any little pices that stick can be removed with a soft chip brush and some water. The head will need a little clean up from being layed down on a garbage bag.

I will post the making of the next side as it gets done, gonna go do it right now. Thanks for looking and i hope this helped some people new to mold making :lol
Next i built up the clay walls that will make the devision between the two pice mold. Its laguna wed clay and pretty easy to come by. The keys are on the outside edge to make the two pices lock together.
Next is the splash coat of ultracal 30 brushed into all the details to make the detail layer.
Then about 5 layers of ultracal with burlap reinforcments. I smoothed the face kinda flat so it wont wobble when ur working with it.
Next is to flip it over and take off all the wed clay. Any little pices that stick can be removed with a soft chip brush and some water. The head will need a little clean up from being layed down on a garbage bag.
I will post the making of the next side as it gets done, gonna go do it right now. Thanks for looking and i hope this helped some people new to mold making :lol
Too Much Garlic
Master Member
Sweet. And nice to see it from the back.
Vegas Vader 2
Well-Known Member
this looks awesome!! and very impressive first post!!:love
Termokk
New Member
I found this pic funny.... RIP predator
LOL! :lol
Yea that its kinda funny. Well the mold making is finished... and i would like to share the final stages with everyone! This first picture is the back of the head with another wed clay wall around it to act as a guide for the ultracals thickness, and it will make a place to put clamps when its done. The pry points are added by making little clay wedges and sticking them around the edge to create a void in the ultracal. All places where ultracal will touch ultracal is covered in vasaline to act as a separating agent. A good layer of crystal clear spray paint helps make the clay come out of the mold a little easyer.

Then a splash coat is added of ultracal-30 to everything, followed by about 5 layers of ultracal soaked burlap. The burlap is there to reinforce the mold so if it cracks it wont shatter.

And thats it! I pryed the molds apart this mourning and there is a first casting of latex drying in there now. Just need to start molding all the teeth and the mandibles now...
Too Much Garlic
Master Member
Cool.
You gotta show some pictures of that bio you have hiding in the back of some of the pictures.
You gotta show some pictures of that bio you have hiding in the back of some of the pictures.
Termokk
New Member
Cool.
You gotta show some pictures of that bio you have hiding in the back of some of the pictures.
Well if you would like to see it here it is. I made this to fit another mask i made. Its fiberglass and from a silicone mold. I painted it up to look like the first predator. There will be bio masks that will fit this current sculpt as well, i am gonna start with a celtic i think. Maybe some crazy design...

Too Much Garlic
Master Member
Sweet.
For P1, however, you should switch the grill out for lenses.
For P1, however, you should switch the grill out for lenses.
Termokk
New Member
Sweet.
For P1, however, you should switch the grill out for lenses.
Yea, i am going to use lenses on the next one i make, but to wear around the mesh helps get some air inside the mask. Its like a predator 1 but its kinda stylized.
Termokk
New Member
OK well i just got done with the first side of the teeth and upper mandable molds! In this first picture you can see the teeth half buried in wed clay, with overflow lines and keys cut in. The walls were some scrap plastic and its got crystal clear same as usual.

Then a splash coat is applied of ultracal 30. I like to get it about half full and float a pice of burlap in there, then fill it the rest of the way up.

And thats about it, same procedure for doing the other side as the head. Gonna try to have some of these mandables cast up tommarow. The latex in the head mold is still drying i put alot on there to make these nice and thick. Will post more updates as they are completed.
Then a splash coat is applied of ultracal 30. I like to get it about half full and float a pice of burlap in there, then fill it the rest of the way up.
And thats about it, same procedure for doing the other side as the head. Gonna try to have some of these mandables cast up tommarow. The latex in the head mold is still drying i put alot on there to make these nice and thick. Will post more updates as they are completed.

Similar threads
- Replies
- 5
- Views
- 912
- Replies
- 7
- Views
- 432
- Replies
- 6
- Views
- 1,061