Blaxmyth
Sr Member
I thought it was about time I assembled my files and shared some progress pics and problems I had to overcome.
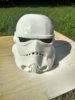
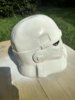
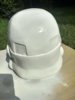
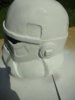
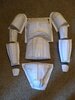
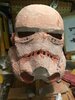
Here's a photo of my Gravel Trooper suit at my mum's 90th birthday last year. It's still a work in progress and I the arms and thighs are vacformed plastic, but I've glassed all the remainder - just needs finishing and strapping.


Not nearly screen accurate, I know, but my version is that it's for the taller and more bulky trooper... Actually, I never really expected to get it to this stage - it's a lot of work, with pieces being pepped and re-pepped up to a dozen times each.
I have done over twenty troops now, and completed two 11 km walks. The fibreglass is a lot heavier than plastic, and as I'll be 65 next month, I'll be doing shorter stints from now on.
My suit is partly based on a mix of my files and some heavily modified dung0beetle files. I found that I needed to lengthen the calves and thighs, and widen the torso pieces. The shoulders and arms also needed tweaking. Pretty much every piece is made overly long so it can be trimmed to length to suit.


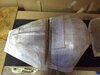
Fibreglass suits are totally inflexible, and armour bite is a lot worse than with vacformed plastic. The calves were a real problem until I cut out a panel in the lower inner calf and secured it with small zip ties. They tend not to be noticed. Also, the lower sides help the calf become self-aligning. The knee plate had to be supported out in front of the knee on a piece of thick rubber, because it was seriously painful on the kneecap otherwise.
The thighs are going to be fun... The db files are too slim fitting and I pepped several versions before I got close. Even then they will need some padding and also some of the back of the knee removed.


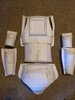
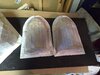
The butt plate is made super thick, in one continuous layout of cloth, so there is no chance of it breaking when you sit down. Six hours standing is no joke any more and it's nice to be able to take the weight off.
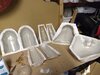
What else? I'll make the new torso separate from the thighs. I'll hang the thighs off a belt and braces. This will let me get the torso and chest/back plates on and off quickly. The forearm halves mate together snugly and will hold together with a magnet. The shoulders in the picture are purposely made far too long, but it's easy to trim them to length as required.
The coil of auto trim is glued and wired onto the edges of the chest and back plates. It gives a more finished look, especially where the chest plate rides over the ab plate.
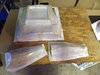
The flat base surrounds in the pics are so that the pieces can be stiffened with resin and glass before being trimmed off the base. This prevents any distortion and is well worth the extra effort. I ruined a few pieces before I thought of this method.
All of my pep files are unlocked and you are free to modify them to suit yourselves. It'd be cool if they didn't end up being sold though. Files are in my DropBox, with links at bottom of this post or the one following.
More to come.
Here's a photo of my Gravel Trooper suit at my mum's 90th birthday last year. It's still a work in progress and I the arms and thighs are vacformed plastic, but I've glassed all the remainder - just needs finishing and strapping.
Not nearly screen accurate, I know, but my version is that it's for the taller and more bulky trooper... Actually, I never really expected to get it to this stage - it's a lot of work, with pieces being pepped and re-pepped up to a dozen times each.
I have done over twenty troops now, and completed two 11 km walks. The fibreglass is a lot heavier than plastic, and as I'll be 65 next month, I'll be doing shorter stints from now on.
My suit is partly based on a mix of my files and some heavily modified dung0beetle files. I found that I needed to lengthen the calves and thighs, and widen the torso pieces. The shoulders and arms also needed tweaking. Pretty much every piece is made overly long so it can be trimmed to length to suit.
Fibreglass suits are totally inflexible, and armour bite is a lot worse than with vacformed plastic. The calves were a real problem until I cut out a panel in the lower inner calf and secured it with small zip ties. They tend not to be noticed. Also, the lower sides help the calf become self-aligning. The knee plate had to be supported out in front of the knee on a piece of thick rubber, because it was seriously painful on the kneecap otherwise.
The thighs are going to be fun... The db files are too slim fitting and I pepped several versions before I got close. Even then they will need some padding and also some of the back of the knee removed.
The butt plate is made super thick, in one continuous layout of cloth, so there is no chance of it breaking when you sit down. Six hours standing is no joke any more and it's nice to be able to take the weight off.
What else? I'll make the new torso separate from the thighs. I'll hang the thighs off a belt and braces. This will let me get the torso and chest/back plates on and off quickly. The forearm halves mate together snugly and will hold together with a magnet. The shoulders in the picture are purposely made far too long, but it's easy to trim them to length as required.
The coil of auto trim is glued and wired onto the edges of the chest and back plates. It gives a more finished look, especially where the chest plate rides over the ab plate.
The flat base surrounds in the pics are so that the pieces can be stiffened with resin and glass before being trimmed off the base. This prevents any distortion and is well worth the extra effort. I ruined a few pieces before I thought of this method.
All of my pep files are unlocked and you are free to modify them to suit yourselves. It'd be cool if they didn't end up being sold though. Files are in my DropBox, with links at bottom of this post or the one following.
More to come.


")