Parquette
New Member
Evening all! After years of on/off research on this particular costume, I have finally made what I think is one of the most accurate replicas of the Witch King's gauntlets.
Now let me begin first by saying, I am not saying other replicas are bad. I LOVE Kropserkel's replicas, and in fact he gave me fantastic advice for areas I was unsure about. I am by no means an expert on armor, but despite my research, there were still areas I needed tips and tricks on. Scott Maple, my hat's off to you sir. I'll have to buy a replica one of these days!
Alright, now for my replica.

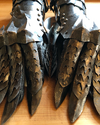
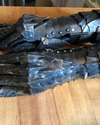
Ringwraith gauntlets 2.0. Made by me in 22 gauge steel. Now for some HD outdoor shots


After tirelessly examining BTS pictures, footage, and realizing a lot of details were missing from replicas on the market, I took it upon myself to make as exact a replica as possible.


Amongst the details never recreated by prop makers is an odd hinged plate on the bottom wrist. It intersects with the clamshell vambrace (with flute work also noticed at certain angles) and interlocks.

Next the fluting on the upper vambrace parts all intersect, and don’t end abruptly as I had previously thought. The spikes on the knuckles are also smaller, and the overall craftsmanship is more crisp. The metacarpal under the knuckles has 2 sudden ridges hidden underneath, so it has a gapless overlap.

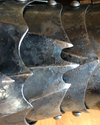
Finally was the scaling texture, which was a tip provided by the wonderful @lordbloomfield on instagram, who trained under Stu Johnson - the blacksmith who made the screen used Nazgul armor. This effect is simple: Throw your parts in a coal-forge, increase heat to a high temperature (without warping or melting preferably), and once you see dark scaling on the entire surface, remove and use a steel brush drill bit to remove the loose flakes. Then polish on a wheel, and you get a two tone effect, which is dimensional and similar to the closeup at Weathertop (included below).

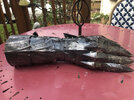
I did for a while experiment with Muriatic acid, which worked close to this effect once out of 5 different attempts, but for kicks and giggles here's what that looked like:

Below are some BTS pics I was able to track down from every corner of the internet. I certainly hope someone else who worked on the films will have higher depth photos than I have here, unfortunately Stu didn't have any available from his time on it. I hope you all enjoy!
Fig. 1: Fellowship of the Ring Witch King (without robes) costume screen test. This was what showed me the hinged plate under the wrist. And also showed me the geometric shape of the metacarpal plates, as opposed to the patterns Tested made available, which are very rounded off on the ends.

Fig. 2: Test shot showing the full armor (that ultimately was redesigned to less resemble Sauron). This and the above image showed me the pointed finger lame at the end of the thumb is actually shorter and smaller than the rest. It's more likely the lame that comes before the spiked finger tips on the other fingers.

Fig. 3: Details showing the top forearms plates, and their flute work.

Fig. 4: 2 Images from Weathertop, showing not only the spiked knuckles, but also the scaling texture absent from replicas. I would also like to point out something that I wasn't able to easily get with my replica, and that was the knuckle spikes are actually protruding out from the plate. Notice they don't lay perfectly flat, but rather rise upward. Something I intend to remedy on the next go around in the future.


Fig. 5: Armor mess-up, the wrist is disconnected from the hand, so it better articulates while holding Eowyn. But this showed me how the metacarpal plate is flush with the knuckle plate, and has 2 hidden ridges to simulate the other fingers not represented by the 3 row fluting design.

Fig. 6. Gauntlet opened up, showing the odd plate under the wrist opened past the forearm vambrace.

Fig. 7: Brightened image of gauntlet/rest of armor from Fig. 2, provided by Weta Workshop's website. This is what confirmed to me the scaling was the correct method. As an aside, it was made aware to me by Lord Bloomfield that Stu textured the "Grunt" Nazgul armor in an odd way:
As you can see in these closeup photos (courtesy of Lord Bloomfield), that the prop on display at Weta's Cafe has a "criss-cross" haphazard etching all over it (also, this exact prop is oversized and was used in all closeups where the Nazgul reach out to Frodo. You can tell by the weird holes in the knuckle plate, which match up perfectly with the tree hiding scene, and the Arwen chase).


Compare this with the Witch King Below. It's clear that the Witch King was done differently, and more naturally.

Thank you all for perusing my thread, if you have any questions, I'll do my best to answer in a speedy time.

Now let me begin first by saying, I am not saying other replicas are bad. I LOVE Kropserkel's replicas, and in fact he gave me fantastic advice for areas I was unsure about. I am by no means an expert on armor, but despite my research, there were still areas I needed tips and tricks on. Scott Maple, my hat's off to you sir. I'll have to buy a replica one of these days!
Alright, now for my replica.
Ringwraith gauntlets 2.0. Made by me in 22 gauge steel. Now for some HD outdoor shots
After tirelessly examining BTS pictures, footage, and realizing a lot of details were missing from replicas on the market, I took it upon myself to make as exact a replica as possible.
Amongst the details never recreated by prop makers is an odd hinged plate on the bottom wrist. It intersects with the clamshell vambrace (with flute work also noticed at certain angles) and interlocks.
Next the fluting on the upper vambrace parts all intersect, and don’t end abruptly as I had previously thought. The spikes on the knuckles are also smaller, and the overall craftsmanship is more crisp. The metacarpal under the knuckles has 2 sudden ridges hidden underneath, so it has a gapless overlap.
Finally was the scaling texture, which was a tip provided by the wonderful @lordbloomfield on instagram, who trained under Stu Johnson - the blacksmith who made the screen used Nazgul armor. This effect is simple: Throw your parts in a coal-forge, increase heat to a high temperature (without warping or melting preferably), and once you see dark scaling on the entire surface, remove and use a steel brush drill bit to remove the loose flakes. Then polish on a wheel, and you get a two tone effect, which is dimensional and similar to the closeup at Weathertop (included below).
I did for a while experiment with Muriatic acid, which worked close to this effect once out of 5 different attempts, but for kicks and giggles here's what that looked like:
Below are some BTS pics I was able to track down from every corner of the internet. I certainly hope someone else who worked on the films will have higher depth photos than I have here, unfortunately Stu didn't have any available from his time on it. I hope you all enjoy!
Fig. 1: Fellowship of the Ring Witch King (without robes) costume screen test. This was what showed me the hinged plate under the wrist. And also showed me the geometric shape of the metacarpal plates, as opposed to the patterns Tested made available, which are very rounded off on the ends.
Fig. 2: Test shot showing the full armor (that ultimately was redesigned to less resemble Sauron). This and the above image showed me the pointed finger lame at the end of the thumb is actually shorter and smaller than the rest. It's more likely the lame that comes before the spiked finger tips on the other fingers.
Fig. 3: Details showing the top forearms plates, and their flute work.
Fig. 4: 2 Images from Weathertop, showing not only the spiked knuckles, but also the scaling texture absent from replicas. I would also like to point out something that I wasn't able to easily get with my replica, and that was the knuckle spikes are actually protruding out from the plate. Notice they don't lay perfectly flat, but rather rise upward. Something I intend to remedy on the next go around in the future.
Fig. 5: Armor mess-up, the wrist is disconnected from the hand, so it better articulates while holding Eowyn. But this showed me how the metacarpal plate is flush with the knuckle plate, and has 2 hidden ridges to simulate the other fingers not represented by the 3 row fluting design.
Fig. 6. Gauntlet opened up, showing the odd plate under the wrist opened past the forearm vambrace.
Fig. 7: Brightened image of gauntlet/rest of armor from Fig. 2, provided by Weta Workshop's website. This is what confirmed to me the scaling was the correct method. As an aside, it was made aware to me by Lord Bloomfield that Stu textured the "Grunt" Nazgul armor in an odd way:
Stu said that he would use spray glue as a resist and would basically muck with the nozzle so it would spray unevenly and he would let it go into the air and then land on the piece of metal randomly. At the time he used nitric acid Which as you probably know is about as full on as Muriatic Acid.
As you can see in these closeup photos (courtesy of Lord Bloomfield), that the prop on display at Weta's Cafe has a "criss-cross" haphazard etching all over it (also, this exact prop is oversized and was used in all closeups where the Nazgul reach out to Frodo. You can tell by the weird holes in the knuckle plate, which match up perfectly with the tree hiding scene, and the Arwen chase).
Compare this with the Witch King Below. It's clear that the Witch King was done differently, and more naturally.
Thank you all for perusing my thread, if you have any questions, I'll do my best to answer in a speedy time.
Attachments
Last edited: