Nike Mag V2 Mod Discussion (Page 58 Shopping List)

Status
Not open for further replies.
EARL!
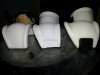
They do look nice, I wonder how they fitted everything in though, incredible achievement.
Looks like its the exact same system as the Mag Lacing prototype they showed last year.

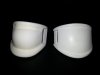
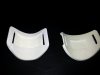
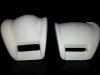
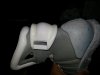
One of the videos on Sneaker Head or Sole Collector or what ever it was I was looking at suggests that the bottom of the sole, about where the arch is, has a molded box. All electronics would be housed in that.

I told you guys. The self lacing shoes will be integrated into shoes other than the MAGs.

BTW, these are ugly as ****!!!

they look like Shape Ups.
Agreed. I am not a fan of these or many of the recent shoes NIKE have put out.

I'd suggest these EARLs are for the general consumer. Not everyone likes the MAG with many posted comments about how ugly they are. Besides, not everyone wants to wear a really tall hi-top. I think standard "sneaker" will have greater market appeal than a MAG to introduce "power laces".

You're not far off! They obviously did this to stall a little longer. They will eventually be on the mags but this is their way of trying to keep us from demanding the real thing.

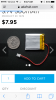
Weren't they doing a "power laced" MAG auction later this year?

If that pair MJF wore are not just a 1 off, then I'd say that have them all ready to go for auction.
 
Here's a fully EL Panel Light Up V2 Replica. I did the video with a Pansonic Lumix, but im not sure how to get it to accurately show the lighting?
Always looks blue rather than its actual colour of cyan.

The sole lights are folded back where the black heatshrink starts and fit into the sole very nicely.
In this example, the white straps were made from scratch using faux leather and using a stiff material inside which gives is a strong feel just like the original V2 straps.

The video doesn't do the actual Cyan colour panel justice. In the video they are looking way too blue but in reality they are cyan just like the RD lights.
They are actual cyan, not blue aqua, so they should be more or less identical to the RD ones.

I'm still working to see if a 9v LED ankle board can be made, thus making it optional to choose either use an EL Ankle lighting panel or the regular LED ankle panel depending on preference for screen accuracy lighting, everything premade, so just plug and play and minor soldering.

Whilst LEDs in the ankle area are brighter than the fully EL Panel, the EL Ankle panel is still quite bright and gives super long battery life, as everything is EL lighting, so no LEDs sucking the power down quick, so its an alternative to the screen accurate method of LEDs.


https://youtu.be/IxsMltqtmPI

Nice job airair. I think the reason they used LEDs in 1989 was because EL was so new and there was probably only the one colour available. In the sketches, the LEDs were supposed to sequence, but they don't, so an alternative lighting system like you have done is great. I have done 2 pair this way and battery life is over 24 hours Vs 5 on the same battery. The circuits are way simpler too.

Are you using the same cyan EL under the fake LEDs or white EL?

Getting the colour to show up as 'correct" is a challenge. You need to calibrate the camera so it knows what white is and you are chasing an actual coordinate of x = 0.313, y = 0.329 which gives you the correct D6500K need to see proper colour in video. Most video systems are well and truly over that, being closer to 8300K which is why everything tends to look bluish - hence the blue push on the cyan. Then there is the issue that everyone's monitors also need to be calibrated to D6500K as well. My Samsung tablet has a close to D6500K mode and the same images seem more red on that screen. Once you get used to seeing everything not tinted blue by an excessive high colour temp, colours look way nicer.
 
So just when I thought all my MAG modding was done, along comes the idea of revisiting the very first part I ever did as a custom - the Ankle Buckle.

attachment.php

attachment.php


I have been using the CP-3D part since cloneprops first uploaded the file to shapeways. I really like the part, but it is slightly too big. The cool thing about it was it just clips overt the factory rubber part that comes with the shoes, so you can use this pretty much right out of the box. I have wanted a smaller version for a while now, just had too many other projects on the go. Today I decided to take some time out and make these happen.

So originally I was going to cut down the CP-3D part, but then decided to re-work a pair of vacuum formed (ABS) parts I have had sitting on my bench since 2012 or something. So the first step was make the hollow parts solid by slush casting in some D65 (this is a 2 part at 1:1 ratio that sets into a hard, white plastic). Then I took to the parts with a dremil and bullet nose bit. I used the CP-3D as a reference to the overall shape. I still need to grind down the bump on the back, but these are looking pretty cool. The problem is, because these are hand made, I have to choose the best of the two and then mold and cast that one part twice to make a pair. Because I am going for "screen accurate", there will be no charge ports on these parts.
 

Attachments

  • 20160318_181920.jpg
    20160318_181920.jpg
    116.8 KB · Views: 409
  • 20160318_182033.jpg
    20160318_182033.jpg
    122 KB · Views: 395
So just when I thought all my MAG modding was done, along comes the idea of revisiting the very first part I ever did as a custom - the Ankle Buckle.

http://www.therpf.com/attachment.php?attachmentid=604966&d=1458300210
http://www.therpf.com/attachment.php?attachmentid=604965&d=1458300210

I have been using the CP-3D part since cloneprops first uploaded the file to shapeways. I really like the part, but it is slightly too big. The cool thing about it was it just clips overt the factory rubber part that comes with the shoes, so you can use this pretty much right out of the box. I have wanted a smaller version for a while now, just had too many other projects on the go. Today I decided to take some time out and make these happen.

So originally I was going to cut down the CP-3D part, but then decided to re-work a pair of vacuum formed (ABS) parts I have had sitting on my bench since 2012 or something. So the first step was make the hollow parts solid by slush casting in some D65 (this is a 2 part at 1:1 ratio that sets into a hard, white plastic). Then I took to the parts with a dremil and bullet nose bit. I used the CP-3D as a reference to the overall shape. I still need to grind down the bump on the back, but these are looking pretty cool. The problem is, because these are hand made, I have to choose the best of the two and then mold and cast that one part twice to make a pair. Because I am going for "screen accurate", there will be no charge ports on these parts.
is it hollow on the inside ? I want to out a lithuim polymer battery in it..
 
Thicker than the CP buckle. Still having issues with bubbles in these bubbles.


I will add extra material to make it stronger.

I can sorta picture that lets just hope I have enough room to fit roughly a 2inch by 2 inch lipo and a small built in charger ! or I could sand a little out of the buckle :confused, and the ankle bubbles hope you can figure it out soon ! I'm starting a new mag mod and wanting the cool stuff you make for it, I'm just waiting for all the pieces to fall into place.
 
2" x 2"? That would be pushing it. Maybe in the CP-3D part, but I doubt my new parts would allow that to go in there.
 
now that I look at this image... I really don't know that size exactly

In the CP-3D part, no problem. In my part, I doubt it. In fact it is looking like I have to grind out a fair bit on the inside of the part I am making to make comfortable to wear.
 
I did some more work on the new master part. I decided to settle on just of the two I was working on and really push that to get it a moldable stage. It still needs more work but getting close now.

Outside surface next to the original factory part.

attachment.php


Inside surface.

attachment.php


Side profile

attachment.php


On a pair of US8

attachment.php
 

Attachments

  • 20160320_201838.jpg
    20160320_201838.jpg
    67.2 KB · Views: 572
  • 20160320_201911.jpg
    20160320_201911.jpg
    103.1 KB · Views: 570
  • 20160320_201940.jpg
    20160320_201940.jpg
    80.2 KB · Views: 573
  • 20160320_225608.jpg
    20160320_225608.jpg
    99.2 KB · Views: 602
I did some more work on the new master part. I decided to settle on just of the two I was working on and really push that to get it a moldable stage. It still needs more work but getting close now.

Outside surface next to the original factory part.

http://www.therpf.com/attachment.php?attachmentid=605669&d=1458480136

Inside surface.

http://www.therpf.com/attachment.php?attachmentid=605670&d=1458480136

Side profile

http://www.therpf.com/attachment.php?attachmentid=605671&d=1458480168

On a pair of US8

http://www.therpf.com/attachment.php?attachmentid=605672&d=1458480184

These are looking great man, definitely a huge step up from the standard V2.
 
These are looking great man, definitely a huge step up from the standard V2.

Thanks. I think I am going to shave a bit of take the bulge off the middle part. Other than that, I need to extend the ends on the part where the strap feeds through and all good.
 
Thanks. I think I am going to shave a bit of take the bulge off the middle part. Other than that, I need to extend the ends on the part where the strap feeds through and all good.

I'm sure you have plenty of reference images but this one is particularly good for seeing exactly how much the buckle bulges out.

Also, the mags just look particularly pretty here i think :D


NikeMag_2011_0854_LarryLuk_JoeMartinez_08.jpg
 
Status
Not open for further replies.
Back
Top