cavx
Master Member
Ok, I'll try this spot if the wrikles don't want to go away.
Trust me, you want to get the toe box out of your shoes. They become SOOOO much more comfortable without that hard thing pressing against your toes after the slim.
Ok, I'll try this spot if the wrikles don't want to go away.
Forget about my question... I think I'm on something
@001FAB : what do you think ?
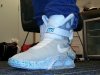
View attachment 564859
He released the ankle buckle on Shape-ways which is still available. He had made (molded and cast) a few sets of Heel Cups, but they were extremely limited. I wish I could buy Heel Cups and bubbles in a 3D print. Would make my projects much easier.
Mine is sewn in. You can see the stitching on the wear pair, but I went in from underneath on the display pair.
Yes, ironing and something different that I'm still working on. And this morning, It looks like the wrinkles are almost gone :coolThey look much better!
Is this only the ironing technique?
Have you decided what other mods you're going to do on them?
I agree. The HC's feels way better too, so I guess the V2 will. But I might have find a method to have a semi socktoe style without having to open the shoe (and I like the idea of not getting in there). I'll tell you about it laterTrust me, you want to get the toe box out of your shoes. They become SOOOO much more comfortable without that hard thing pressing against your toes after the slim.
")
Not really. It won't come out though.did is you follow the same stitching line as the shoe around the laces ?
Not really. It won't come out though.
Do you think it may work if I sperate the 2 layers of fabric where the laces are and stitch it threw the inner layer ?

It is Ironin, but I've not used the conventionnal method (like on my HCs)So these are just steamed?
)
Good idea, I'll use this if I make the electrical mods.Phone or data line is flat with up to 4 pair of wires.
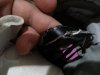
Can you post some close ups picture of the area where you did glue / sew ?@cavx sewing didn't work so I straight up glued it in the shoe on the left is the modded tongue using the strap from my first pair as a test.
It is Ironin, but I've not used the conventionnal method (like on my HCs)
And it is a result I had in about 10 minutes.
Basically, you put a old shirt or some fabric on the toe box as usual.
Inside the shoe, I made a "shoe last" shape out of some card board. The key is to make a flat shape on the bottom that goes with a light angle.
Strating flat from the tip of the toe and goes up to the laces with an angle of aproximately 20°.
Then, you put the insole on this shape (the shape should be the same than the insole).
Next : You iron from side to side as usual for 1/2 minute (depending of the steam).
After, your shoe should be a bit wet due to the steaming. You have hape the toebox with your figners and carrefully
put the insole of the other shoe on the fabric.
AND FINALLY : You place a BIG OLD BOOK on this and wait ! (and some other weights if you like)
I waited for four hours but I guess it doesn't have to be so long.
View attachment 565419
And VOILA !
Good idea, I'll use this if I make the electrical mods.
Can you post some close ups picture of the area where you did glue / sew ?
I will, I may attempt it tonight (my time) on my left shoe I'll take pics as I creating my tongue.
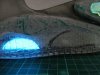
That'll be great ! How do you make the led bubble like this ? I mean how to ungloss it ? (I don't find the word in english, as it is not my language so I say "un - gloss" ^_^)
that is basically roughing the ankle bubble with sandpaper and spraying it with a matte spray.How do you make the led bubble like this ? I mean how to ungloss it ? (I don't find the word in english, as it is not my language so I say "un - gloss" ^_^)
that is basically roughing the ankle bubble with sandpaper and spraying it with a matte spray.
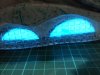
Ok, and you need to open the heel cup to get to the sides and sand the whole bubble ? Or is it ok without opening anything ?
I opened mine one my display pair I'm working on bc I'm adding new lights so I figured if I'm gonna open up the heel cup for lights go a head and take it out and worry about it later. Btw do you now where I can buy styrene sheets ?Ok, and you need to open the heel cup to get to the sides and sand the whole bubble ? Or is it ok without opening anything ?