Nike Mag V2 Mod Discussion (Page 58 Shopping List)

Status
Not open for further replies.
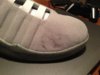
Yeah it doesn't look too bad once the glues dried, but not perfect...I may go with a different loctite super glue, one that has a longer working time. Then follow with that Loctite vinyl adhesive (finishing glue)...that stuff is great. And yes first time around its not easy at all.

- - - Updated - - -

I hate to make light of your situation, but you can finish the mod and have a throw-away pair. You can wear em anywhere and not worry about em getting messed up. Take em to the gym, to play sports, out and about....whatever.

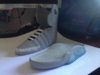
I will probably do that..play basketball in them would be epic! They will be my beaters...
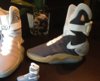
 
I messed up a part one of my toe mods. I didn't push hard enough down and it set. I just pulled really hard until it disconnected and glued it again. Luckily no glue marks show. This won't tear easily, especially with super glue on it.
 
Help! Can anyone offer me advice... I have wired up the LEDs, but i cannot seem to get the green as bright as the others. (See picture). I managed to get it working on one set, but cannot do it on a second!
any advice anyone can give would be a great help! IMG_3424.JPG
 
Help! Can anyone offer me advice... I have wired up the LEDs, but i cannot seem to get the green as bright as the others. (See picture). I managed to get it working on one set, but cannot do it on a second!
any advice anyone can give would be a great help! View attachment 194451

you need to make all your LEDs are the same forward voltage usually.
your green ones must have a slightly different voltage drop on them.
I'd try get LEDs which are all the same voltage.

- - - Updated - - -

another custom mag.

this time they went iron man!

http://sneakernews.com/2013/06/06/nike-mag-ironman-customs-by-mache/

nike-mag-iron-man-custom-mache.jpgmag-iron-man-customs.jpgnike-iron-man-mag-customs-mache.jpgnike-mag-ironman-custom-02-570x492.jpg
 
you need to make all your LEDs are the same forward voltage usually.
your green ones must have a slightly different voltage drop on them.
I'd try get LEDs which are all the same voltage.

Its weird because i made another set with the same LEDs that works fine (see picture). I just cant work out why all the others are doing this!IMG_3427.jpg
 
Its probably a loose solder connection or something along one of the lines.
Check the green row and and the resistors. It might just need some more solder somewhere.
 
Here's a picture of my V2 scratch uppers test. Still in rough phase,and needs some tweaks here and there but fits perfectly on my feet and almost dead on to the RD mags. With the white collars added, it will be roughly 2.5cm taller than the v2s, and virtually identical in height to the RD/movie ones. I measured them as accurately as possible and to scale.

magv2scratchcomparison_zpsd35f0f4a.jpg


You can see the difference between them and the standard V2 uppers. No comparison whatsoever. V2 leans too forward, especially from the back of the sole. I've made the correct uppers so they lean slightly back, and now depending on which fabric is used, the ankle buckle will now stay in line with the heel cup, rather than droop forward like they do on the v2s.

The V2s seem to have the exact same template used from the V1 knockoffs, hence the innacuracy at the back and top sections.
I've pretty much nailed the exact way to do it now like the RD/Movie versions.

Just need to get some decent fabric now and see which method to go with. Either foam type like the movie versions, or more rigid with EVA foam like the 2011 release.

The standard V2s are more close to the way the movie versions were done, I opened the V2 fabric up, and its 2 layers of grey fabric, inner and outer, some thin upholstery type foam inside and some sort of strong cross stitch type fabric to give it lots of strength.

Depending on which materials I can get, I'm going to decide then on which version to go for, more movie style or more RD style.
 
Help! Can anyone offer me advice... I have wired up the LEDs, but i cannot seem to get the green as bright as the others. (See picture). I managed to get it working on one set, but cannot do it on a second!
any advice anyone can give would be a great help! View attachment 194451

Because the resisters are used to limit the power, you can change out the values to bias one or more rows.
I don't know what value you need, but 3x that desired is parallel works - total divided by 3. So lets just say need 10K, you'd use 3 x 30K in parallel. Make sense?

Now you want the green to be brighter, so you change out the 30K resister on the green row to say 25K. The total system is slightly less than the 10K, but you now have brighter green LEDs because they get slightly more power (than red and yellow) due to having slightly less resistance.
 
Thanks
well out of a screwup, I guess some good came out, I managed to finally work out this template which will come in handy for later builds too.

Ive been wearing one pair of V2s for the last few days, most people don't even know they are replicas, especially with the modifications!
 
Airair, will you release your templates once they are done? I'd understand if you wanted to keep your work to yourself though.
 
Thanks for all your input earlier guys and I just got some Loctite Ultra Liquid Control super glue with a 15 sec. work time. I think I'm going to leave the 5 sec. work time Loctite Professional super glue to the professionals! Or atleast just not use it on my toebox mods.

On a side note, I messed up again by scorching the material by getting the hair dryer too close to the shoe. So tonight I ordered my 2nd pair of mags, my first pair will be so jacked up...but you live and learn.

Both toe mods are now done (right shoe has scorch marks which really cant be fixed unless I dye them all black like Taffs black darth vader mags). But, if not for the scorch marks they would have been an ok job. These first pair will be my beaters, and also my practice for learning how to mod mags...but one things for sure my first pair will not look like any DS RD mags!

Not bad turnout, except for the scorch march on the right outside they would be perfect...

image.jpg
 

Attachments

  • image.jpg
    image.jpg
    2.5 MB · Views: 181
  • image.jpg
    image.jpg
    1.6 MB · Views: 176
Last edited:
I hope he does. He has done some awesome work here.

I do too. Even his first go at it is dead on.

One day I might get like 3 pairs. One pair modded like the ones everyone has been doing (By the time I could afford 3 pairs and have enough time to do the mods, the pair I have now will be worn out. Plus I could have done better on them.) , a movie accurate pair for display, and a movie accurate pair for wearing. The ones for wearing will be reinforced with the kind of mesh the V2s come with.
 
Last edited:
Here's a picture of my V2 scratch uppers test. Still in rough phase,and needs some tweaks here and there but fits perfectly on my feet and almost dead on to the RD mags. With the white collars added, it will be roughly 2.5cm taller than the v2s, and virtually identical in height to the RD/movie ones. I measured them as accurately as possible and to scale.

http://i1256.photobucket.com/albums/ii495/airair1989/magv2scratchcomparison_zpsd35f0f4a.jpg

You can see the difference between them and the standard V2 uppers. No comparison whatsoever. V2 leans too forward, especially from the back of the sole. I've made the correct uppers so they lean slightly back, and now depending on which fabric is used, the ankle buckle will now stay in line with the heel cup, rather than droop forward like they do on the v2s.

The V2s seem to have the exact same template used from the V1 knockoffs, hence the innacuracy at the back and top sections.
I've pretty much nailed the exact way to do it now like the RD/Movie versions.

Just need to get some decent fabric now and see which method to go with. Either foam type like the movie versions, or more rigid with EVA foam like the 2011 release.

The standard V2s are more close to the way the movie versions were done, I opened the V2 fabric up, and its 2 layers of grey fabric, inner and outer, some thin upholstery type foam inside and some sort of strong cross stitch type fabric to give it lots of strength.

Depending on which materials I can get, I'm going to decide then on which version to go for, more movie style or more RD style.

Wooow,looks so good ,congrats!!!!!!!.
for stiching I recommend a technique for reinforcing "stressing areas" when you walking with them...I make small holes with soldering iron on inner textile areas(see photo)for increase stiching power on critical areas.when I was wearing my "gray cloneprops" for skating, I noticed some areas that need to be reinforced on my final prototypes.
Concerning to glue issues:As I said to you in last Private Mail, you need to know firstly what exact compound is your V2 soles(urethane,EVA,ect),so ask to supplier.
 

Attachments

  • ImageUploadedByTapatalk1370591138.390470.jpg
    ImageUploadedByTapatalk1370591138.390470.jpg
    2.4 MB · Views: 177
  • ImageUploadedByTapatalk1370591460.685323.jpg
    ImageUploadedByTapatalk1370591460.685323.jpg
    1.9 MB · Views: 194
  • ImageUploadedByTapatalk1370591628.073538.jpg
    ImageUploadedByTapatalk1370591628.073538.jpg
    501.9 KB · Views: 193
Well the only reason I've done 3v is because I can't get any thin 9v inverters easily.
You are right though. The 3v led setup means more soldering and more difficulty in completion. You have to cut out very thin lanes of copper tape which are a real pain to do.

The 9v led wiring is a piece of cake in comparison! Only 3 rows of solder compared to 6!

The thin led strips that come in the soles got me wondering. Three rows of them in the heel cup would certainly be easier to wire although you would need to put something over them to give them a circular led style look.

I might investigate that when I get some time because soldering each individual led in such a tight box is a real pain!

TOTALLY disagree!!!.
I use 3V because for preparing led is EASIEST way, I use 2 leds row soldering (in serial) to obtain the limit of voltage of leds,so is a combinarion of pair of led(in serial) and combine the others LED pairs (in parallel).if you calculate that voltage and configuration,that combination is EXACT for the leds voltage limits.
If you see,mostly of everyday electronics using 3,6 v,(original mags are using that voltage) so its more easy to tweak and obtain a good battery to buy ,a thinnest/small battery with high Mah(I use nokia cells 1020Mah)
About inverters, the smallest inverters is for 3 volts configuration.
Conclusion:
-easy to find,cheap,slim and small and high capacity(long lasting hours).
-easy for LED(forget ressistors using mixing "serial" and "parallel" wiring config)
-EL inverters soooo tiny,the smallest in market, good for hiding.
I have all of I need in my cloneprops ankle buckle(like original mags :) ) plug,EL inverter,and 1020Mah battery.

Hi I agree on what you said, lower voltage is more than enough to power the setup,
but for some reason, soldering the LEDs in parallel for my 3v setup is more difficult than I expected?
Thats why I was saying the 9v LED setup seems easy in comparison, as thats only 3 rows to solder, and much more space it seems.

Well so far ive done 5 pairs shoes using 3v system (not 3.6v yet-but definitely later on)

For my V2 replicas setup, because i only use 2 x AAA batteries, i have to solder the LEDs in parallel using resistors.
But I find the space is very tight between each LED positive/negative row.

I put in copper tape, very thin strips, 6 rows, because i am soldering all positive, and all negative rows for each LED.

So 6 rows in total.

Do you have a picture of your LED setup on your shoes?
Maybe Im doing it a complicated way for no reason and there must be an easier way.

I only went on what i was told before when working out the resistors using the online calculators.

i've been soldering it pretty much this way here, in parallel, except using white plastic thin sheet with copper tape lanes stuck on.
IMAG1727.jpg
 
Last edited:
Wooow,looks so good ,congrats!!!!!!!.
for stiching I recommend a technique for reinforcing "stressing areas" when you walking with them...I make small holes with soldering iron on inner textile areas(see photo)for increase stiching power on critical areas.when I was wearing my "gray cloneprops" for skating, I noticed some areas that need to be reinforced on my final prototypes.
Concerning to glue issues:As I said to you in last Private Mail, you need to know firstly what exact compound is your V2 soles(urethane,EVA,ect),so ask to supplier.

Cool, thanks.
I think the V2 grey midsoles are urethane, but it could be EVA, maybe someone here knows or can guess?
 
Status
Not open for further replies.
Back
Top