Nike MAG replicas (V2 and V3 only)

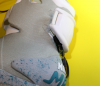
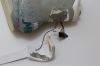
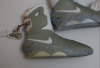
Well...I have opened my ankle buckle. The inverter is 100% in the ankle buckle, its a custom board like I thought. Also...yea Its not pretty how I opened the shoe up, but it wouldn't charge anyways so figured I'd open it up. The charging port is actually attached to the inverter board too. Its hard to see the actual components since they brushed black encapsulation resin over the board, but the shoes are definitely dim because of the weak inverter. I'll have to put the inverter in my hot box to soften the resin so I can remove it. Trying to charge them up again, but will post back more pics soon of it completely removed.
 

Attachments

  • inverter.PNG
    inverter.PNG
    1.5 MB · Views: 115
Does the V3 have the same elastic or stretchy fabric from each side of the tongue like the V2s had?

if you mean the elastic that held it down to the sole, nope. I think they're better off without that anyway. the V2s had so much of it they were almost like they had an inner sock. Made them very hot when i went up to central QLD when i first got them
 
I wish I had some new 0.7mm x 2.5mm ports, I am pretty sure its the port. Wont know for sure until I clean the resin off the contacts. The inverter could be replaced/upgraded if you just bypassed the original one, although you'll want to keep the original board because the LEDS connect to it and charging circuit. I managed to get the buckle off without ruining the visible fabric, when I reattach it. But the buckle did get pretty wrinkled because its foam. The board/port is not glued down in any way, I can see this being a problem if you want to charge these more then a dozen times lol.
 

Attachments

  • buckle.PNG
    buckle.PNG
    1.7 MB · Views: 489
Well that's not good.

And I guess since you have the buckle off, you can use some white plastidip to give it a much better finish.

Nope, its just sandwiched between the foam buckle and the fabric. It should hold up a while if you are careful though. I think it really should be glued down though.

I don't think plastidip would stick too well
 
if you mean the elastic that held it down to the sole, nope. I think they're better off without that anyway. the V2s had so much of it they were almost like they had an inner sock. Made them very hot when i went up to central QLD when i first got them

Yeah that part that is almost like an inner sock. I mean, that (with the strap) is what holds the shoe to your foot, not the 4 elastic straps.

I wish I had some new 0.7mm x 2.5mm ports, I am pretty sure its the port. Wont know for sure until I clean the resin off the contacts. The inverter could be replaced/upgraded if you just bypassed the original one, although you'll want to keep the original board because the LEDS connect to it and charging circuit. I managed to get the buckle off without ruining the visible fabric, when I reattach it. But the buckle did get pretty wrinkled because its foam. The board/port is not glued down in any way, I can see this being a problem if you want to charge these more then a dozen times lol.

Nope, its just sandwiched between the foam buckle and the fabric. It should hold up a while if you are careful though. I think it really should be glued down though.

I don't think plastidip would stick too well

attachment.php


Words can't describe this, but you are certainly leading the R&D team here. What would be amazing is if the factories in China actually paid attention to all of this and implemented these discoveries into their design to make these shoes something else.

So by the look of the buckle, it is soft material (you said foam) with hard plastic inserts for the strap. This was the issue I had with mine when I cast them in a A65 rubber - the buckle was awesome, but the strap parts were too soft and would tear with any real force applied to them. Based on your image, it is possible to make and cast harder (A100 to D65 or even harder) parts that can be glued into the softer shell.
 
I saw in Jaycar a thermoplastic which was bagged up as they were beads. They could be melted just by boiling water. The beads seemed hard enough that they could be used for it (buckle arms). I was curious if I could use it for another project, but it's too hard a plastic.
 
I saw in Jaycar a thermoplastic which was bagged up as they were beads. They could be melted just by boiling water. The beads seemed hard enough that they could be used for it (buckle arms). I was curious if I could use it for another project, but it's too hard a plastic.

That is Plasti-Make. Yeah it sets pretty hard. Too hard for the buckle. Having said that, my buckles on my V2s are A100 plastic, so they have no flex, but what I did was shape them to my ankles whilst they were still not 100% post cured. What many people don't know about casting resins is that there is a few phases - Pot life or liquid state, gel state, cure state and a post cure time.

- - - Updated - - -
Jedifyfe did you use heat or just a knife to get these off?

attachment.php
 
Last edited by a moderator:
@Jedifyfe so do you have any ideas on that bottom EL? Were you able to find someone to get replacements made? I saw that thin ribbon looking taped on connection, and didn't want to mess with it haha. The bottom EL looks really fragile, the strap EL seems solid though.

Also if you decide to completely take the sole off let me know. My soles are slightly ticker at the top, so it would effectively fill in the area you cut too.
 
Last edited:
@Jedifyfe so do you have any ideas on that bottom EL? Were you able to find someone to get replacements made? I saw that thin ribbon looking taped on connection, and didn't want to mess with it haha. The bottom EL looks really fragile, the strap EL seems solid though.

Also if you decide to completely take the sole off let me know. My soles are slightly ticker at the top, so it would effectively fill in the area you cut too.

I'm working on it. Even the bottom EL is sturdy but I think the problem is with the workers shoving them into the soles.

- - - Updated - - -

- - - Updated - - -
@Jedifyfe did you use heat or just a knife to get these off?


VERY sharp knife
 
Wow, this is a fascinating page of the thread. Cool pics guys!

But yeah, it would really be nice if the stuff in this thread actually influenced slight changes at the factory. It looks like they have the right ideas with those wire connectors, and putting stuff in the white pad to keep foot pressure off, but if they could just make a few minor adjustments, these would be PERFECT. The charge port is definitely a problem if it's so hard to use. There is no reason why that can't be improved. Bigger hole, and glue that thing in place.


I wont hold my breath on them making any changes, I hope they do...but I just don't see it happening soon. I think David just tells us what we want to hear. Although I hope to be proved wrong.

The only changes that I think just really need to be made...

The port...if it was angled outwards just 3-5mm it would make the shoe easy to plug in. Right now the plug is flat against the fabric. Also, I really think it should be glued down. Everything else in the shoe is glued down (even the battery) yet not the port. Every time I try to plug them in it's tricky and feels like It would be easy to break.

The dim EL...the inverter needs to be more powerful. "David" said earlier they would up the "voltage". It would require a completely new board in all their shoes, or at least a modified version...which again...I doubt will happen...but I hope it does.

If I was being picky...

In addition to the 2 changes above. The yellow soles...which again I think is an unreasonable request since It will always happen with their process.

The ankle bubble shouldn't be as diffused as it is. The LEDS are typical 45degree LEDS...and look much better with the clear bubble.


EDIT: On a side note I found "Right Angle" plug connectors for the shoe, I am going to see if these make it easier to plug in. I am sure they will, but wont look as good probably. Unfortunately I couldn't find any of the components located in the US, so I guess I get to wait 2 weeks for China shipping.
 
Last edited:
The glue I was testing didn't hold very well...removed it (thankfully only did a small test section first) and going to try something better. Also still trying to perfect the right amount of blue pigment. This batch is mostly clear, with just a hint of blue. I have never owned the RD, but I think I like this the best. Here's a quick pic before I try the proper glue...as you can see the ankle bubble mod and the icy sole makes a pretty noticeable difference.
 

Attachments

  • compares.PNG
    compares.PNG
    1.8 MB · Views: 110
that's very nice. I'd already planned to do the ankle bubble clear-coat when i can find my cans of clear. Creating a newer, clearer sole is beyond my ability, I think....
 
This thread is more than 3 years old.

Your message may be considered spam for the following reasons:

  1. This thread hasn't been active in some time. A new post in this thread might not contribute constructively to this discussion after so long.
If you wish to reply despite these issues, check the box below before replying.
Be aware that malicious compliance may result in more severe penalties.
Back
Top