NIKE MAG Knockoffs

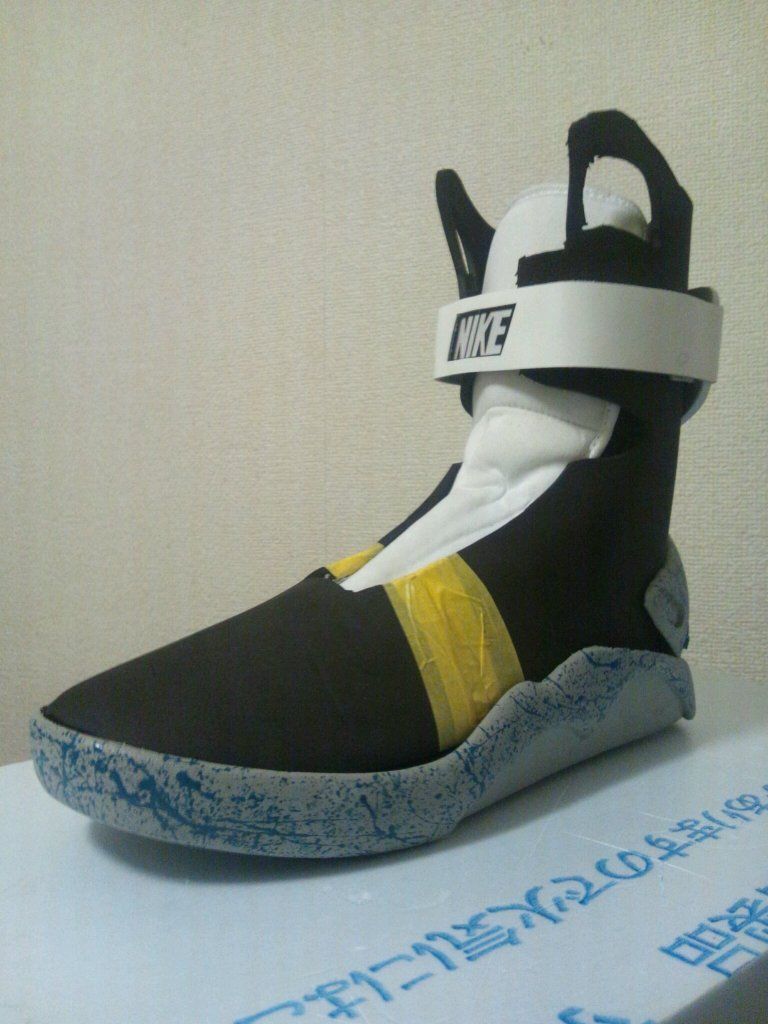
It does look just a bit OS in the pics but it looks fine.

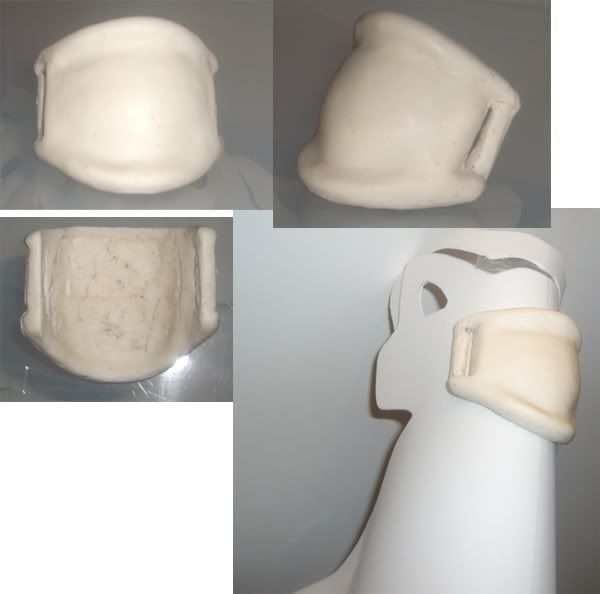
Ideally I want to find some rubber matting with the waffle pattern to avoid all this messing around with molds and heating. Not that I don't like the effect the fumes have on my me:lol

The problem is the method i'm using does not work well for a piece the size of the larger sole but I may just concentrate on getting the ovals (which are getting much easier to do well now) and only imprint the visible areas on the sides of the shoe. Considering you'd never have to see the full sole and they'd most likely go bald over time anyway, that might be what I go for.

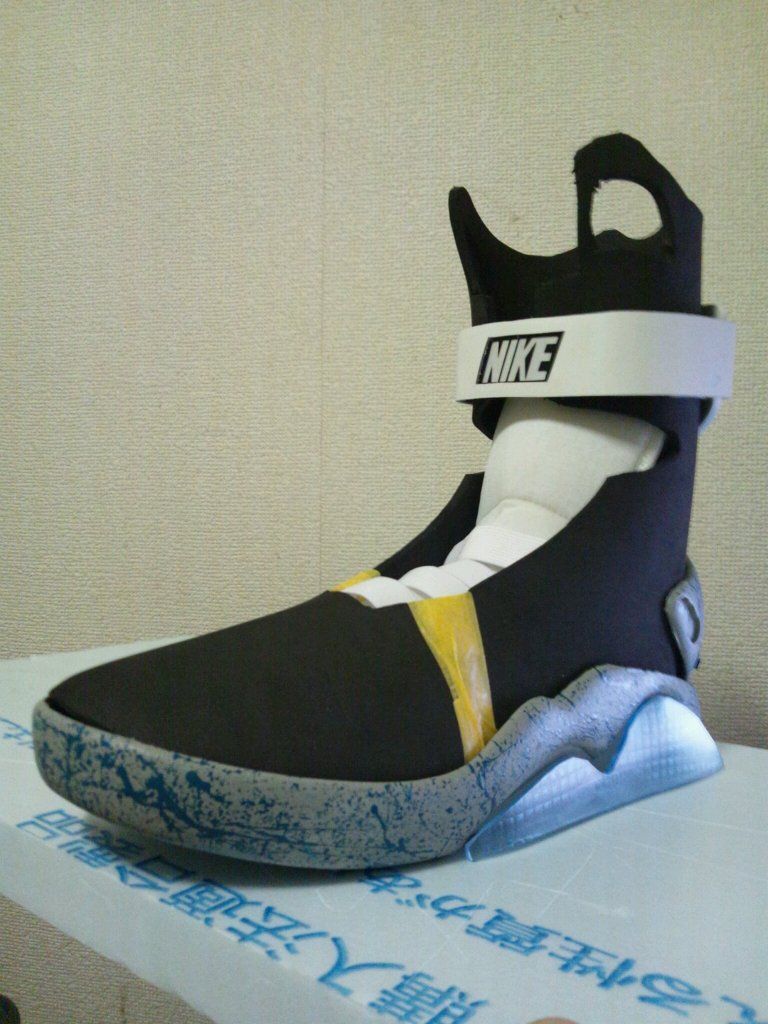
Did you hand cut those letters?
 
Like the Ankle Buckle, this part has been a challenge and I think like the buckle, this is about my 6th go at it. Generally I like the shape, but the size might be a bit too big. Having said that, I have not cut one down to a smaller size to see if that would be acceptable or not.

Finding an off the shelf clear rubber with the right pattern would be like finding the grail cup. Calos seemed to find something, but he didn't communicate where he found the stuff very well.

Those letters are laser cut. I posted a photo of them two pages (?) back. Because they are cheap to do, I will get the next sets colour coded.
 
well after a long struggle, i finally made my silicone mold and first casting today. some sort of success at last.


This sg2000 fast cast resin is supposed to be similar to the polytek 60, but its a slightly harder shore, about 72 it says, compared with polytek 60. The only reason i got it was that its supposed to be more easier to paint onto this resin.

The actual casting feels very very light, it cured white, and its very solid and strong. I think it should be ok to flex from the sides and won't crack that easily, especially with a strap inside it.

Next attempt, i'm going to cast it with pt flex 85 resin and see how it compares. Its a hard shore rubber, so should still be strong yet flexible. I'm going to see which material i prefer.

I will be making multiple copies for sale in the junkyard shortly to recoup some of the money ive spent on the resins. this stuff is expensive.
 
Last edited:
Pictures of cast buckle, and placed on the new template crafty foam upper to see what it looks like.
overall, the cast is good, strong and usable.

anklebucklecast.jpg
 
Last edited:
Havn't had time to do the soles yet. But I did manage to do the splatter on my heroes. Look a bit blue here but greener in real life.

Tried hard to get the minimal splatter of the real megs but it always comes out more speckled. How did thay do it?

DSC_0250.jpg

Good effect, congratulations!!Im using for splattering for my wearable mag project a modified airbrush (I broke at now at experiments FOUR dual action airbrushes!!) and for painting im using a liquid mixture of urethane and pigments.Its a complex formula avoiding high density.Its essential that the splatter stitch perfectly to the sole!!!
 
Good effect, congratulations!!Im using for splattering for my wearable mag project a modified airbrush (I broke at now at experiments FOUR dual action airbrushes!!) and for painting im using a liquid mixture of urethane and pigments.Its a complex formula avoiding high density.Its essential that the splatter stitch perfectly to the sole!!!

wow, you went through 4 brushes!

what stage are you at cloneprops? do you have new pics yet?

i thought you were at testing stage last time?

thanks
 
Good effect, congratulations!!Im using for splattering for my wearable mag project a modified airbrush (I broke at now at experiments FOUR dual action airbrushes!!) and for painting im using a liquid mixture of urethane and pigments.Its a complex formula avoiding high density.Its essential that the splatter stitch perfectly to the sole!!!

Thanks! It's not true to the actual Mags but I just could NOT get the accurate splatter effect so I decided to personalize it a bit more.

You might not be able to see it in the pics but there's actually a sort of 3d/trompe l'oeil effect going on. I put down one set of splatters then snded them back until they faded slightly. Then I went over that with a more pronounced splatter effect. It is barely noticeable in these pics.

Can't wait to see you final kit(s).
 
Well, im enjoying my prototype mags in my holydays... Using a lot with my skateboard,ect...some guys think that i am crazy destroying the Mags!!!!!!the textile part is totally damaged(sandpaper of skateboard hurts!!!)

Conclussion:
The cloth is elastic and too much ressistant! IMPRESSIVE!! But its no cheap!!

-The soles works perfectly but the only problem was the lack of UV protection , and the gray color turns minimally to yellow in two weeks (that was because I make a new formula with more shore hardness for testing)but at now is totally solved,using a mix of different formulas,aplyying manually inside mold.(like back heels technique colors that you can see in my videos!)

-The abrassion of transparent soles and the UV protection works perfectly.no noticeable marks and no tearing,yellowning or degrading material.very strong but so expensive and hazzardous/dangerous for working with.

-The glue of the urethanes soles that stitch with cloths pieces and poliurethanes(whiteparts,bubbles) its the most harder and stable glue that I ever know. 100% effective.100%happy!!!I had troubles with my first tests with polyurethanes compound glues!!!

-The pieces are very breathable, even using in a intense sport.

-the weigth of every "cloneprops" prototype shoe is about 670 g (something like a wheigth of jordans VI) more confortable but too high for some sports.(dont use for cross training,or footing!!!)

-The electronics is on "testing mode stage" but I have marks between 3- 7 hours depending the quality/miliamperes cell batteries.(3v at 300Mah.)
More news and photos soon(I hope).I come back in a few weeks .

PD:Sorry for my BAD english!! My apologies!!

Hey, no problem. I can you understand perfectly:cool

Love hearing about your progress. This is one impressive project.
 
Hey Clone they are your shoes and you can tear them up on a skate board if you want. At least you can rebuild them when you get back.
 
I just want to see the photos of the completed pair before they got trashed on the skate board. I watched all the videos in absolute amazement and then it all seemed to come to an abrupt end before we got to see the end result.
 
WOW! That looks good.

:coolReally? For all of one minute's construction that's encouraging.
:cool

I need to stop testing on scraps and get down to some final ones. Is heat needed for the eva or can you just mold by hand?

DSC_0264.jpg


DSC_0260.jpg
 
Last edited:
:coolReally? For all of one minute's construction that's encouraging.
:cool

Just one question: Did you make the seam at the back or have you make the whole back from a single piece?


This is encouraging because I still have the Cold Cast Clear Elastomer soles I made sitting in a bag in my kit. Maybe I just need to cut them down and glue them in place like shown here.
 
It's just one piece. The seam will be on the fabric. Q
OK. Now not I am in any way an expert here, but my thought process for this is that the whole heel/collar section should be made with a seem. That way you can get the curvature that the real shoe has. Making this out of one piece (pretty much what everyone seems to have done) will make this very cylindrical and unless you heat form it, you won't really get the shape. Does that make sense?

I am wanting to make a start on mine, but am procrastinating (for what ever reason) about cutting up the shoes. I have the fabric and just need to complete the Heel Cups. I want to make mine with less foam so that they wrinkle and collapse when not being worn, similar to the screen shoe.
 
Back
Top