If I had this as a kid I would have died from joy. Good thing it wasn't around back then!
You are using an out of date browser. It may not display this or other websites correctly.
You should upgrade or use an alternative browser.
You should upgrade or use an alternative browser.
New Star Trek TOS Phaser coming November 2014
- Thread starter jhusel
- Start date
Yes PLEASE!Is someone already offering a metal handle? I considered doing a few similar to ones I offered years ago.
Are they shipping properly? Ya know, actually packaging it in a box rather than a envelope like Thinkgeek?
To anyone still looking to get one, the Star Trek store has a 20% off deal with $3.99 flat rate shipping, with GREENMONDAY as the code.
Number 6
Active Member
To anyone still looking to get one, the Star Trek store has a 20% off deal with $3.99 flat rate shipping, with GREENMONDAY as the code.
Hi!, Newbie here, first post! Also BTW, ThinkGeek is having a 25% off sale with $6.95 shipping for a total of $119.44.I've ordered a second one. Now I'll have two, I can stack the cases!
")
I ordered a couple of extra things at the same as Christmas presents and also to hopefully to force them to put them in a box.
asalaw
Master Member
I'm offering the metal handle. The Limited Run thread is here.Yes PLEASE!
Last edited by a moderator:
JLinNY
Sr Member
Is someone already offering a metal handle? I considered doing a few similar to ones I offered years ago.
Hmmmm, I think I have one of your stashed away Rylo.
- - - Updated - - -
Are they shipping properly? Ya know, actually packaging it in a box rather than a envelope like Thinkgeek?
Got mine last Thursday from the Geek and it was boxed.
Are they shipping properly? Ya know, actually packaging it in a box rather than a envelope like Thinkgeek?
My first one was from ST.com, and it was packed well in a cardboard box. I'm hoping the one I got from Thinkgeek that is supposed to arrive Wednesday isn't in an envelope. Hopefully enough people that did get them in bags bitched at them and they began boxing them all.
stapleton13
Well-Known Member
For anyone interested here is a little naked phaser.
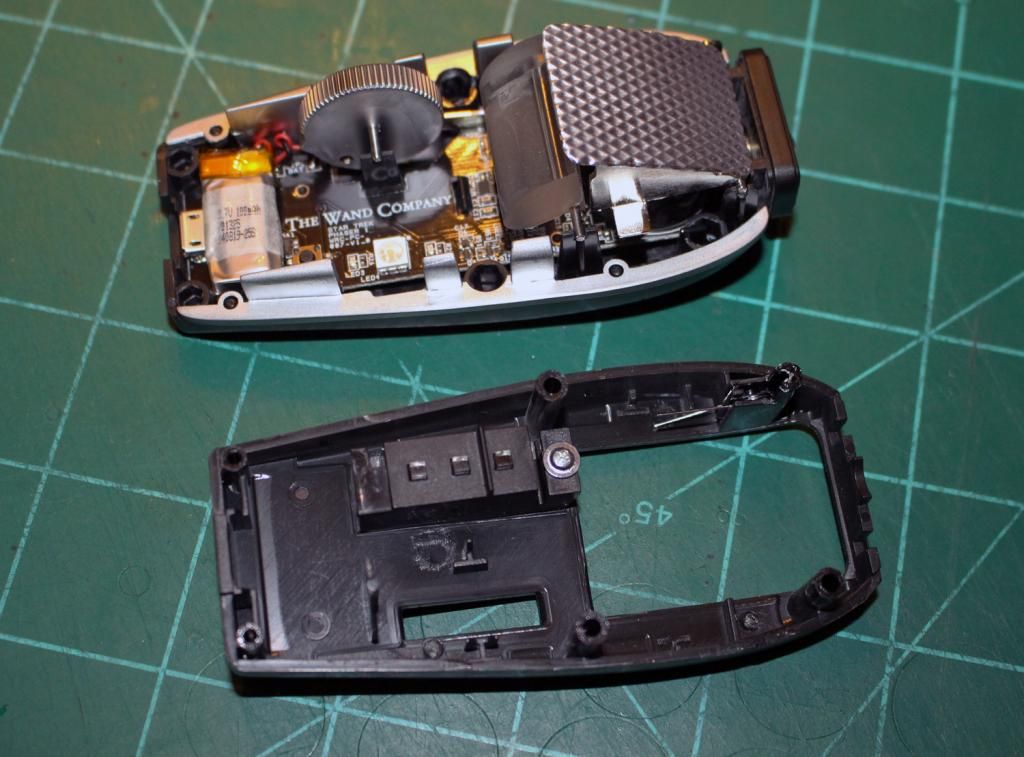
For anyone interested in the process. Not for the faint at heart. Take care not to put the blade in too deep as the battery is in the rear of the phaser. I took a flat blade on my large Xacto knife, and starting from the rear seam by the port started prying the upper shell up. That opened up a gap, and then I was able to start moving down the side between the upper shell, and the midplate applying pressure to the upper shell until it broke free. The process must be done in small increments so that you don't stress the body. Once the gap starts then you have to move down the line.


For anyone interested in the process. Not for the faint at heart. Take care not to put the blade in too deep as the battery is in the rear of the phaser. I took a flat blade on my large Xacto knife, and starting from the rear seam by the port started prying the upper shell up. That opened up a gap, and then I was able to start moving down the side between the upper shell, and the midplate applying pressure to the upper shell until it broke free. The process must be done in small increments so that you don't stress the body. Once the gap starts then you have to move down the line.

Last edited:
JiminSTLouis
Master Member
Wow! Thanks for posting those pics. Looking forward to seeing more. I still don't know how The Wand Co. pulled this off at such a low price.
it looks like there's some damage to the pins. Did some material stay in the holes? Do you think there was some adhesive on the pins?
it looks like there's some damage to the pins. Did some material stay in the holes? Do you think there was some adhesive on the pins?
stapleton13
Well-Known Member
Wow! Thanks for posting those pics. Looking forward to seeing more. I still don't know how The Wand Co. pulled this off at such a low price.
it looks like there's some damage to the pins. Did some material stay in the holes? Do you think there was some adhesive on the pins?
The pins are welded together. The pins all came out in tact. The odd looking one has a slot in it that goes around a post to hold in the spring that holds the site down.
JiminSTLouis
Master Member
The pins are welded together. The pins all came out in tact. The odd looking one has a slot in it that goes around a post to hold in the spring that holds the site down.
Thanks for the info and for being brave enough to crack yours open.
stapleton13
Well-Known Member
Thanks Myron for the info
Yea it did make polishing them easier.
Good look a the innards..no way in Hell I am gonna do that with mine..lol..But as I said before, I'm fine with it as it is...
My main reason for trying was to see if it could be done for future battery replacement. That way I could replace the phaser now while they are still available if I screwed it up.
Mine came in a box with a air insert! :thumbsup
Are they shipping properly? Ya know, actually packaging it in a box rather than a envelope like Thinkgeek?
iSteve
Active Member
Mine came in a box with a air insert! :thumbsup
Ditto that. It appears to be their standard packaging for it, though even with the air inserts it did rattle about a bit. Still better than an envelope. Too bad the phaser within was a lemon.
simonwaters
Well-Known Member
WOW STAPLETON, YOU HAVE HUGE BALLS. That said, it would be nice to see someone replace the red LED in the p1 dial with a wite one. And add a numbered decal to it as well.
Sean
Master Member
For anyone interested here is a little naked phaser.
http://i567.photobucket.com/albums/ss114/stapleton666/IMG_1149_zps95f34136.jpg
For anyone interested in the process. Not for the faint at heart. Take care not to put the blade in too deep as the battery is in the rear of the phaser. I took a flat blade on my large Xacto knife, and starting from the rear seam by the port started prying the upper shell up. That opened up a gap, and then I was able to start moving down the side between the upper shell, and the midplate applying pressure to the upper shell until it broke free. The process must be done in small increments so that you don't stress the body. Once the gap starts then you have to move down the line.
http://i567.photobucket.com/albums/ss114/stapleton666/IMG_1155_zpsf9950c25.jpg
Nice work man. do you see any problems with it going back together?
Sean
Master Member
WOW STAPLETON, YOU HAVE HUGE BALLS. That said, it would be nice to see someone replace the red LED in the p1 dial with a wite one. And add a numbered decal to it as well.
Why put a light under the number dial at all. there wasn't one on the hero's or was there? as stated I'm still learning this stuff.
Similar threads
- Replies
- 1
- Views
- 1,197
- Replies
- 1
- Views
- 1,092
- Replies
- 61
- Views
- 8,148