You are using an out of date browser. It may not display this or other websites correctly.
You should upgrade or use an alternative browser.
You should upgrade or use an alternative browser.
New BMF coming
- Thread starter Jimmer
- Start date
Hello,
First post here I just got mine off ebay for 63 dollars shipped, looking forward to working on this. I have not touched a model in at least 10 years. Lots of good stuff in this topic as well as the other build threads.
Sent from my SM-N910T using Tapatalk
Welcome!
Tons of fun around here! If you follow these guys you will transform the Hasbro into a real Studio Model, almost...
Cheers
I have a couple more pictures of my build that I am doing at the same time as my Hasbro Hero. This is my Hasbro Legacy I have done so much to this and I have so much more to do.
This is a lot of the piping. Changing the piping really makes a huge difference in the toy like appearance.


This is a lot of the piping. Changing the piping really makes a huge difference in the toy like appearance.
Timmythekid
Sr Member
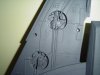
Question for anyone who's gotten to their "SalFZ6o" resin parts already. Most of the sidewalls are easy to locate against reference photos, but anyone know which of the inner madible walls goes on which side? I noticed that the greeblies are arrayed on those parts in a way which means while close, they're not interchangable, and none of the 32" survey photos I have show that area clearly enough to see definitively which goes where. While I'm at it, anyone know how the extra little "shelf" pieces attach to those inner mandibles as well?


Timmythekid
Sr Member
Eloquent, very eloquently said
") THANK YOU!!!!!!!!!!
THANK YOU!!!!!!!!!!leyrich
Well-Known Member
Eloquent, very eloquently said
yore welcome
leyrich
Question for anyone who's gotten to their "SalFZ6o" resin parts already. Most of the sidewalls are easy to locate against reference photos, but anyone know which of the inner madible walls goes on which side? I noticed that the greeblies are arrayed on those parts in a way which means while close, they're not interchangable, and none of the 32" survey photos I have show that area clearly enough to see definitively which goes where. While I'm at it, anyone know how the extra little "shelf" pieces attach to those inner mandibles as well?
Hi Timmy!
Yes, the left and right parts are different, like the up and bottom parts of the jawbox. Also the back part of the jawbox has a position.
Fortunately Leyrich posted some shots.
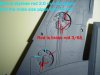
So after reading Kokkari's thread I took another look at mine. I'm ripping out the 1/16 rod I've laid in as it's just a little too big, gonna keep it on the engine deck but the rest is being cut out and replaced with. 3/64 looks better on the front and with the radar mount. (This is what I get for rushing)
Timmythekid
Sr Member
Hi Timmy!
Yes, the left and right parts are different, like the up and bottom parts of the jawbox. Also the back part of the jawbox has a position.
Fortunately Leyrich posted some shots.
Thanks, yeah the jawbox,being labelled, was easy
Since you're passing through here, can you comment on the quad guns? I haven't assembled them yet, just chopped the lug off the back, but a quick dry-fit with the yokes against the Falcon is making me think they're larger than they should be (it looks like the body of the quad gun will actually stick out forward past the turret window) - am I seeing things, or were those maybe intended for the SS ship?Thanks, yeah the jawbox,being labelled, was easy
Timmy.
My quad laser for the Hasbro is 1 mm longer than the stock lasers. So, it fits. The DeAgo/SS ones are longer, of course.
About the jawbox, on my 3D printed parts I've labelled them with arrows and "Up" and "Down" at the back. :cool
Just let me know if you have more questions!
Timmythekid
Sr Member
Timmy.
My quad laser for the Hasbro is 1 mm longer than the stock lasers. So, it fits. The DeAgo/SS ones are longer, of course.
About the jawbox, on my 3D printed parts I've labelled them with arrows and "Up" and "Down" at the back. :cool
Just let me know if you have more questions!
Thanks, Tony!
I got some of the missing panels made. i just used the stickers provided,attached them to .15mm styrene and cut them out.

I have gotten one section of the missing panels notched and attached.
I also re-piped this section and added in the kit-bashed cut-out pit area.


I have gotten one section of the missing panels notched and attached.
I also re-piped this section and added in the kit-bashed cut-out pit area.
Attachments
Last edited:


Not sure if you've all seen this yet. Kinda eases my mind about painting not being so daunting. Although enamel vs acrylic paints for durability and handling comes up.
https://m.youtube.com/watch?v=H5jl8Hz9V_0
https://m.youtube.com/watch?v=rmEb31D6GD0
Although the second video brings up some questions/concerns, for those of you that have cut out and added lighting for engines, did you add extra support stuctures or did you have any gaps in the engine grill area?
It still amazes me how good this thing looks with some painting, both simple and intricate.
Timmythekid
Sr Member
Although the second video brings up some questions/concerns, for those of you that have cut out and added lighting for engines, did you add extra support stuctures or did you have any gaps in the engine grill area?
Funny this should come up - I literally JUST cut the engine out yesterday. I'm taking a "filming-miniature" appraoch to the look (solid, frosted engine), but it should be much the same thing as the grill. Dry fitting with my engine lighting box, inside Spacebob's plywood structural frame, it looks like removing the engine is not going to cause any major issues, despite the large number of support posts and alignment thingies that had to be chopped out of that area. Regardless, I'm hoping to find some teeny, tiny screws or bolts that will look okay with the engine deck detail, that I can sink through the plastic and into the plywood frame just to be sure the hull halves are as tight as possible.
.
I'm actually more worried about removing the sidewalls than the engine. I think I remember Tony said he designed his walls to just glue onto the existing ones, but I really think I'm going to have to chop them out to place the new ones far enough back under the hull overhang. That said, I don't know how well everything is going to fit together once the stock walls are gone, so a bit nervous now.


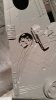
Hi guys some Kit - bashing and Hot iron work View attachment 484502
What kit did you use for these pieces if you don't mind sharing...
Similar threads
- Replies
- 49
- Views
- 1,305
- Replies
- 86
- Views
- 10,171