You are using an out of date browser. It may not display this or other websites correctly.
You should upgrade or use an alternative browser.
You should upgrade or use an alternative browser.
NeoRutty's Prop Projects - ANH Stunt Stormtrooper Bucket - Pointers requested?
- Thread starter NeoRutty
- Start date
Re: Finishing my Prop Projects - ESB Luke saber COMPLETE
I'll check on that... found through trial and error. Got a piece of metal and drilled some holes til I found a good match. Those screws being as old as they were (and the whole turning black brown white) I didn't want to chance them just breaking off.
What size drill bit did you use for the screws?
I'll check on that... found through trial and error. Got a piece of metal and drilled some holes til I found a good match. Those screws being as old as they were (and the whole turning black brown white) I didn't want to chance them just breaking off.
Re: Finishing my Prop Projects - ESB Luke saber COMPLETE
Turns out it's a 3/32" bit...
Test first though, not 100% sure as going by my buddy's memory.
What size drill bit did you use for the screws?
Turns out it's a 3/32" bit...
Test first though, not 100% sure as going by my buddy's memory.
Luke the Belter
Well-Known Member
Re: Finishing my Prop Projects - ESB Luke saber COMPLETE
It looks fantastic :thumbsup
The wooden form/template (can't find the right word for what it is) to hold the tube with attached T-tracks in place is a great invention. And lucky you that the ESB only has 6 grips and not 7. That would be quite challenging")
It looks fantastic :thumbsup
The wooden form/template (can't find the right word for what it is) to hold the tube with attached T-tracks in place is a great invention. And lucky you that the ESB only has 6 grips and not 7. That would be quite challenging
Re: Finishing my Prop Projects - ESB Luke saber COMPLETE
Yup I thought of that ahead of time... if it was 7 I wouldn't have pre-glued, heh. It was very convenient.
I... I can't do it... I got ready to do it, and I just couldn't get myself to pull the tab.
Which is ridiculous, cuz I drilled into the base already... riveted the back...
Dammit I should just pull it!
It looks fantastic :thumbsup
The wooden form/template (can't find the right word for what it is) to hold the tube with attached T-tracks in place is a great invention. And lucky you that the ESB only has 6 grips and not 7. That would be quite challenging
Yup I thought of that ahead of time... if it was 7 I wouldn't have pre-glued, heh. It was very convenient.
Now it's time to pop a couple beer tabs, first on the saber, then for yourself while you sit back and enjoy the fruits of your labor
I... I can't do it... I got ready to do it, and I just couldn't get myself to pull the tab.
Which is ridiculous, cuz I drilled into the base already... riveted the back...
Dammit I should just pull it!
Re: Finishing my Prop Projects - ESB Luke saber COMPLETE
I have to agree on this one. It's a great idea. Wish I could pick one up at the quickie-mart for my build.
It looks fantastic :thumbsup
The wooden form/template (can't find the right word for what it is) to hold the tube with attached T-tracks in place is a great invention. And lucky you that the ESB only has 6 grips and not 7. That would be quite challenging
I have to agree on this one. It's a great idea. Wish I could pick one up at the quickie-mart for my build.
Re: Finishing my Prop Projects - ESB Luke saber COMPLETE
Yeah my buddy made it up... took him 5 minutes. That's why I wait to go to his place for everything, any tiny problem I have he just pulls out a tool and quickly fixes it.
Needless to say, he will be coming down to help with my Han in Carbonite. He does cabinets/ high-end furniture for a living, so I think he can get the carbonite box looking perfect.
I have to agree on this one. It's a great idea. Wish I could pick one up at the quickie-mart for my build.
Yeah my buddy made it up... took him 5 minutes. That's why I wait to go to his place for everything, any tiny problem I have he just pulls out a tool and quickly fixes it.
Needless to say, he will be coming down to help with my Han in Carbonite. He does cabinets/ high-end furniture for a living, so I think he can get the carbonite box looking perfect.
Re: Finishing my Prop Projects - ESB Luke saber COMPLETE
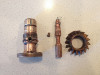
Alright, as I may have mentioned, I messed up bad while cleaning up my obi grenade. If you recall, it had a thick beige paint slathered on, and was not in anyway looking like an obi grenade. I opted to take the paint off, and then blue it.
In order to properly take the paint off, I tried to remove the neck. This sucker would not give. I went by advice and put a screwdriver through the holes in the neck and gave her a good crank.
What happened next REALLY pissed me off, and made me feel like an idiot. The pin came off (NO idea how) and the screwdriver warped the hole - I had no idea brass was so soft.
So while I am usually ridiculously carefull with my projects, I flat out messed up. I was so mad at myself. It's ridiculous really, but anytime I looked at that grenade with the broken pin, I got angry.
But then I got talking to Edraven, a fellow Canuck, who was willing to trade necks from his "parts display".
But before I could do that... that friggin neck needed to come off. THIS TIME I went all out.

After soaking the threaded area with rust removal, and heating/cooling the grenade for a bit, I wrapped a better screwdriver in tape, covered everything with rubber, and got ready to give it one last try with a wrench and some leverage.

It popped out so easily it was hilarious. 2 hours of prep, and me and my buddy high-fived like we won the superbowl.

Now that it was free... it was time to head to Edraven's and see if he had a grenade neck to swap!
Alright, as I may have mentioned, I messed up bad while cleaning up my obi grenade. If you recall, it had a thick beige paint slathered on, and was not in anyway looking like an obi grenade. I opted to take the paint off, and then blue it.
In order to properly take the paint off, I tried to remove the neck. This sucker would not give. I went by advice and put a screwdriver through the holes in the neck and gave her a good crank.
What happened next REALLY pissed me off, and made me feel like an idiot. The pin came off (NO idea how) and the screwdriver warped the hole - I had no idea brass was so soft.
So while I am usually ridiculously carefull with my projects, I flat out messed up. I was so mad at myself. It's ridiculous really, but anytime I looked at that grenade with the broken pin, I got angry.
But then I got talking to Edraven, a fellow Canuck, who was willing to trade necks from his "parts display".
But before I could do that... that friggin neck needed to come off. THIS TIME I went all out.
After soaking the threaded area with rust removal, and heating/cooling the grenade for a bit, I wrapped a better screwdriver in tape, covered everything with rubber, and got ready to give it one last try with a wrench and some leverage.
It popped out so easily it was hilarious. 2 hours of prep, and me and my buddy high-fived like we won the superbowl.
Now that it was free... it was time to head to Edraven's and see if he had a grenade neck to swap!
Last edited:
Re: Finishing my Prop Projects - Authentic parts Obi Grenade neck swap!
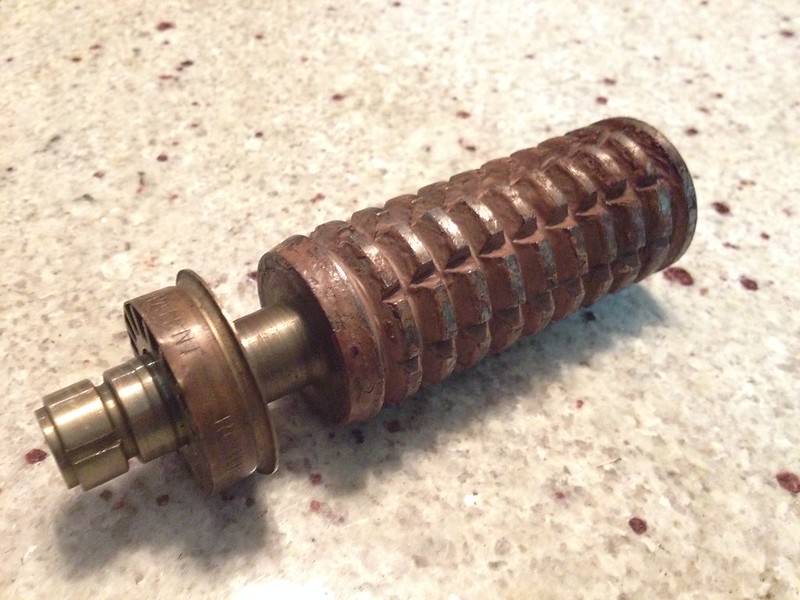
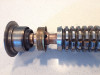
So last Saturday I dropped by Edraven's to check out his collection (which was awesome btw...)
The original neck we talked about swapping actually was too small at the base, BUT luckily he still had one more option...

I got a little nervous when I saw this neck as it had corrosion/rust all over it, and I worried about possible ruining another neck, heh.
I got it home, soaked it for a while in apple cider vinegar (Edraven had done this as well), froze it, heated it, and then with a tiny knock on the counter, the ring came off.

The pins did NOT want to come out from the side, so the detonator was trapped inside.
So I doused the whole thing with rust remover, let it sit again over night in vinegar, and then boiled it. Only after that did the pins fall out!
This is when I learned a bit about brass...

Comparing the two necks, the new one looked like copper. That couldn't be right... so I looked it up. Turns out brass will turn to copper when heated or mixed with certain chemicals (so whatever I was doing). I didn't look that closely into it, I stopped reading at "You can remove the copper look with brasso and polishing."
I took to polishing it and then stopped when it was a mix between the two... it's now kind of brass, with a tinge of copper. I still want to get rid of the black build up on it... buuuut... I'll see. I kind of like it. I dunno.
The threading on the new-old neck is actually longer... interesting to see. It's covered by the ring, so doesn't matter if an accuracy issue... just haven't seen one like that.

Next I start bluing the grenade... going off some Teecrooz directions... Until then, the new-old neck on the old-old grenade.


So thanks to Edraven99 (not sure if this links...) for hooking this up at the "RPF Canada Prop party"
So last Saturday I dropped by Edraven's to check out his collection (which was awesome btw...)
The original neck we talked about swapping actually was too small at the base, BUT luckily he still had one more option...
I got a little nervous when I saw this neck as it had corrosion/rust all over it, and I worried about possible ruining another neck, heh.
I got it home, soaked it for a while in apple cider vinegar (Edraven had done this as well), froze it, heated it, and then with a tiny knock on the counter, the ring came off.
The pins did NOT want to come out from the side, so the detonator was trapped inside.
So I doused the whole thing with rust remover, let it sit again over night in vinegar, and then boiled it. Only after that did the pins fall out!
This is when I learned a bit about brass...
Comparing the two necks, the new one looked like copper. That couldn't be right... so I looked it up. Turns out brass will turn to copper when heated or mixed with certain chemicals (so whatever I was doing). I didn't look that closely into it, I stopped reading at "You can remove the copper look with brasso and polishing."
I took to polishing it and then stopped when it was a mix between the two... it's now kind of brass, with a tinge of copper. I still want to get rid of the black build up on it... buuuut... I'll see. I kind of like it. I dunno.
The threading on the new-old neck is actually longer... interesting to see. It's covered by the ring, so doesn't matter if an accuracy issue... just haven't seen one like that.
Next I start bluing the grenade... going off some Teecrooz directions... Until then, the new-old neck on the old-old grenade.
So thanks to Edraven99 (not sure if this links...) for hooking this up at the "RPF Canada Prop party"
Attachments
-
 20066810261_71263acc39_c.jpg123.9 KB · Views: 117
 -
 20066810261_71263acc39_c.jpg123.9 KB · Views: 115
 -
 20066810261_71263acc39_c.jpg123.9 KB · Views: 114
 -
 20066810261_71263acc39_c.jpg123.9 KB · Views: 124
 -
 20066810261_71263acc39_c.jpg123.9 KB · Views: 117
 -
 20066808901_94778b6c2b_c.jpg111.3 KB · Views: 121
 -
 20066808901_94778b6c2b_c.jpg111.3 KB · Views: 117
 -
 20066808901_94778b6c2b_c.jpg111.3 KB · Views: 111
 -
 20066808901_94778b6c2b_c.jpg111.3 KB · Views: 115
 -
 20066808901_94778b6c2b_c.jpg111.3 KB · Views: 126
 -
 19471617503_6fab2282d6_c.jpg128.1 KB · Views: 115
 -
 19471617503_6fab2282d6_c.jpg128.1 KB · Views: 119
 -
 19471617503_6fab2282d6_c.jpg128.1 KB · Views: 115
 -
 19471617503_6fab2282d6_c.jpg128.1 KB · Views: 121
 -
 19471617503_6fab2282d6_c.jpg128.1 KB · Views: 118
 -
 19905894589_2b93328d3f_c.jpg146.9 KB · Views: 106
 -
 19905894589_2b93328d3f_c.jpg146.9 KB · Views: 105
 -
 19905894589_2b93328d3f_c.jpg146.9 KB · Views: 124
 -
 19905894589_2b93328d3f_c.jpg146.9 KB · Views: 119
 -
 19905894589_2b93328d3f_c.jpg146.9 KB · Views: 113
 -
 19905893889_8d422c56b9_c.jpg145.5 KB · Views: 111
 -
 19905893889_8d422c56b9_c.jpg145.5 KB · Views: 126
 -
 19905893889_8d422c56b9_c.jpg145.5 KB · Views: 120
 -
 19905893889_8d422c56b9_c.jpg145.5 KB · Views: 118
 -
 19905893889_8d422c56b9_c.jpg145.5 KB · Views: 119
 -
 19905893409_13d745c9dd_c.jpg136.6 KB · Views: 121
 -
 19905893409_13d745c9dd_c.jpg136.6 KB · Views: 119
 -
 19905893409_13d745c9dd_c.jpg136.6 KB · Views: 124
 -
 19905893409_13d745c9dd_c.jpg136.6 KB · Views: 122
 -
 19905893409_13d745c9dd_c.jpg136.6 KB · Views: 130
Last edited by a moderator:
Re: Finishing my Prop Projects - Authentic parts Obi Grenade neck swap!
I would try JamesKenobi's suggestion of soaking it in old used motor oil for a long time. The one he did that way looked great and just like my old real one. He can elaborate on it.
I would try JamesKenobi's suggestion of soaking it in old used motor oil for a long time. The one he did that way looked great and just like my old real one. He can elaborate on it.
Re: Finishing my Prop Projects - Authentic parts Obi Grenade neck swap!
Well let's call out James kenobi 1138 (*can't figure how to tag him here...) My studio is next to a garage... I could probably get a can of old oil from them pretty quickly.
I would maybe have to test it on the replica grenade (machine finish) first...
I'll go check his pics regardless...
I would try JamesKenobi's suggestion of soaking it in old used motor oil for a long time. The one he did that way looked great and just like my old real one. He can elaborate on it.
Well let's call out James kenobi 1138 (*can't figure how to tag him here...) My studio is next to a garage... I could probably get a can of old oil from them pretty quickly.
I would maybe have to test it on the replica grenade (machine finish) first...
I'll go check his pics regardless...
Similar threads
- Replies
- 2
- Views
- 313