My Rocketeer Jetpack build progress thread

Re: My Rocketeer Jetpack

you betcha rob m'man.

here's today's minor update.
i have the body work of the engines done, and the wires cut for them. im going to drill out the wire holes tonight, then paint them tomorrow. im satisfied with them, and i cant wait to call them done. finally, something with this pack will be done, im so excited.
 
Re: My Rocketeer Jetpack

so, im stoked to finally report this. 4 days of work.

this picture shows what i used to make them. i have to give credit to whoever used a toilet floater ball for a green lantern, you clicked something on in my head for these. here's this parts list.
you only need one toilet floater ball for both engines
2 - 4" corr hub fit adapters from home depot
2 - oversized paper roll plastic runner things, not sure what they're called but they're usually in oversized paper rolls for large printers.
2 - 45 degree pvc couplers
3' garden hose
2 pvc 1 1/4" t coupler
2' 1/2" medical tubing
2' 1/4" medical tubing
10' coax cable

31298_415962028161_577488161_5184211_7613684_n.jpg


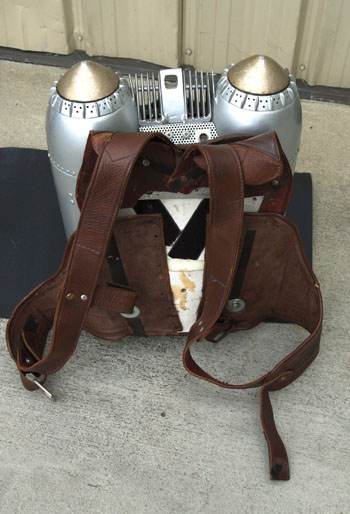
this one shows them together. dont fret over pretty hot gluing, but try to make them atleast look sort of like welds. you have to cut off the larger part of the hub and keep the bottom half, and cut along where the bottom bump/flat part meet on the toilet floater ball. on the half of the ball with the part you attach to he floater stick, you can leave on or cut off. i actually cut that off and the small circle so i could wire lights through it eventually.

the coaxial wires, make up all the wires, to get the effect of the webbed wires, just strip the rubber casing off. to get the effect of copper, i painted it gloss brown, then misted gold over it.

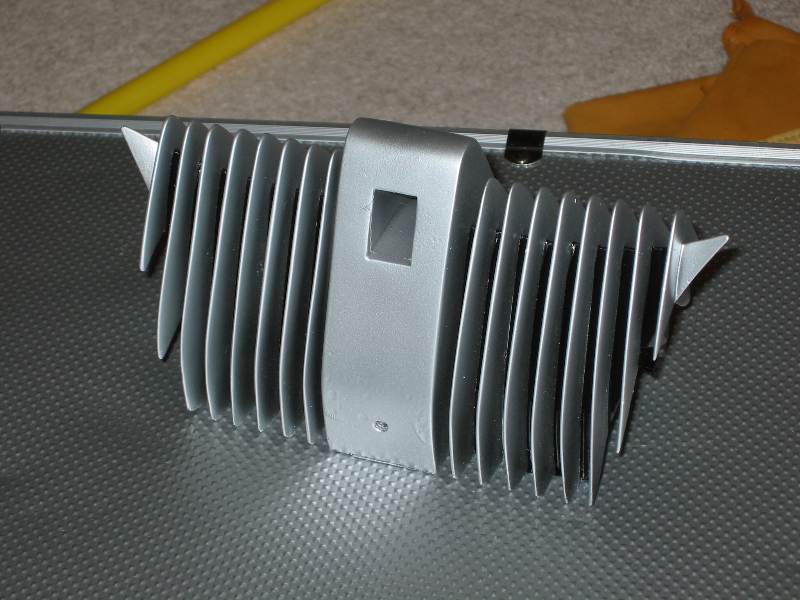
to paint the physical engines, i panted gloss black on the bottom over a flat coat, then i dusted on a silver paint. the top half i painted matte nickel with a dust of black. dont worry about perfection, just imagine them being super hot all the time, and being beat to heck from flames. if it comes out a little more black than gun metally, then cool. i actually was going to flat black them the really really lightly dust them flat to resemble the space shuttle's rocket boosters.
30498_417016028161_577488161_5205498_7806052_n.jpg


finished
30498_417016048161_577488161_5205500_4730679_n.jpg


right detail
30498_417016058161_577488161_5205501_3412772_n.jpg


left detail
30498_417016073161_577488161_5205503_830761_n.jpg


when all is done and i get to lighting and wiring, i thought of a really cool way to go about these that im keeping hush hush in the warehouse of my mind, because its a really neat idea and i want to play around with it to see if it works. i kind of figured out a way for it physically to make the crackle of rocket fire.
 
Re: My Rocketeer Jetpack

i broke an engine last night. i fixed it today.

also, my fins for the top vent arent working out the way i originally planned. im going to be fixing alot of that today.
 
Re: My Rocketeer Jetpack

That's great work on the engine. :thumbsup
Really weird you used a piece from a toilet, as I had plans to use a plunger for that piece. :confused:lol

Engine.jpg
 
Re: My Rocketeer Jetpack

lol, i was originally going to use a plunger for the top of the boosters, but found i like the shape of the bowls better. for the engines i was going to use one of those "crinkle" looking plungers, but after having to redo this pack and wanting to make it close to the real thing as possible i changed my mind. however, i have this idea in my head to start making different jet packs i make up and havent completely tossed that idea out.

im using 6" airduct pipe, with the wires and the other parts of the engine the toilet ball looks really good in it. i think the parts of the engines fit like they were made for it. i just wish the silver paint on the cables still with their sleeve didnt keep rubbing off when i touch it.

i havent been keeping as good of track of how much its costing as this as i should, but i am keeping track of what i use. when all's said and done i'll make a master list of what you need and how much it costs. its nothing to go to home depot and kill an hour or two, i love that store.

i have a little more to do to this today and i'll take another progress pic, and one of the engines mounted in the boosters.

thank you all for compliments and keeping up.
 
Re: My Rocketeer Jetpack

i dropped the ball when i said id put up some more pics.

but i did manage to figure out that middle thing in the vent at the top
(the uh, solid thing with the square in it in this picture)
Paint3.jpg


i just noticed that i routed my square hole a little large. i blame that i attempted to drill it out with a 3/4" paddle bit and went at an angle because i dont have a drill press. so, to fix that, i took it to my router table with a 3/4" bit to clean up that nasty hole i made.

but now its too big.

no pictures. because im going to figure out how to fix it. i might fill it in with bondo and take a 1/2" bit to my router and see what trouble that'll get me into. i made it out of 3/4" ply wood, because originally i was going to use my plexi, and paper over it then fiberglass as my first foray into attempting fiberglassing paper for pepakura, but that turned into one gigantic waste of time not to mention material.

also, looking at that picture, i realised i didnt make near enough pieces of "vent" from my plexi. so now when i get home, im going to have to find another peice(i hope i have one, because i think im out. and that means i have to find a whole new sheet of something thin and plastic to work with and do them all over again, which is complete bull crap).


edit: i keep forgetting abuot this one
pack_back.jpg
see how the thin parts of the vent are wider spaced and there are less than the one above, and the hole i nthe solid thing is larger? these conflicting pictures are driving me nuts. i know one is the kit, i know the other "might be a stunt pack sold on ebay years ago" what should i do? i really dont want to have to make 8 more of those thinner vents if the real one doesnt have that many.

would anyone have any idea how far the individual thinner pieces of that thing are spaced? im thinking they're about 1/2" but if that doesnt work im going to go as close as 1/4".
 
Last edited:
Re: My Rocketeer Jetpack

im going to go ahead and use six fins for that vent on each side, its inbetween both of those pictures and looks pretty good.

i also got bondo today, and am soo thrilled to finally have it in my possession after needing it for so long. so really expect this thing to start cranking out.
 
Re: My Rocketeer Jetpack

so here is today's progress.

i finally got around to getting the top center vent to where im happy with it. i decided to have 6 fins on either side(routing for almost 2 days straight), mostly because i cant figure out the curve to cut into the fins to make them "hang" on the side of the booster, and because only 6 fit. the fins are made from 1/4" sintra, and the center is made from 2 pieces of 3/4" plywood. i had to refill the hole twice with bondo so i could get that hole just right. its routed 1/2" at 1/2" high. still much to do, with filling in the wood and screwing it into place.
30698_420023663161_577488161_5277143_2849563_n.jpg


this is the finished boosters in their place as i said i would post
30698_420023673161_577488161_5277144_2731194_n.jpg


this is the whole pack where it stands now
30698_420023683161_577488161_5277145_3552217_n.jpg


my list of things to do tomorrow is fill/shape the body with bondo and sanding some more tomorrow, and smooth out the top center vent. also start planning how im going to do those smaller fins around the tips of the boosters(my main concern is figuring out the curve of the booster top to fit the inside of the fin and how im going to attach them with out showing how).
 
Re: My Rocketeer Jetpack

well, i didnt do any that i said i was going to do.

i ended up deciding that in order for me to shape the center of the body was to take out that upside down T shape from the bottom(since i had to rework it anyway), and work my way up. i was thrilled with it being an uneven shape, so i started to build that back up, and i filled in the bondoglass with bondo. when i get the body figured out and settled, especially the center "shaft" shape .

i also then noticed that its not exactly symmetrial toward the center on each side of the "fan vent" after i routed that out so i can make that hole more centered.


so, from taking things apart, i did manage to put some bondo on it, im content with work today. i also figured im going to take the fins i didnt use, and make the small fins at the top of the booster, but i wont actually tackle that until i get on to the tips of the booster, which wont happen until i get the center to my liking.
 
Re: My Rocketeer Jetpack

im still working on this thing, just not as actively as i was. the boosters came unglued the other day, i completely reworked the bottom of the pack and i remade the center of the pack. its getting there, slowly, but surely.
 
Re: My Rocketeer Jetpack

What a fabulous project! These kind of threads with this kind of ingenuity are my absolute favorite on here! Way to kick ass and inspire!
More progress!! :)
 
I did not read most of the thread. But I got to say you have a lot of talent and your really creative. I love the way I jet pack is coming out. I love the detail :thumbsup
 
WOW! Great build so far, I love the simple parts you're using. One of my favorite movies as a kid, awesome to see interest in this!
 
ive been bondoing the center of the jet pack off an on for a week now smoothing it out and making it symmetrical.
in the mean time i was wondering if anyone had any information on straps for this? what an alternative for the orignal buckle would be?

so far im thinking of using a car seatbelt buckle from the junk yard, shaped something like this.
352358210_tp.jpg


however, even if i used a seatbelt buckle, im not sure how to pattern the straps to attach to it. im kind of at a complete loss with this.

any input would really be appreciated
 
its coming along great! I admire your patience and hard work you're putting in. Really not an easy prop to build
 
Back
Top