My New Star Wars Home Theater - Death Star Hangar

azheat01

Sr Member
RPF PREMIUM MEMBER
Been off the boards for a while, working on some home projects, one of which is my new Star Wars home theater. My old "mini theater" was getting too cramped so I decided to convert the loft into a larger theater. Sorry if you've attempted to look at some of my older threads, I recently switched web hosting companies so my old photos are mostly off-line at the moment, I'll work on putting those up next.

I'm going to try and make this room look like the inside of a Death Star bay / hallway / hangar. I'm not specifically trying to copy any exact image, just the idea.

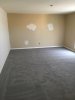
Here is the loft prior to starting, put in some new gray carpet and started priming the walls to cover the old color.

IMG_0370.JPG

IMG_5447.JPG

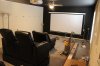
I painted the front wall and ceiling black, mounted the new fans, projector, and screen. I'm running an Epson Optoma 3500. I was skeptical about getting a projector, but I wanted something larger for the room and still wanted 3D. For the price, I am incredibly happy. There was a lot of great feedback on this projector. The screen is 120".

IMG_5450.JPG

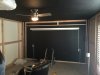
I wanted the room to look like you were in the hanger looking out, so I started framing the side walls and making the front wall look like a bay door.

IMG_0457b.jpg

IMG_0476.JPG

IMG_0458.JPG

I'm going to paint the projector screen housing black along with the wire covers and control box. I also added a strip of blue LEDs that work off a remote.

IMG_0477.JPG

Started installing the panels, slots will be cut out for the windows and there will be hinged panels covering them so they can be easily opened.

IMG_5482.JPG

This room is bigger than my previous room, about 5' wider and 7' longer. I plan on putting some x-wings and tie fighters on the front wall, battling it out. Maybe some of those Fathead decals, not sure yet. So far this has been quite the project, especially since my carpentry skills suck.
 

Attachments

  • IMG_0370.JPG
    IMG_0370.JPG
    2 MB · Views: 607
  • IMG_5448.JPG
    IMG_5448.JPG
    6.2 MB · Views: 705
  • IMG_0457.JPG
    IMG_0457.JPG
    1.7 MB · Views: 668
Last edited:
Re: My New Star Wars Home Theater - Death Star Hanger

I also worked on the two slotted wall pieces that will be back lit. I used 1/2" MDF for those.

IMG_0482.JPG

To illuminate these I am using two, 4' LED light strips. Lowe's sells these but they aren't cheap, $40 per strip. I wanted to use 4 strips per panel, but just wasn't going to spend that kind of money. There may be other alternatives to this type of lighting, I just went with what was available locally. I also wanted LEDs so I didn't have to change bulbs and to reduce the heat.

Since I am only using two lights per panel, I decided to cover the wall area with aluminum foil to help with light reflection. I tested the panel against a white wall and with the foil and the foil did help reflect the light once the panel was installed. The lights run off a light switch so that I can turn them on as soon as I enter the room. The good thing about putting this theater room upstairs was that I had easy access to the attic. So I was able to run an extension cord through the ceiling to power both panels with one switch. I was able to completely hide all wires, so I am happy with how it came out.

IMG_5484.JPG

IMG_0483.JPG
 
Re: My New Star Wars Home Theater - Death Star Hanger

This is sweet. Have you posted this over at the AVS forum?

SB
 
Re: My New Star Wars Home Theater - Death Star Hanger

Looking great, can't wait to see the next progress photos!!! What a great idea for a theatre room!!!
 
Re: My New Star Wars Home Theater - Death Star Hanger

As a kid I always wanted to do something like this to my bedroom. Needless to say, I'm definitely interested to see how this turns out. Very cool project!
 
Re: My New Star Wars Home Theater - Death Star Hanger

I love these full area projects. This is looking awesome!
 
Re: My New Star Wars Home Theater - Death Star Hanger

Looks promising. But where is the hanger and the Death Star to hang from it?

I knew that was coming. I tried everywhere to find the edit button for the title, I know it's here because I've used it before, but no luck. I'll eventually find it and change it.
 
I got the last of the panels up today, finally. These were such a pain, lugging each 4' x 8' sheet up the stairs. I still have a few more screws to put in and some minor adjusting. I'm going to start working on the detail layers now. I picked up several lengths of 5/8" MDF trim and a few more panels to cut. I want to get all those pieces in place, fill in the gaps with caulk, then start painting. I'm anxious to get the speakers hooked up, I haven't seen LOTR BOTFA yet, I'm holding out until this room is done!

IMG_0484.JPG

IMG_0485.JPG

IMG_0486.JPG

IMG_0487.JPG
 
This is great. I love the whole room builds that I've seen. I would love to try something like this, but there's two problems. One I've not the slightest clue how to install the electrical nor the experience in carpentry, and two I live in an apartment.
 
Thanks brother, I was inspired by your Smugglers Room. Except mine, ya know, won't be as detailed!

Thanks for that nod. I think there is plenty of detail here. Looks killer so far. Those light panels just just add so much to the space!
 
Thanks for that nod. I think there is plenty of detail here. Looks killer so far. Those light panels just just add so much to the space!

Yeah, I really love the panels, they're my favorite part. They really sell the Star Wars theme.

Slow progress this week, but I managed to get some of the front detail pieces on. I had to take several liberties with my design. These front wall detail pieces are supposed to be recessed, but I didn't want to mess with cutting them in. So I saved some time and labor and just went with pieces on top. I still may add some greeblies to this front area.

IMG_0501.JPG

IMG_0503.JPG

I also started on the side wall panels. I found some air return grills and decided to use those rather than building from scratch. Although not screen accurate, I think they'll feel the part once painted. I'm also going to line the inside of these grills with some black screen material. I temporarily taped one in just to get an idea of the look.

IMG_0502.JPG

IMG_0504.JPG

I'll work on the rest of the walls this weekend. Because I had to make some design changes, I am not entirely sure how I want to alternate these panels.
 
Last edited:

Your message may be considered spam for the following reasons:

If you wish to reply despite these issues, check the box below before replying.
Be aware that malicious compliance may result in more severe penalties.
Back
Top