You are using an out of date browser. It may not display this or other websites correctly.
You should upgrade or use an alternative browser.
You should upgrade or use an alternative browser.
My Marty McFly Cosplay Project for 2015: 3 Martys In 3 Days
- Thread starter jhk1976
- Start date
ElectroDFW
Well-Known Member
Very nice.
I'll be attempting this as well for All-Con in Dallas in March.
My version is a 'Marty-on-a-budget' cosplay though, that I've been improving on for just over a year.
I get as close as I can without the vintage or repro costs for as many pieces I can find local or make myself as possible.
Eventually I hope to have my own thread on this, but it's difficult enough for me to keep my Cosplay Facebook page up-to-date with everything, let alone c&p everything to a thread here.
Regards,
Your Friend in Time,
--Electro--
aka David M.
www.facebook.com/mcflydallas
jhk1976
Well-Known Member
January Updates:
The cosplay project took a back seat for a while as I ended up landing a new job in November and moving from Charlotte to the greater Asheville area. With the holidays over and things settling down, I'm back to working on my Marty incarnations. Here's the latest:
The Shirt:

Dissatisfied with the first shirt I had made, I elected to have a second one produced for me. My friend did a decent enough job with the first shirt, but it was done from a shirt pattern that turned out to be too big for my frame, despite being a pattern for a men's small. Before moving away from Charlotte, I had a custom clothier named Bruce Julian produce a new one, based on my actual measurements. I once again used Risu's Marty McFly fabric design from Spoonflower for the fabric. They got the patterns on the pockets lined up correctly, but forgot to cuff the sleeves. As I was in the process of moving, I didn't quibble about that (it'll be under a denim jacket and puffer vest most of the time anyhow). It's a much better fit, and I'm quite pleased with it.
The Backpack:

My vintage Eastpak is now outfitted with the correct patch featuring the orange globe logo. Shortly before I moved, I scored a used Eastpak duffel bag on Etsy for around $30 that had the patch I needed. A fellow cosplayer, who's very handy with a thread and needle, agreed to perform the patch transplant for me. In addition to adding the correct patch, she reversed the name tag patch on the back. I was going to have her remove it entirely, but she told me that the patch actually conceals some of the backpack's stitching. She elected to just flip it over and reattach it, which I was okay with. As for the duffel bag, that now has the red logo and will become my gym bag -- as it's in great shape for its age. Below is a photo of both prior to the switch.

HC Mag Modifications:

Back in the fall, I got my hands on a pair of the V2 Mags. I originally planned to use them for cosplay, but I liked them so much, I started having second thoughts about it. I initially considered buying a second pair of V2's so I would have one for cosplay and one to keep as a display piece. Then came the HC mags, which gave me a budget alternative for the second pair. I ordered a couple of Mark Poon's mod kids for the HC Mags -- one for the side and heel branding, the other for the EL logo on the strap. While the decals have been pretty easy to work with, I ran into a lot of headaches with the EL kit. Having never soldered anything before, I ended up making a few mistakes. The biggest mistake was assuming the wiring could be soldered to the logo's wire tape. I took the instructions of "solder it all together" quite literally, not realizing that the wire tape could instead be made to work using conductive wire glue instead (which I had seen in Jedifyfe's tutorial video, but forgot about). I destroyed the tape in the process and actually scorched the EL a little. I have some replacement wire tape on order, and the damaged area of the EL will end up concealed underneath the front of the shoe strap anyhow, so it's not a major problem.

The V2's I have on display will get their share of mods as well (I'm looking to add the sole EL's next), but not until I have a firm handle on what I'm doing. The HC Mags sort of became the "practice" pair, and will likely be the set I wear to DragonCon. I've ordered some simpler inverter kits that should enable the future EL mods to be virtually solder free, as I find soldering to be a bit of a pain -- not to mention something I'm not especially skilled at just yet. It's something I'm gonna need to know for a future mod though (keep reading).
The Ones That Got Away:

Several of the items I needed have shown up on eBay once or twice in the last couple of months, but wound up going for a lot more than I wanted to spend. One or two small Class5 vests showed up for around $250-300 each, but both were red, and as the consensus seems to be that the proper color of the vest is a dark orange, I decided to pass on them. The Aiwa cassette player also turned up as a part of a "Marty McFly Costume" package around halloween. I contacted the seller, but he wasn't willing to break-up the set. It included the JVC camcorder (which I already have) and some vintage Bruins (which I don't have, but they were the wrong size). It went for something like $800, so I said no thanks. Then the Valterra Skateboard showed up on there last week, and I watched as my $150 bid was dwarfed by the $355 bid that ultimately won it. As such, I made the decision that if I couldn't find an affordable Valterra board, why not recreate it?
The Skateboard:
View attachment 431147
Two days ago, I began cobbling together the needed parts to recreate the Valterra. I ordered a "retro" styled Madrid skateboard deck, which I'll end up sanding down and repainting black to use as a base. I also ordered the Madrid "Fly" wheels for the board, and found one of the three stickers featured on the original prop. Users curemode and emmaincandyland were kind enough to provide me with graphics files so I can recreate the board's top and bottom designs, as well as the accompanying stickers. The plan is to have the top and bottom printed out as large pieces of adhesive vinyl, and then apply them to the board. I've located most of the other hardware I need for the board as well (wheel bearings, grip tape, etc.), but I still have a few parts to find. A such, this project will take a back seat for now as I finish up the HC Mods first. Then, once the Skateboard's done, it'll be time to focus my attention on the 2015 jacket...
The 2015 Jacket:

The first step will be to get the jacket tailored, as it's quite big on me. Then, I plan to retrofit it with the device you see above. It's a 16GB sound module which I intend to rig up to play the jacket's sound effects. The goal is to get the board configured, acquire some sort of enclosure for it and the speakers, and then run a couple of tactile switches over to where the jacket's "buttons" would be. So far, this is just in the brainstorming stage, but provided I can figure out exactly how to get it the hardware situated in the jacket, it'll make for a nice touch. If I'm feeling super ambitious, I may also wire up an LED light as well. Jedifyfe has already done all this this, and he's much, much handier than I, so hopefully I won't be biting off more than I can chew when I take this on. Here's a link to the sound module for anyone who's interested: http://www.adafruit.com/products/2217
To Be Continued...


The cosplay project took a back seat for a while as I ended up landing a new job in November and moving from Charlotte to the greater Asheville area. With the holidays over and things settling down, I'm back to working on my Marty incarnations. Here's the latest:
The Shirt:
Dissatisfied with the first shirt I had made, I elected to have a second one produced for me. My friend did a decent enough job with the first shirt, but it was done from a shirt pattern that turned out to be too big for my frame, despite being a pattern for a men's small. Before moving away from Charlotte, I had a custom clothier named Bruce Julian produce a new one, based on my actual measurements. I once again used Risu's Marty McFly fabric design from Spoonflower for the fabric. They got the patterns on the pockets lined up correctly, but forgot to cuff the sleeves. As I was in the process of moving, I didn't quibble about that (it'll be under a denim jacket and puffer vest most of the time anyhow). It's a much better fit, and I'm quite pleased with it.
The Backpack:
My vintage Eastpak is now outfitted with the correct patch featuring the orange globe logo. Shortly before I moved, I scored a used Eastpak duffel bag on Etsy for around $30 that had the patch I needed. A fellow cosplayer, who's very handy with a thread and needle, agreed to perform the patch transplant for me. In addition to adding the correct patch, she reversed the name tag patch on the back. I was going to have her remove it entirely, but she told me that the patch actually conceals some of the backpack's stitching. She elected to just flip it over and reattach it, which I was okay with. As for the duffel bag, that now has the red logo and will become my gym bag -- as it's in great shape for its age. Below is a photo of both prior to the switch.
HC Mag Modifications:
Back in the fall, I got my hands on a pair of the V2 Mags. I originally planned to use them for cosplay, but I liked them so much, I started having second thoughts about it. I initially considered buying a second pair of V2's so I would have one for cosplay and one to keep as a display piece. Then came the HC mags, which gave me a budget alternative for the second pair. I ordered a couple of Mark Poon's mod kids for the HC Mags -- one for the side and heel branding, the other for the EL logo on the strap. While the decals have been pretty easy to work with, I ran into a lot of headaches with the EL kit. Having never soldered anything before, I ended up making a few mistakes. The biggest mistake was assuming the wiring could be soldered to the logo's wire tape. I took the instructions of "solder it all together" quite literally, not realizing that the wire tape could instead be made to work using conductive wire glue instead (which I had seen in Jedifyfe's tutorial video, but forgot about). I destroyed the tape in the process and actually scorched the EL a little. I have some replacement wire tape on order, and the damaged area of the EL will end up concealed underneath the front of the shoe strap anyhow, so it's not a major problem.
The V2's I have on display will get their share of mods as well (I'm looking to add the sole EL's next), but not until I have a firm handle on what I'm doing. The HC Mags sort of became the "practice" pair, and will likely be the set I wear to DragonCon. I've ordered some simpler inverter kits that should enable the future EL mods to be virtually solder free, as I find soldering to be a bit of a pain -- not to mention something I'm not especially skilled at just yet. It's something I'm gonna need to know for a future mod though (keep reading).
The Ones That Got Away:
Several of the items I needed have shown up on eBay once or twice in the last couple of months, but wound up going for a lot more than I wanted to spend. One or two small Class5 vests showed up for around $250-300 each, but both were red, and as the consensus seems to be that the proper color of the vest is a dark orange, I decided to pass on them. The Aiwa cassette player also turned up as a part of a "Marty McFly Costume" package around halloween. I contacted the seller, but he wasn't willing to break-up the set. It included the JVC camcorder (which I already have) and some vintage Bruins (which I don't have, but they were the wrong size). It went for something like $800, so I said no thanks. Then the Valterra Skateboard showed up on there last week, and I watched as my $150 bid was dwarfed by the $355 bid that ultimately won it. As such, I made the decision that if I couldn't find an affordable Valterra board, why not recreate it?
The Skateboard:
View attachment 431147
Two days ago, I began cobbling together the needed parts to recreate the Valterra. I ordered a "retro" styled Madrid skateboard deck, which I'll end up sanding down and repainting black to use as a base. I also ordered the Madrid "Fly" wheels for the board, and found one of the three stickers featured on the original prop. Users curemode and emmaincandyland were kind enough to provide me with graphics files so I can recreate the board's top and bottom designs, as well as the accompanying stickers. The plan is to have the top and bottom printed out as large pieces of adhesive vinyl, and then apply them to the board. I've located most of the other hardware I need for the board as well (wheel bearings, grip tape, etc.), but I still have a few parts to find. A such, this project will take a back seat for now as I finish up the HC Mods first. Then, once the Skateboard's done, it'll be time to focus my attention on the 2015 jacket...
The 2015 Jacket:
The first step will be to get the jacket tailored, as it's quite big on me. Then, I plan to retrofit it with the device you see above. It's a 16GB sound module which I intend to rig up to play the jacket's sound effects. The goal is to get the board configured, acquire some sort of enclosure for it and the speakers, and then run a couple of tactile switches over to where the jacket's "buttons" would be. So far, this is just in the brainstorming stage, but provided I can figure out exactly how to get it the hardware situated in the jacket, it'll make for a nice touch. If I'm feeling super ambitious, I may also wire up an LED light as well. Jedifyfe has already done all this this, and he's much, much handier than I, so hopefully I won't be biting off more than I can chew when I take this on. Here's a link to the sound module for anyone who's interested: http://www.adafruit.com/products/2217
To Be Continued...
Last edited by a moderator:
jhk1976
Well-Known Member
Very nice.
I'll be attempting this as well for All-Con in Dallas in March.
My version is a 'Marty-on-a-budget' cosplay though, that I've been improving on for just over a year.
I get as close as I can without the vintage or repro costs for as many pieces I can find local or make myself as possible.
Eventually I hope to have my own thread on this, but it's difficult enough for me to keep my Cosplay Facebook page up-to-date with everything, let alone c&p everything to a thread here.
Regards,
Your Friend in Time,
--Electro--
aka David M.
www.facebook.com/mcflydallas
I perused your FB page. Nice work! I don't know that I've seen much part III cosplay that wasn't the "50's Western" iteration. I may hit you up when I get around to working on the part III costume. I'm focused on parts I and II at the moment, trying to get them close to perfect before I tackle part III in any way. I'm working on costumes for DragonCon, so I have until September.
brokenhyperlink
New Member
HI! Awesome cosplay! I'm looking to do Marty in the summer as I'm going from Belfast to London to go to a Back to the Future reunion (being my 18th birthday present because it's so expensive XP) and I want my cosplay to be as perfect as possible. Which of the items would you recommend on getting for Marty's original costume (appart from the actual thing obviously)
I'm having trouble finding a denim coat to modify so I don't mess up too much and decent jeans and shoes that fit. Also I'm still in school and only get £30 from EMA (basically we get paid to go to school etc) so I can't splash out as I'm also planning on doing other cosplays around that time. I was going to modify a cassette tape but it might be best to just not have one and try to keep looking I guess.
Also sorry if I sound annoying but is there a technique or a forum you use to find all these things? Like many other people said it's hard to get all this together and I'm surprised you have a lot of this that are almost identical to the movie. Also living in Belfast is tough because we don't get everything you guys do and vice versa but Americans seem to get more cooler things and for a cheaper price :'(
HI! Awesome cosplay! I'm looking to do Marty in the summer as I'm going from Belfast to London to go to a Back to the Future reunion (being my 18th birthday present because it's so expensive XP) and I want my cosplay to be as perfect as possible. Which of the items would you recommend on getting for Marty's original costume (appart from the actual thing obviously)
I'm having trouble finding a denim coat to modify so I don't mess up too much and decent jeans and shoes that fit. Also I'm still in school and only get £30 from EMA (basically we get paid to go to school etc) so I can't splash out as I'm also planning on doing other cosplays around that time. I was going to modify a cassette tape but it might be best to just not have one and try to keep looking I guess.
Also sorry if I sound annoying but is there a technique or a forum you use to find all these things? Like many other people said it's hard to get all this together and I'm surprised you have a lot of this that are almost identical to the movie. Also living in Belfast is tough because we don't get everything you guys do and vice versa but Americans seem to get more cooler things and for a cheaper price :'(
A lot of the stuff we get are from months or even years of searching. Sometimes you just get lucky.
Last edited:
jhk1976
Well-Known Member
Yeah, you do have to be patient, and stash some money away for when the big ticket items turn up on eBay or elsewhere. I would suggest just getting together a costume on the cheap using "close enough" materials to start, and then replace them one article at a time as you find more authentic pieces. It's the approach I'm taking.
If you want tips as to what to get, search around these forums. There's one for almost every individual thing Marty had or wore in those films. It's how I researched my own cosplay late last year. The folks here are happy to share what they know and to aid you in your efforts as best they can.")
If you want tips as to what to get, search around these forums. There's one for almost every individual thing Marty had or wore in those films. It's how I researched my own cosplay late last year. The folks here are happy to share what they know and to aid you in your efforts as best they can.
jhk1976
Well-Known Member
As far as a starter wardrobe, I'd do the plaid shirt, denim jacket, puffer vest, acid wash jeans and old-style Nikes at the very least. You can add on incrementally from there. The outfit I got together for DragonCon last year came together in a month. Don't worry if it's not perfect. It's damn near impossible to get it perfect with limited time and funds. Do what you can, and most importantly, have fun with it!
brokenhyperlink
New Member
thanks! I'm on the hunt for a lot of things and trying everywhere other than Ebay and Amazon to see if there even any things similar to the props. Looks like the cassette player, camcorder, skateboard, future shoes and fututre coat while be the hardest but I can live without the skateboard, camcorder and 2015 outfit ask I can't bring them all on a plane The 2015 costume will probably be a costume I'll work on for the rest of the year
The 2015 costume will probably be a costume I'll work on for the rest of the yearbrokenhyperlink
New Member
Also, the JVC camcorder and cassette player. Do they actually work or not. I'm kind of on the fence on getting actual working ones if they even appear. There is one on ebay right now on a bid for £75 and £10 pp and it is in excellent condition and everything. But I only have maybe £45 right now and unless I borrow some money and ask my mummy I might have to give it a pass :'(
MOD EDIT: Please do not post Ebay links, thanks.
If I can, should I get it?
MOD EDIT: Please do not post Ebay links, thanks.
If I can, should I get it?
Last edited by a moderator:
jhk1976
Well-Known Member
The camcorder is one of the first vintage pieces I was able to get my hands on, and it does work. It's nice to have, but not essential to the "costume." They turn up online fairly often, so I wouldn't sweat it if you can't get your hands on it right away. Odds are, you'll get another crack at it. As for the Aiwa, I'm still in search of one, though I'd much prefer to get a working unit. If it doesn't work, I'd likely look into having it repaired. A non-working one would be fine for visual purposes, but I'm a music lover, so I'd want it fixed for the nostalgia factor, if nothing else.
I would make a list of everything you think you need for your cosplay, and put them in priority order. Focus on the things you need/want the most, and then go from there.
I would make a list of everything you think you need for your cosplay, and put them in priority order. Focus on the things you need/want the most, and then go from there.
The JVC recorder has really gone up in price. I remember them being only around $100. Now people try to sell them for $300+. I don't have one, but i want one.
jhk1976
Well-Known Member
The JVC recorder has really gone up in price. I remember them being only around $100. Now people try to sell them for $300+. I don't have one, but i want one.
I snagged mine somewhat easily last August for $100. The price surge must be a recent thing.
If anyone is looking for a good enough vest, be on the lookout for burnt orange Woolrich vests. They are basicaly the exact same design as the Class-5 vest except for the pockets. Other little details that are off are the snap button placements and some stitch lines. Other than that it's perfect.


Compared to the real thing.

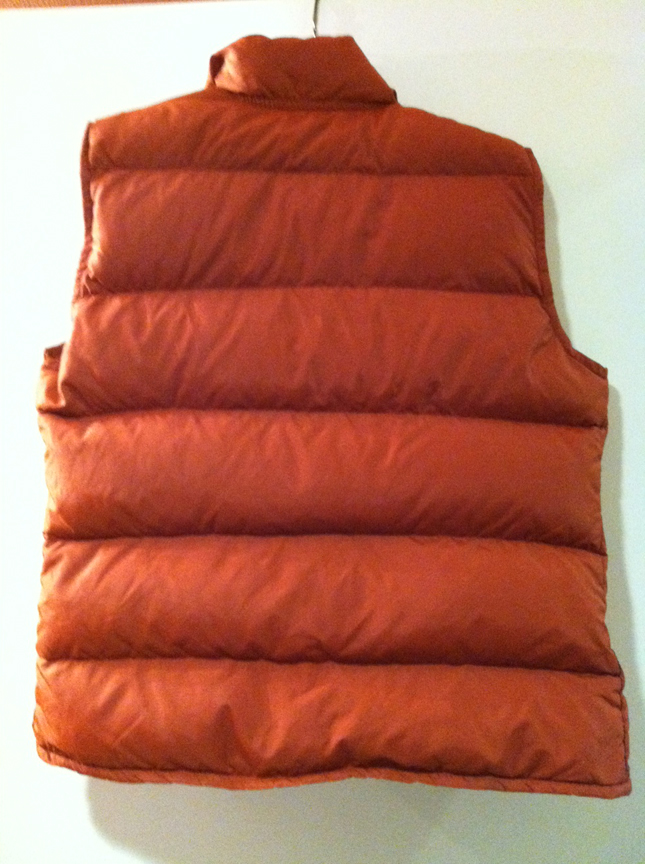
They're relatively inexpensive. I got mine for $68 shipped. But I also bought another similar but not exact one for spare fabric to bring to a tailor and make accurate pockets.
Compared to the real thing.
They're relatively inexpensive. I got mine for $68 shipped. But I also bought another similar but not exact one for spare fabric to bring to a tailor and make accurate pockets.
Last edited:
jhk1976
Well-Known Member
March Updates:
March has turned into a sort of modding month for me --" March Mod-Ness" if you will. :facepalm
HC Mag Conversion:


Back when I purchased my V2's in the fall, I ordered a set of Mark Poon's NIKE EL's with the intent of modding that pair. Instead, I made them a display item and decided to mod a pair of the HC Mags instead. I purchased Mark's lettering kit for this purpose a couple months back, and finally got to work last month. I applied the lettering to the heel, but am waiting to finish all of the other mods before adding the swoosh. I used the "steaming" method to slim the toe and to flatten the ribbing on the sides for when I later apply the swoosh. As for the strap, it took me a long time to find material I felt was suitable for the task. A check of every fabric store in a 30 mile radius yielded only off-white vinyls that weren't a close enough match color-wise. I eventually found a "cow white" leather on Etsy from a seller called MoxiesLeather based out of Canada. The sample they sent was a very close match, and thickness was just right. I ordered a 36" x 10" swath of it, which was more than enough to produce two straps (I'm saving the rest for future mods). The first strap is done, and the second will be finished up in the not-too-distant-future.
As I had never soldered anything before, assembling the EL kit proved challenging. The tip of the soldering iron I purchased was too unwieldy for the detailed nature of the soldering I had to do, especially for the power switch. I also wound up warping the EL and disintegrating the wire tape from the heat of the iron. So, I went to plan B. I ordered a replacement set of EL's, and decided to use wire glue instead. Jedifyfe used wire glue for his strap mods, so I thought I would give it a try too. I struggled with it at first, due to the fact that wire glue is extremely runny and a little tricky to apply with accuracy. I eventually found that dispensing a dollop of it, then applying it with a toothpick worked extremely well. I also went a different route for the power inverter, replacing the kit that came with the EL's with a 3V coin cell inverter from Adafruit. While the inverter is a bit bulky, it's self contained and gave me a solder-free way of bringing the strap mod to completion. The inverter is a little too big to fit in the buckle, but should do just fine Velcroed to the tongue of the shoe.
2015 Jacket Mods:
At present, my 2015 jacket is in the care of a trusted tailor who is shortening it for me and adding a couple of inside pockets (which I wanted to hold my replica Gray's Sports Almanac). In the meantime, I started work on the sound mods. I used an Adafruit Audio FX Sound Board with 16MB flash storage for this project, which ran me $30. The board had lots of features that made it perfect for the task. For one, 16MB was more than enough space for the jacket sounds. Second, the board is ridiculously small, measuring a little less than 2" W x 1" H. Third it has a 2W amplifier, which makes it plenty loud.
Best of all, the board has stereo pinouts. The advantage to this is that it allows me to use one channel for the audio and the other channel for an LED. I used booshman's provided WAV files for the audio, which were saved in mono, meaning that the audio would be identical over both channels. I then hooked up a 3W 4 ohm speaker to the left channel, then followed Jefifyfe's guidance in connecting a 3mm yellow LED to the right. I'm pleased to say the prototype was a complete success
https://youtu.be/aRw4dnkwGxE
Over the weekend, I worked up the nerve to permanently solder some of the wires in place. I bought a new soldering iron with a more precise tip, higher wattage and some lead-free solder as well. I also have some additional components on order: extra wiring, a AAA battery pack to power it and a small tin to act as an enclosure. I'm also mulling over how I want to attach the switches eventually. Once I eventually get the jacket back, I'll figure out a way to get it all installed.
Skateboard Mod:

After failing to snag a vintage Valterra on eBay, I have decided to make my own replica. After reading up on the needed parts elsewhere in these forums, I managed to get a hold of several key components. The first was a Madrid "Explosion" deck, which I'm told is the correct size and shape. Madrid still sells these, but not in the "splatter" style, unfortunately. So, my goal is to sand this board down, paint it black, and then have the splatter design screen printed onto the board. To do this, I'm re-creating the pattern as vector art in Adobe Illustrator. Using photos EmmainCandyland provided, I'm painstakingly vectorizing the entire pattern. I'm nipping away at it, working on it for an hour or two at a time...

The yellow denotes the parts I've completed thus far (the end product will not be yellow -- not the splatters anyway).
As for the hardware, I procured a set of Madrid's yellow "Fly" wheels for the board as well. Madrid no longer stocks the correct trucks for the replica, so I'll be searching the web for a set, or at the very least, a close facsimile. I also have a set of Madrid copers, which will be painted white to match the original board. The rest of the parts I need (bearings, risers, grip tape, etc.) I'll worry about once the board is closer to completion. One thing I DID manage to snag are the stickers. I successfully found two vintage Madrid stickers on eBay that are a match for the ones on the original prop. The circular sticker is a reproduction, but is plenty close enough for me. The stickers for the copers I plan to have reproduced for me by a vinyl shop.

To Be Continued...


March has turned into a sort of modding month for me --" March Mod-Ness" if you will. :facepalm
HC Mag Conversion:
Back when I purchased my V2's in the fall, I ordered a set of Mark Poon's NIKE EL's with the intent of modding that pair. Instead, I made them a display item and decided to mod a pair of the HC Mags instead. I purchased Mark's lettering kit for this purpose a couple months back, and finally got to work last month. I applied the lettering to the heel, but am waiting to finish all of the other mods before adding the swoosh. I used the "steaming" method to slim the toe and to flatten the ribbing on the sides for when I later apply the swoosh. As for the strap, it took me a long time to find material I felt was suitable for the task. A check of every fabric store in a 30 mile radius yielded only off-white vinyls that weren't a close enough match color-wise. I eventually found a "cow white" leather on Etsy from a seller called MoxiesLeather based out of Canada. The sample they sent was a very close match, and thickness was just right. I ordered a 36" x 10" swath of it, which was more than enough to produce two straps (I'm saving the rest for future mods). The first strap is done, and the second will be finished up in the not-too-distant-future.
As I had never soldered anything before, assembling the EL kit proved challenging. The tip of the soldering iron I purchased was too unwieldy for the detailed nature of the soldering I had to do, especially for the power switch. I also wound up warping the EL and disintegrating the wire tape from the heat of the iron. So, I went to plan B. I ordered a replacement set of EL's, and decided to use wire glue instead. Jedifyfe used wire glue for his strap mods, so I thought I would give it a try too. I struggled with it at first, due to the fact that wire glue is extremely runny and a little tricky to apply with accuracy. I eventually found that dispensing a dollop of it, then applying it with a toothpick worked extremely well. I also went a different route for the power inverter, replacing the kit that came with the EL's with a 3V coin cell inverter from Adafruit. While the inverter is a bit bulky, it's self contained and gave me a solder-free way of bringing the strap mod to completion. The inverter is a little too big to fit in the buckle, but should do just fine Velcroed to the tongue of the shoe.
2015 Jacket Mods:
At present, my 2015 jacket is in the care of a trusted tailor who is shortening it for me and adding a couple of inside pockets (which I wanted to hold my replica Gray's Sports Almanac). In the meantime, I started work on the sound mods. I used an Adafruit Audio FX Sound Board with 16MB flash storage for this project, which ran me $30. The board had lots of features that made it perfect for the task. For one, 16MB was more than enough space for the jacket sounds. Second, the board is ridiculously small, measuring a little less than 2" W x 1" H. Third it has a 2W amplifier, which makes it plenty loud.
Best of all, the board has stereo pinouts. The advantage to this is that it allows me to use one channel for the audio and the other channel for an LED. I used booshman's provided WAV files for the audio, which were saved in mono, meaning that the audio would be identical over both channels. I then hooked up a 3W 4 ohm speaker to the left channel, then followed Jefifyfe's guidance in connecting a 3mm yellow LED to the right. I'm pleased to say the prototype was a complete success
https://youtu.be/aRw4dnkwGxE
Over the weekend, I worked up the nerve to permanently solder some of the wires in place. I bought a new soldering iron with a more precise tip, higher wattage and some lead-free solder as well. I also have some additional components on order: extra wiring, a AAA battery pack to power it and a small tin to act as an enclosure. I'm also mulling over how I want to attach the switches eventually. Once I eventually get the jacket back, I'll figure out a way to get it all installed.
Skateboard Mod:
After failing to snag a vintage Valterra on eBay, I have decided to make my own replica. After reading up on the needed parts elsewhere in these forums, I managed to get a hold of several key components. The first was a Madrid "Explosion" deck, which I'm told is the correct size and shape. Madrid still sells these, but not in the "splatter" style, unfortunately. So, my goal is to sand this board down, paint it black, and then have the splatter design screen printed onto the board. To do this, I'm re-creating the pattern as vector art in Adobe Illustrator. Using photos EmmainCandyland provided, I'm painstakingly vectorizing the entire pattern. I'm nipping away at it, working on it for an hour or two at a time...
The yellow denotes the parts I've completed thus far (the end product will not be yellow -- not the splatters anyway).
As for the hardware, I procured a set of Madrid's yellow "Fly" wheels for the board as well. Madrid no longer stocks the correct trucks for the replica, so I'll be searching the web for a set, or at the very least, a close facsimile. I also have a set of Madrid copers, which will be painted white to match the original board. The rest of the parts I need (bearings, risers, grip tape, etc.) I'll worry about once the board is closer to completion. One thing I DID manage to snag are the stickers. I successfully found two vintage Madrid stickers on eBay that are a match for the ones on the original prop. The circular sticker is a reproduction, but is plenty close enough for me. The stickers for the copers I plan to have reproduced for me by a vinyl shop.
To Be Continued...
Last edited by a moderator:
DragonGalvy
Sr Member
I guess this is the right place to put this.....
The weekend just gone, there was Supanova convention in Melbourne. I, unfortunately, had to go in to work. So I was on the train and there was this guy with a Marty costume. It wasn't spot on, but it was easily recognisable. Guess you dont need to have every single detail, but hey they closer the better right? So I said "There's still a few of us who like those movies" and showed him I was wearing my V1' MAGs. I don't suppose this Marty would be a member on RPF here?

The weekend just gone, there was Supanova convention in Melbourne. I, unfortunately, had to go in to work. So I was on the train and there was this guy with a Marty costume. It wasn't spot on, but it was easily recognisable. Guess you dont need to have every single detail, but hey they closer the better right? So I said "There's still a few of us who like those movies" and showed him I was wearing my V1' MAGs.
I don't suppose this Marty would be a member on RPF here?jhk1976
Well-Known Member
I guess this is the right place to put this.....
The weekend just gone, there was Supanova convention in Melbourne. I, unfortunately, had to go in to work. So I was on the train and there was this guy with a Marty costume. It wasn't spot on, but it was easily recognisable. Guess you dont need to have every single detail, but hey they closer the better right? So I said "There's still a few of us who like those movies" and showed him I was wearing my V1' MAGs.
View attachment 464302
You never know. This forum reaches far and wide.
Similar threads
- Replies
- 37
- Views
- 1,341
- Replies
- 319
- Views
- 23,506
- Replies
- 13
- Views
- 331
- Replies
- 0
- Views
- 921