My Looper Blunderbuss build–With fire. (Nicksdad and Nickytea parts)

benhs1898

Master Member
RPF PREMIUM MEMBER
Hello all! This thread will be dedicated to my build using Nicksdad and Nickytea blunderbuss parts.

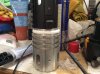
So far I only have the muzzle and am currently waiting for the rest of the parts to be made BUT, I will begin working on a mechanism to get the thing to fire a fireball.

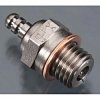
So far my research has led me to two important things:

-A flash plug.
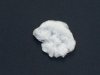
-Nitrocellulose or flash cotton.

The plan is to cap the back of the muzzle (similar to the stunt version from filming) and mount the flash plug into a small tube attached to the cap. The battery compartment will be in the barrel of the gun with a small push-button behind the trigger. Hopefully this will all work out. I will start posting pictures when I start getting materials together.
 

Attachments

  • image.jpg
    image.jpg
    21 KB · Views: 149
  • image.jpg
    image.jpg
    125.2 KB · Views: 151
Last edited:
Re: My Looper Blunderbuss build-With fire. (Nicksdad and Nickytea parts)

Just bought my YHM 5005. I'll post pics when it comes in and I get the muzzle fitted to it. Link is at the bottom to where I bought it. Paid $106 including shipping!

so far my plan is for the muzzle to detach from the barrel. The aluminum tube will separate and attach with the large screw holes on the YHM. This will allow me to service the firing mechanism.

Rifle Length Smooth Free Float Forearm AR-15
 
Re: My Looper Blunderbuss build-With fire. (Nicksdad and Nickytea parts)

Building one, too. You might want a little flash paper in there also for a slightly larger effect. The plug ignites the flash cotton and the flash cotton ignites the flash paper. Magic stores are the best source.
 
Re: My Looper Blunderbuss build-With fire. (Nicksdad and Nickytea parts)

I'm fortunate enough to have one right down the street from where I live! The unfortunate part is that the owners talk to you for hours.

Just realized you live just a couple hours away, that's funny! Yeah I'm excited about getting the rest of the parts from Nick.
 
Last edited:
My Looper Blunderbuss build-With fire. (Nicksdad and Nickytea parts)

I used this same setup in the end of the Penguin's flame throwing umbrella in 1992! (My replica, not for the film!)
 
Re: My Looper Blunderbuss build-With fire. (Nicksdad and Nickytea parts)

I have a couple questions about the aluminum tube you bought. Is it the correct length for the gun and would it be easy to cut through?
 
Re: My Looper Blunderbuss build-With fire. (Nicksdad and Nickytea parts)

It is available by the foot so you can buy as much as you want (I think I bought 3 feet, just to be sure). You can cut it with a hack saw.
 
Re: My Looper Blunderbuss build-With fire. (Nicksdad and Nickytea parts)

Thanks! I will have to cut the muzzle section so that I can service the flash mechanism and install batteries.
 
Re: My Looper Blunderbuss build-With fire. (Nicksdad and Nickytea parts)

image.jpg
Really crappy concept drawing for the flash circuitry and detachable muzzle. Any comments or suggestions are welcome!
 
Re: My Looper Blunderbuss build-With fire. (Nicksdad and Nickytea parts)

image.jpg

Got the YHM 5005. That link turned out to be a great source. Can't beat $100.

The aluminum tube was Ahoudini's recommendation (link below). The YHM was a tight fit. Had to work it on with some WD-40 and a rubber mallet but you couldn't ask for a more solid feel.

1-3/4"OD x 36"x 1/8"Wall 6061 T6511 Aluminum Round Tube$8.04

Once I make a trip back home to Richmond, I can pick up the muzzle and start work on the "weld" line and the paint.
 
I think you are going to want a small (5/8"?) brass tube removably mounted inside the muzzle to load with the flash cotton, etc. and into the back of which the glo plug fits. That way, a reasonable amount of the cotton and paper can fit somewhat snugly in the tube and give you some projectile-like effect. Otherwise you will, I think, just get a flash inside the muzzle with no forward whoosh!
 
image.jpg

I think you're right, at least that's what I could tell from the Youtube video I saw. Basically, I'll make "rounds" of flash cotton wrapped in flash paper and stuff them into the tube in the barrel.

Tomorrow I'm heading to Lowes for flush Allen screws, paint, caulk, and clearcoat. I figure I can do the weld effect and most of the painting without the rest of the parts.
 
You will like flash paper wrapped in flash cotton better, or leave a little tail of cotton sticking out for the glo plug to touch.
 
I'll have plenty of time to test different combinations one I get this thing rigged with electronics, but I've decided to hold off on that part of the build until I get the other parts.
 
image.jpg
So I was able to find the correct flush phillips screws. I bought half-inch.
image.jpg
Here I'm about to saw off the muzzle portion.
image.jpg
All of the barrel screws in place.
image.jpg
Here it is all fit together. I still need to find the correct flush screws to fasten the muzzle. The original YHM ones will do for now.
 

Attachments

  • image.jpg
    image.jpg
    1.3 MB · Views: 206
image.jpg

First coat of paint. Obviously it doesn't match. Should I find a different paint or repaint the YHM to match?
 
If you hit the muzzle with Dullcote lacquer it will look a lot better. Might still not match perfectly, though.
 
Hmm, what would you recommend to match the YHM better? I am pretty sure the paint job on the YHM is powder coated or something like that so it would be hard to duplicate.
 
Dullcote lacquer. Cheap and easy and will go over the black paint you've applied. Nothing to lose as you can strip it all off if it doesn't match well enough. You can only try different brands of flat black paint. I like Rustoleum high performance flat black but no way to know if it will match til you try spraying something and hold it up to the YHM.
 
Back
Top