My builds/finds: aluminium razor crest lever

Looks great, some people over greeblie. This came out juuuuuuuuust nice ;)
Thank you, like to think that this is some sort of device for monitoring and keeping the detonator stable in transit, I didn’t want it to distract too much from the detonator, but wanted the greebles to look like they did something or were there for a reason. 1 thought having it weathered would contrast against the shiny td.

as soon as I finish work I’ll take some picks of it finished.
 
Ok so here as promised are the finished glamour shots.

Other than a couple of lightsabers this has been my first prop build, I’ve had a blast making it and for £30-35 spent on materials I’m over the moon with how it turned out.

Its now sitting next to my desk. Once I’ve built a few more props I plan to make some display selves to go next to my home office to put them all on.

D150B569-B221-48C7-87B4-3E4258D0A83F.jpeg
CFF4AEC9-63F5-4013-86DF-0CFE23469E6F.jpeg
FE400AD6-452E-4F95-847D-86FB0AB5E6B3.jpeg
CEE3E417-E4E7-4372-8338-666EC940C835.jpeg
06A6F825-3721-4598-991A-1E69D2CF2834.jpeg
09F20EC5-CB86-43E6-B032-BA972F46F0A1.jpeg


Awesome ! :D
Scratch building is the very essence of prop making and even more for star wars props
Your interpretation of this prop is splendid and the weathering of the basis too
I like your idea of deep etching the vertical lines. Why didn't you make them narrower ?
 
Awesome ! :D
Scratch building is the very essence of prop making and even more for star wars props
Your interpretation of this prop is splendid and the weathering of the basis too
I like your idea of deep etching the vertical lines. Why didn't you make them narrower ?

thanks, for the etching I used pin line tape to get them consistent, the thinnest tape I had was 1.5mm, I could have tried to cut thinner tape by hand, but I wasn’t sure that would work
 
Absolutely stunning. Congrats on a fantastic build --can't wait to see what you decide to do next.

Thank you. Im doing the visual dictionary version of the neuro-Saav nd.621 rangefinder from TLJ next. I was able to pick up a sportster v cine camera, nimrod knife strap and talon sling swivels, and the anchor lugs, I think the 2-3 greebles from the front are inside and on top. the rest I’ll make in aluminium.

I probably won’t do a step-by-step, but add pics to existing threads, as I’ll be following those.

also have the parts for a star destroyer capacitor bearing.

I’ve got a long list of things I want to try.
 
After being out bid for the umpteenth time on a kobold flash at an affordable price (does such a thing exist?) I decided to pick up a Leitz Wetzlar Flash to modify, it won’t be accurate but I think it will make a nice prop droid caller none the less,

I also picked up a couple of aircraft relays to turn in to belt power cells, so I can have a little kit of belt greebles.

the Bernard multi collet arrived to go with the Poundland screwdriver set, thinking of doing the inside too, couple of greebles that would fit, but I’m thinking a valve/vacuum app tube may look cool.

8DCC08CB-C7A8-4B70-82A1-3B80E0E4CC6E.jpeg


started work on the range finder, this is as far as I’ve got so far:
E15E3915-C187-495E-8DEA-23098D2366A5.jpeg
E3E6736A-173A-4267-B767-EFA86C4C5C7C.jpeg
9D6C403A-51C5-4C0D-9233-B33A1E23416A.jpeg
 
Came out wicked good man, can’t wait to see where you go with this next one
Thank you, already decided I’m not happy with those 2 greebles, I made them from 0.8 aluminium, but they look too thin and that alu was real soft and a pain to work with, so I’m going to redo them thicker.
 
So today on AN4 aluminium weld on fitting came in, it was cheap and I got it as a possible greeble for a future build, turned it over and this is the base, I think that could make a passable hat greeble? I may just have to cut this one up before I use it,

25593082-FEA1-4EB8-89D2-BAC9263D7D2F.jpeg
56DB22F8-3A24-4050-A042-7274454A4AEC.jpeg
 
Found another cine cam in a local junk shop. it was very cheap, so picked it up and stripped it down, I think with some greebles, a strap and paint it will make a nice ‘in universe’ prop.

7838251A-88A7-42FF-8E10-84B163F07ACB.jpeg


I was also able to snag a damaged Coughtrie SW10 light housing for future Falcon light build. The screw holes have been drilled throughso I’ll need to pick up some aluminium rod to glue in and shape. It came with 3 screws, but unfortunately just the standard flat head ones, and not the 3 pronged security ones.

B4F846F2-ACB0-46FD-B1B4-FD81C5B524A9.jpeg
im hoping to use it as an anchor point for a training remote on fishing line, I was hoping to fit in a motor to make it turn, led for gge light, IR sensor switch and 3/4 AA battery holder. Not sure if there will be room - it’s not as big as I’d pictured it in my mind.

on the current build I cut out the bottomplate and was going to fit the rivets and washers, but my wife has sprained her shoulder and broken a couple of ribs, so work on that has been stalled whilst I take care of her. Hopefully I’ll be back in the ‘workshop’ in a week or two.
 
A2A242F6-A86F-4413-B3AB-ECEAAE73FB4E.jpeg
Not much of an update but my wife’s rib injury is pretty much mended and she’s back to work so I had a little time to pick my build back up, I got the bottom plate of the range finder done with shim washers and aluminium rivets which I hand peened with a hammer.

Just a couple more greebles for the front to make and I can start work on the viewer on the back.
 
Been a while, but I’m gradually getting there.

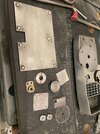
Got all my greebles done and weathered and put the front together.

I ended up shearing the bolt that holds the lens together by over tightening it, but I was able to epoxy it back together.

After a tense wait leaving it clamped up up over night it worked and I can still rotate the lens assembly.

I wanted to keep the guts of this thing for greebles for other builds, so to add some weight I taped up some stacks of coins to replace them with.

Greebles are glued on for the most part and started work on the view finder.

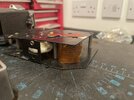
I have a lazer cut screen which will light up, by 2 3mm leds at the sides. the slot in the sides is to fit a recharge port, I’m going to cover the outsides with the leather from the top or bottom of the camera and have a small metal recharge port cover.

I’m housing the battery in the main body, so I drilled a hole in the back to run the wires.

That’s it so far. hoping to have this finished before Christmas.
5B16C4E9-A2D0-4A02-9AE9-28A9A17DD5C9.jpeg
 

Attachments

  • 163AF506-1DD4-42D6-ADFA-DDCCBE34438F.jpeg
    163AF506-1DD4-42D6-ADFA-DDCCBE34438F.jpeg
    3.8 MB · Views: 85
  • 9ACEA109-0127-4497-9AFF-E4458E353DB3.jpeg
    9ACEA109-0127-4497-9AFF-E4458E353DB3.jpeg
    2.2 MB · Views: 87
  • 9F10958F-5049-4557-ACAB-2AB9CDCE6FC4.jpeg
    9F10958F-5049-4557-ACAB-2AB9CDCE6FC4.jpeg
    1.7 MB · Views: 79
  • C138AA24-2E29-4EF8-9D09-E954FD893C23.jpeg
    C138AA24-2E29-4EF8-9D09-E954FD893C23.jpeg
    3.4 MB · Views: 79
Last edited:

Your message may be considered spam for the following reasons:

If you wish to reply despite these issues, check the box below before replying.
Be aware that malicious compliance may result in more severe penalties.
Back
Top