Moldmaking advice: Cylindrical part with open side (Solved! P.2)

Volpin

Sr Member
RPF PREMIUM MEMBER
Looking for some suggestions on making a mold.

I'd consider myself to be a "pretty okay" moldmaker. I can make the simple ones, and a few more simple multi-parters, but this has me stumped. After a few months of noodling the problem, and one colossally expensive molding failure, I'm calling uncle and asking for a little help.

Here's what I'm tossing under rubber. The first pic is just to show general shape. These are old pics, but lets all pretend it perfect and glossy and ready.

5014220553_d2e4edbe3f_b.jpg

5014828196_7db9b3bfc2_b.jpg


This has an outer diameter of 4". The inside curve as well as the open ring at the end detail will all need to be captured. The back facing side that is an open "U" shape does not have to be captured - ideally this is the "pour" area.

Currently I'm thinking about a three-piece mold - one for the ring at the front of the barrel, one for the inside, and a third for the outside. Struggling with how to keep all of that aligned, however.

If anyone can help, its you guys! Thanks in advance.
 
Last edited:
Re: Moldmaking advice: Cylindrical part with open side

Hmm.. how about taping off both ends (to seal the inside), then you could mold the bottom half up to the open area of top. Then flip it and make a mold of the full circled end, up to the open area of the top. Then make a mold of the top half.

Hope this helps:


Cast.jpg
 
Re: Moldmaking advice: Cylindrical part with open side

I have nothing to add but I do know what you're making.:p
 
Re: Moldmaking advice: Cylindrical part with open side

why can't this be a one piece mold. get a tube. preferably a thin plastic container. fill with silicone, then dip the piece in with the full circle side towards the top. get it sunk in right to the top edge. you would of course have to do a little trimming on the pour side. but not much if you sink it just right.
plus for ease of cast access, you could make a partial slice down one side. i did a similar mold ill have to take some pics.
 
Re: Moldmaking advice: Cylindrical part with open side

I agree with xdmray. Make a single-part mould with the detail ring end uppermost and pour there. Way the easiest way, just removing it will require a bit of elbow grease.
 
Re: Moldmaking advice: Cylindrical part with open side

I had thought of that, but I suppose it all depends on if he needs the details in the end. But even then, he could get a tube that fits snugly over the piece, and pour the rubber in both ends, one end at a time. Lots of release agent would probably be needed.

Thanks for the advice guys! I had thought of something like the one big pour mold before, but wasn't sure if that would:

a) lock the whole thing in after pouring
or
b) make the long center plug difficult to register once the master has been removed

Also, that would be a lot of rubber. The other thought I had was similar to Sandman's first illustrations. If I could make this thing a brush-on mold I'd prefer it, but more and more its looking like it will have to be a pour.
 
Re: Moldmaking advice: Cylindrical part with open side

why can't this be a one piece mold...

inner ring detail on end needs a plug/core.

...and here's how I would do it:

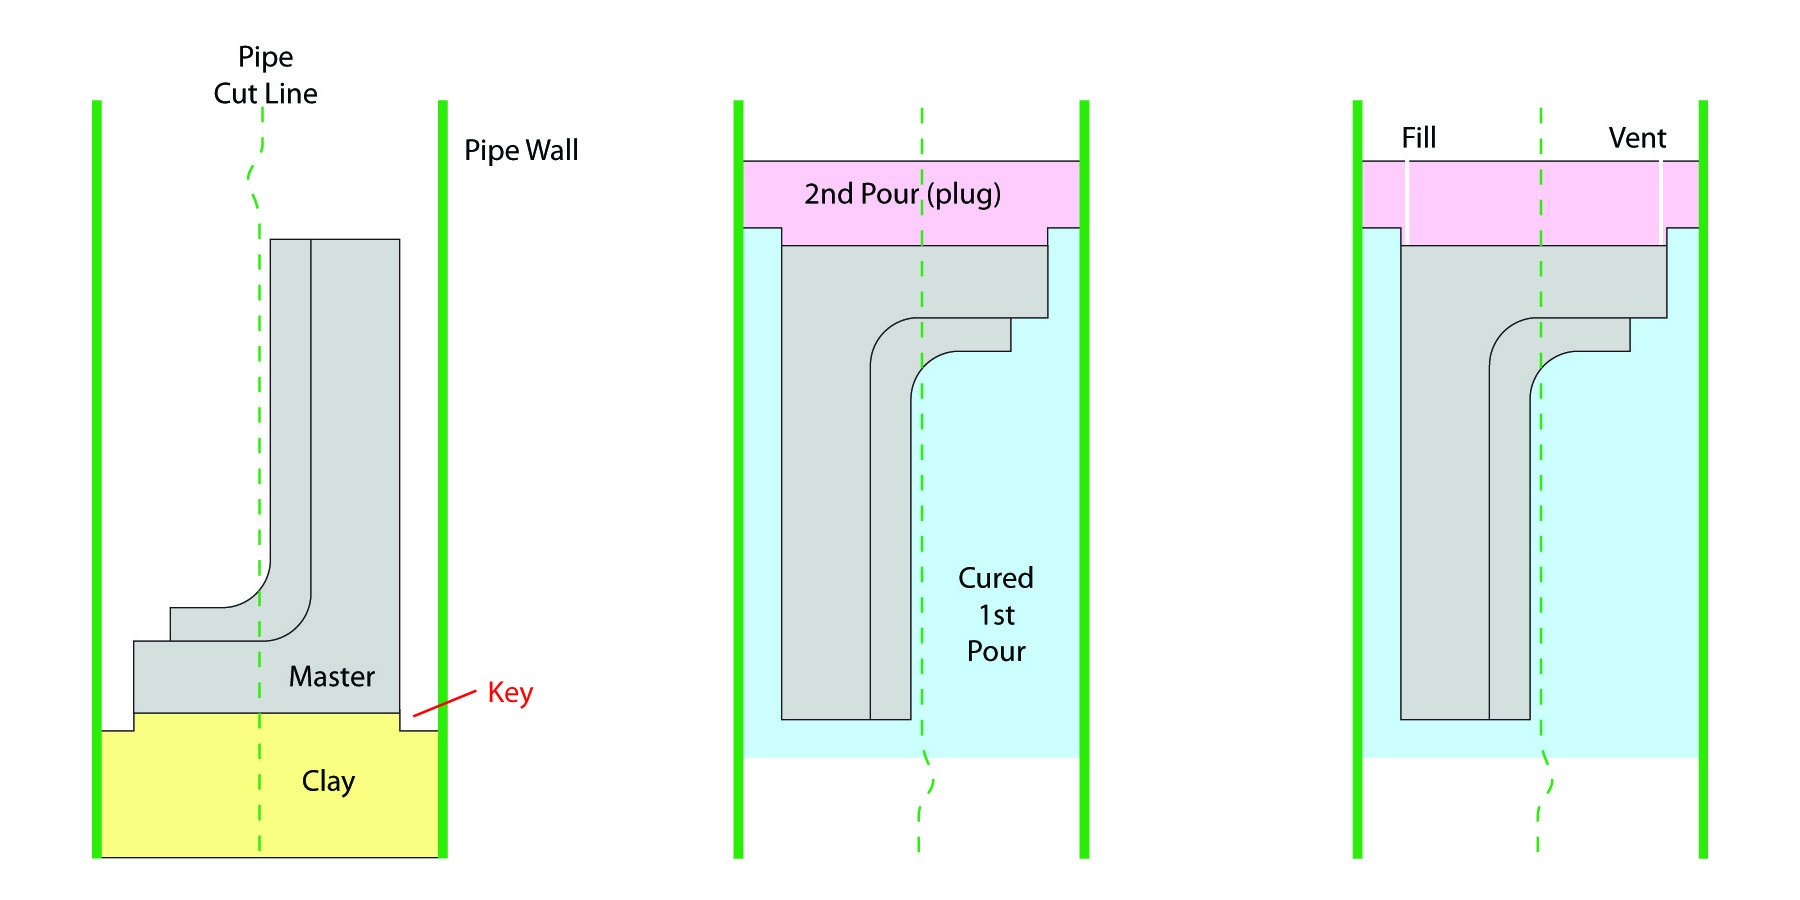
pipe%20mold.jpg


1. Cut a PVC pipe (slightly larger than your part) down the center of it's length (be sure to include 'keys' to aid in realignment. Tape halves together.

2. build a solid base from non sulfur clay as tall as you want your core to be (1 inch is plenty) and integrate a 'key' wall for realignment.

3. Center part on cardboard and slide Pipe-halves down around part. Center and hot-glue the Pipe to the cardboard.

4. Pour silicone (shore 20-30) and let set

5. remove cardboard and clay from end and then spray/brush mold release into plug end.

6. Pour Silicone into plug cavity and let set

7. Demold Master part and, from the inside, cut 2 vents opposite each other for filling and venting into the plug cap (2nd pour) note: I use thin walled brass tube to cut the silicone and surgical needle nose forceps to extract the vent core.

8. Set plug into mold and then place pipe-halves around mold. Tape halves together.

9. Pour (or use a syringe to inject) resin. Tilting the mold at a slight angle while pouring will allow air to escape out of top vent

10. Let set and demold by removing pipe-halves and plug, then extracting part straight up out of mold through core end.

Did I miss anything? Guys, I sure you'll correct me if I did. Thanks.
 
Re: Moldmaking advice: Cylindrical part with open side

Volpin, the big one pour mould is your friend, IMO. Worst-case scenario: slit it part of the way down one side like xdmray suggested - if your silicone is any good you'll still get a decent seal and you shouldn't have too much trouble removing the piece.

The central half-cylinder of silicone will probably offer some resistance but you can push directly on the end of it...

Re registration, how floppy is the stuff you're using? If you have the castellated end at the top of the mould then the centre plug will only be an inch or two long, right?

Edit: superkrates, that looks spot on to me.
 
Re: Moldmaking advice: Cylindrical part with open side

mold.jpg


Personally this is how I would mold it,

A solid block pour, with the part oriented horizontally with the detail pointed downward.

The gray represents a removable core that matches the ID of the part snugly
It can made from either aluminum pipe, wood dowel, etc.(release very, very well with vaseline before casting)
-Make sure to leave atleast .75" of silicone on both sides of the core to make sure it registers accurately.

The yellow of course are pour spout/vents.

To demold remove core then remove part from left side, and make small incision in silicone mold if needed to remove part.

I recently molded a bunch of prototypes for a client in this method and it worked great!
Good Luck!
 
Re: Moldmaking advice: Cylindrical part with open side

I have a question. The ROUND part.

Does it end FLAT ? or are you molding the separation of the two pipes?


I think everyone is over complicating the mold.

How many are you making? One sort of Silicone?

How about a ONE part mold..that ISNT SPLIT at all? Therefore, no seamline.

Yes it can be done.

Frank
 
Re: Moldmaking advice: Cylindrical part with open side


I like the core (a lot less mold material needed) and if the sprues (fill and vent ports) break off clean during extraction, this will work. Otherwise, the sprues will rip the mold. Also I see problems with trapped air if the fill/vent ports are not relocated to an outter edge.
 
Re: Moldmaking advice: Cylindrical part with open side

I have a question. The ROUND part.

Does it end FLAT ? or are you molding the separation of the two pipes?


I think everyone is over complicating the mold.

How many are you making? One sort of Silicone?

How about a ONE part mold..that ISNT SPLIT at all? Therefore, no seamline.

Yes it can be done.

Frank

I will be pulling around 8 of them, I need 6 good pieces and 2 backups. Might need more if any of the pulls have nasty bubbling or misregisters. I had plans for using Mold Max 30 as I'm pretty familiar with how it works, but might need something more rigid. I'm open to buying a specific type of silicone if need be.

I don't have any good shots right now, but hopefully i can explain what the front of this looks like. The two pipes just end flat. For clarification sake, we'll call the piece discussed here the "middle"

This is the barrel end:

5014220661_7b6e6d5667_b.jpg


This piece will be molded separately and added to the "middle" we're discussing here so the final result will look like this:

5074181274_8504f3009b_b.jpg


The barrel end will be hollow as well, but that mold I've already got figured out. The reason both need to be hollow is because of the wiring, LEDs, and mounting points for other components that need to fill that center cavity.

To get an idea of what I'm working towards here, this was my V1:

3246822948_2a920c171c_b.jpg


The entire center section is one piece there, and not a piece thats mold friendly. After attempting once to mold it, I've decided instead to make it in sections and mold those.

I really appreciate all the feedback so far guys. The "core" idea seems to have a lot of potential.
 
Re: Moldmaking advice: Cylindrical part with open side

Man I thought it was a saber part or something small....that's a really big chunk. :)
 
Re: Moldmaking advice: Cylindrical part with open side

The gray represents a removable core that matches the ID of the part snugly
It can made from either aluminum pipe, wood dowel, etc.(release very, very well with vaseline before casting)
-Make sure to leave atleast .75" of silicone on both sides of the core to make sure it registers accurately.!

IMO the best way to do a core is to create a core with a core, meaning you cast a silicone sleeve around your wood or metal core in an initial phase... The advantage here is upon removal from your real casting you can remove the smaller 'stiff' core and then wiggle out the silicone sleeve without any worries about damage to the part or having the core lock into the part... Resin shrinks just that much and even removing a silicone core can be troublesome sometimes...

I would also do a sorta combo of what Zero Cool and Superkrates suggest, use the removable core but cast it vertically, and I would also add on 1/8" of material to what will be the 'top' when you pour this will act as a buffer zone to catch all the bubbles... I would do it more so as a squish mold where the top plug is set on top of the already full bottom part and the resin is allowed to just spill over as it settles into place... I personally have not had much success with 'fill' holes unless they are fairly large and have perfect venting... After casting you can trim or sand the extra 1/8" bubble buffer area off and end up with a near perfect bubble free casting... Your piece is pretty large but in my case I trim a few of my parts 'bubble buffer' after casting with a chop saw, and the part held in a jig, nice and clean vertical cut...
 
Re: Moldmaking advice: Cylindrical part with open side

sorry im late, but it looks like you got better suggestions. i didnt realize the size of it. i think my way works best for smaller things.
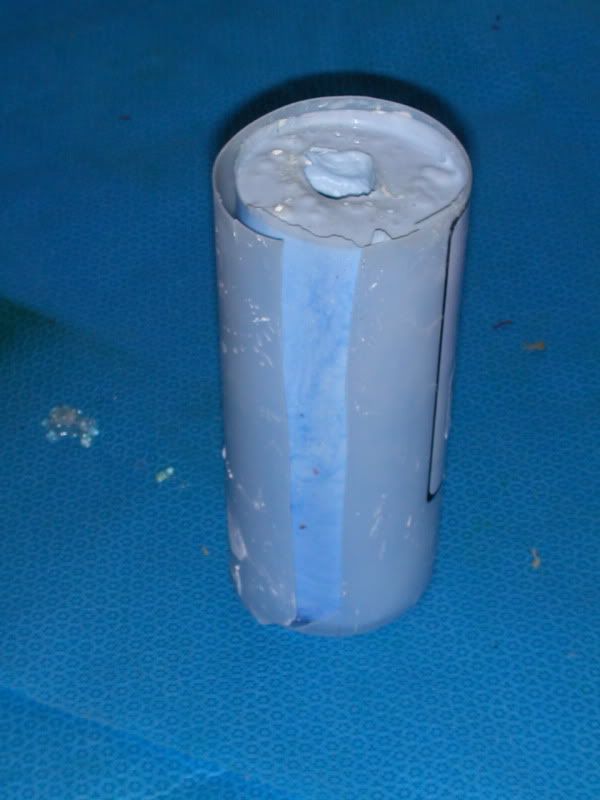
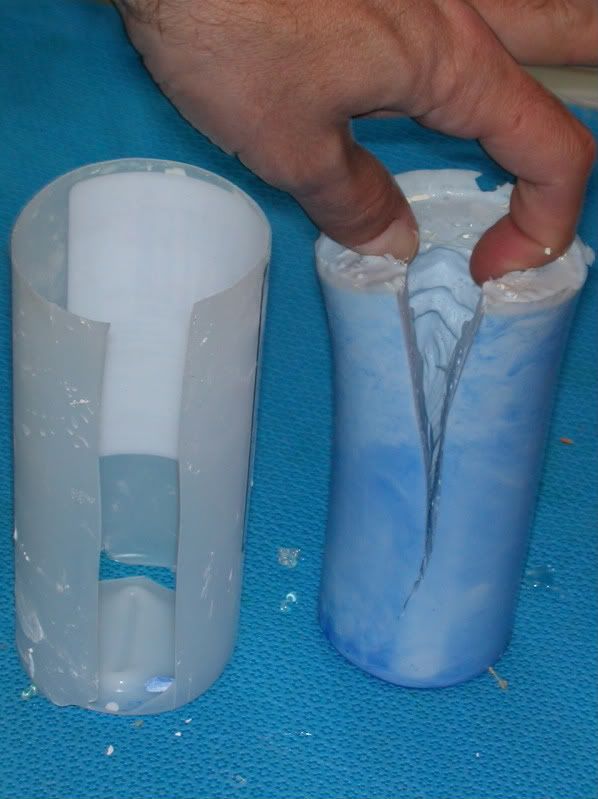
here's the mold i made. i made a partial slice for easier access.
put the silicone back in the tube and tape it shut.
if im carefull, i don't get a seam line.

DSCN7144.jpg


DSCN7147.jpg
 
Re: Moldmaking advice: Cylindrical part with open side

Thanks for all the advice everyone. I am going to be making an amalgamation of a couple of the ideas here to make the final piece. I should be getting it under rubber this weekend, so I'll post here when all is said and done.

5080741003_b6aa32478c_b.jpg


I'll make a baseplate with an interior sleeve bolted to it for registration. The barrel will go over this, ring end down, elevated slightly to allow for poor/sanding area. An outer sleeve will go around everything, and the whole item will be made with a single pour.

Cross your fingers that it all goes well! It'll be another pricey one if I hamfist it again.
 
Re: Moldmaking advice: Cylindrical part with open side

Good luck dude, I'm looking forward to seeing how it turns out. :)
 
Re: Moldmaking advice: Cylindrical part with open side

Cross your fingers that it all goes well! It'll be another pricey one if I hamfist it again.
Big molds are allways stressful, my biggest word of advise is take is SLOW while double and triple checking your logic and what you are doing at each step...
 
Back
Top