Help with weathering a prop

Angry Mammoth

New Member
Hello all, I'm not sure if this is the right section for this question but I couldn't find a specific one.

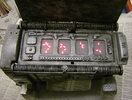
I'm looking for help on how to weather a piece of armor I'm 3d printing. It's the self destruct gauntlet from the original predator. I have attached a pic of a prop I found for reference.

Would I paint it metallic and then dry brush the black/dark over and then go back and dry brush metallic over that? I'm really stumped on this one. I'd like it to look as close to the pic as possible.

Thanks in advance for any help and tips you can offer.
 

Attachments

  • Gauntlet 6.jpg
    Gauntlet 6.jpg
    261.6 KB · Views: 78
I would paint it metallic first, ensuring you get a good bond between the paint and the material. Then overpaint with black and sand through the black to reveal the metallic underneath. However, depending on the level of weathering, you may want to look up the hairspray technique on youtube to see if that kind of weathering is what you're looking for. Perhaps a combination of both?

TazMan2000
Great thanks, I've never heard of the hair spray thing. I'll look it up now. I'm used to painting spaceships and figures. The armor is throwing me off.
 
To me, from the picture, that looks like a classic use of silver leaf rub-n-buff over a black base. Spray it a good coat of black (as mentioned above), and then put rub-n-buff on a soft cloth and go over the surface details + blotting very gently with the cloth. And then use a clean cloth to buff/feather. And then do it again, if needed, to taste. As with most things, go light and work up, not heavy and trying to remove excess. Some dry brushing grooves with black acrylic followed by a black acrylic wash after will get you most of the way there in terms of weathering.
 
For me, I would lay down the base coat, then a wash or wet coat of the darker colors ( black and browns), remove most of that with a towel then hit the edges with the light metallic.

Without seeing a close hi res pic to see the weathering, I tend to agree with the above. From that pic it just looks like a metallic with a wash that was wiped into the recesses.
 
You could also use a combination of all above techniques. The hairspray over metallic, then remove with tape. Apply darker or lighter colours and sand lightly all over. This should give a mottled look.

Rub and buff works well on edges and common touch points. It goes on thin enough to look like paint wear.

TazMan2000
 
Black base color, then the metallic base color, then a wash/drybrushing/pastel chalks with black/brown/grime colors, then lightly misting over it with the metallic color to tone down the weathering, then a clear sealer coat.
 
If I was going to replicate that prop in the photo, I would use silver rub and buff and some really light sponge with the colour just south of the prop color.

Weathering is usually about trial and error.....there are no rules...but you break them at your peril....!!!!.... :lol::lol:
 
As gregatron said, I would also start with a Black base coat. I instantly thought about graphite powder to give it that dark metallic tone or, dry brushing it with a silver paint (maybe the technique they actually used) , then clear coat the whole stuff.
That way you should already have a good base to work on.
I then would lighten some edges with silver paint to give the illusion of paint chips, Washing it with different brown acrylic paint mixed with water.

Adam Savage is a weathering jedi Master, all the answers you need are in his "one day builds" vidéos.
 
Last edited:
To my eye, this looks to be a fairly simple paint job that you are seeing on this prop.

1. After priming, I would start with a black base coat.

2. Following that, it appears that there are several coats of at least two different metallic paints that have been “misted” onto the prop.

IMG_8526.jpeg


To achieve this look; stand a good 4-5 feet from the prop and spray the metallic paint onto it with broad passes until you achieve the coverage that you want. Switch it up between what appears to be at least two different metallic paint colors. The key is to go very light with your paint coverage, on each pass.

I recommend using brand-new cans of paint for this action, to avoid any “sputtering”.

3. The paint on the “ribs” appears to be more deliberate and achieved via “dry brushing” the metallic paint in several light coats.

IMG_8527.jpeg


4. Finally, I would apply a “black wash” using diluted acrylic paint and seal it all up with a clear
 
Last edited:
Back
Top