APropOr2
New Member
Hello RPF - I was just hired for my first commissioned prop: The Metroid containment capsule from super Metroid!!

The client and I have agreed upon the below design that I laid out in tinkercad
(if anyone can recommend a free modeling software with a similar learning curve to tinkercad I would greatly appreciate it)
A sourced acrylic tube was measured to be a 9" outer diameter. Everything else was built around that 1 piece for accuracy and scale. - In the end this piece should measure 16-18 inches tall with lights.


After design was done I converted the model into hollow pieces to allow for future electronics. I also tried to consider the 3D printers time and filament intake. I don’t want to waste filament and want to be able to churn out the pieces so I can start cleaning for paint.

I printed all pieces on the Tevo Tornado (new gold version) - this printer has been printing like a dream! Very nice and smooth - I would highly recommend it if you are a maker on a budget. I got mine from Amazon:
Using Hatchbox wood filament I printed the upper and lower casing pieces. My first print had the tolerances way too tight so I needed to reprint. Second print fit like a smooth glove.
All the black pieces were printed using Amazon Basics PLA 1.75mm - Again, worked like a charm. Nice and smooth prints.
Wood pieces printed at .4mm layer heights
Black pieces printed at .1mm layer heights.

Side note about wood filament: if you are going to print large smooth areas like these top and bottom casings then I would highly consider wood filament. It sands so smooth to be prepped for primer and paint. - Regular 100% PLA tends to have a little more bite on the sand paper IMO


Since I only have 1 set of the top and bottom casing done I have to use same pieces to try a test fit.
See top and bottom rough assembly:


And since these have been designed to be hollow there will be plenty of play room for lighting from a neo-pixel or LED lights from an arduino. I will leave that fun stuff to my wife.
Unfortunately - the many failed prints plus these 2 successful wood prints have depleted one spool of Hatchbox. I ordered another but since their is some major weather right now it is being delayed. Once it arrives and I print duplicates of casings - I will show a fully assembled unpainted prop.
WHILE I WAIT FOR THE FILAMENT TO DELIVER....
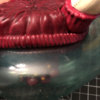
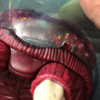
This containment unit is intended to house a replica Metroid creature created by Jakks Pacific
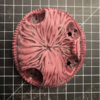
Its a pretty sweet 1:1 scale replica toy - but it is very much just that "a toy". You can tell this from the bottom teeth joints, plastic finish and minimal, simplistic paint job.
Lets fix that.


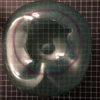
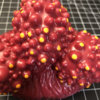
The top membrane of the Metroid is a molded piece of vinyl - you can tell because it holds its' molded shape very well and does not inflate. Very similar feel to a childs' bouncy ball. The cheap kind that are usually stacked in towers at Wal Mart.
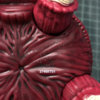
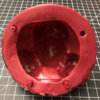
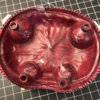
Now that I was sure I wanted to gut this guy - I needed to remove the membrane to see inside the 2 red pieces construction.


Using a dry erase marker I traced the outline of the Membrane. This showed me what was visible after I disassembled the piece.


Using generic scissors I cut the extra vinyl around the rim I just traced giving my self a little room so the membrane can lock back onto the piece when re-assembling.

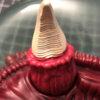
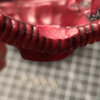
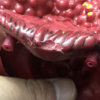
With the membrane removed I was able to see inside and see the small plastic nubs on each tooth that was locking them in. (impossible to remove from outside without damaging teeth sculpt - the pegs mushroom out once inserted - a common toy design tactic to make sure parts aren't easily removed after factory assembly... Lets remove them with a dremel.


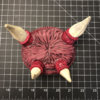
Full piece breakdown of this toy:

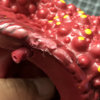
I then took each tooth and I trimmed their locking nubs so that I can permanently hot glue them into a fixed position.

Before gluing however - i need to remove the factory shine on the base and top piece of metroid - using a 220 grit sand paper I lightly go over all areas until all is dull. - I take extra care on legal line so I can remove completely. Sorry Jakks!


Now glue:


With all the teeth positioned I will leave this here - Next steps is to start using Apoxie clay to fill all these hinge gaps and get ready for an official repaint.
I will be updating this thread as I progress in this project. I hope you all dig it. If you have any questions, suggestions or complaints please lemme know.
I am on instagram @25thpixel I will be posting often there if you want to follow along.
Thanks guys! Hope you enjoyed my first post hahah
The client and I have agreed upon the below design that I laid out in tinkercad
(if anyone can recommend a free modeling software with a similar learning curve to tinkercad I would greatly appreciate it)
A sourced acrylic tube was measured to be a 9" outer diameter. Everything else was built around that 1 piece for accuracy and scale. - In the end this piece should measure 16-18 inches tall with lights.
After design was done I converted the model into hollow pieces to allow for future electronics. I also tried to consider the 3D printers time and filament intake. I don’t want to waste filament and want to be able to churn out the pieces so I can start cleaning for paint.
I printed all pieces on the Tevo Tornado (new gold version) - this printer has been printing like a dream! Very nice and smooth - I would highly recommend it if you are a maker on a budget. I got mine from Amazon:
Using Hatchbox wood filament I printed the upper and lower casing pieces. My first print had the tolerances way too tight so I needed to reprint. Second print fit like a smooth glove.
All the black pieces were printed using Amazon Basics PLA 1.75mm - Again, worked like a charm. Nice and smooth prints.
Wood pieces printed at .4mm layer heights
Black pieces printed at .1mm layer heights.
Side note about wood filament: if you are going to print large smooth areas like these top and bottom casings then I would highly consider wood filament. It sands so smooth to be prepped for primer and paint. - Regular 100% PLA tends to have a little more bite on the sand paper IMO
Since I only have 1 set of the top and bottom casing done I have to use same pieces to try a test fit.
See top and bottom rough assembly:
And since these have been designed to be hollow there will be plenty of play room for lighting from a neo-pixel or LED lights from an arduino. I will leave that fun stuff to my wife.
Unfortunately - the many failed prints plus these 2 successful wood prints have depleted one spool of Hatchbox. I ordered another but since their is some major weather right now it is being delayed. Once it arrives and I print duplicates of casings - I will show a fully assembled unpainted prop.
WHILE I WAIT FOR THE FILAMENT TO DELIVER....
This containment unit is intended to house a replica Metroid creature created by Jakks Pacific
Its a pretty sweet 1:1 scale replica toy - but it is very much just that "a toy". You can tell this from the bottom teeth joints, plastic finish and minimal, simplistic paint job.
Lets fix that.
The top membrane of the Metroid is a molded piece of vinyl - you can tell because it holds its' molded shape very well and does not inflate. Very similar feel to a childs' bouncy ball. The cheap kind that are usually stacked in towers at Wal Mart.
Now that I was sure I wanted to gut this guy - I needed to remove the membrane to see inside the 2 red pieces construction.
Using a dry erase marker I traced the outline of the Membrane. This showed me what was visible after I disassembled the piece.
Using generic scissors I cut the extra vinyl around the rim I just traced giving my self a little room so the membrane can lock back onto the piece when re-assembling.
With the membrane removed I was able to see inside and see the small plastic nubs on each tooth that was locking them in. (impossible to remove from outside without damaging teeth sculpt - the pegs mushroom out once inserted - a common toy design tactic to make sure parts aren't easily removed after factory assembly... Lets remove them with a dremel.
Full piece breakdown of this toy:
I then took each tooth and I trimmed their locking nubs so that I can permanently hot glue them into a fixed position.
Before gluing however - i need to remove the factory shine on the base and top piece of metroid - using a 220 grit sand paper I lightly go over all areas until all is dull. - I take extra care on legal line so I can remove completely. Sorry Jakks!
Now glue:
With all the teeth positioned I will leave this here - Next steps is to start using Apoxie clay to fill all these hinge gaps and get ready for an official repaint.
I will be updating this thread as I progress in this project. I hope you all dig it. If you have any questions, suggestions or complaints please lemme know.
I am on instagram @25thpixel I will be posting often there if you want to follow along.
Thanks guys! Hope you enjoyed my first post hahah
Attachments
-
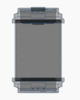 image.png5.9 KB · Views: 412
 -
 IMG_9821.jpeg5.4 MB · Views: 388
 -
 IMG_9822.jpeg6 MB · Views: 320
 -
 IMG_9823.jpeg4.4 MB · Views: 308
 -
 IMG_9828.jpeg5.2 MB · Views: 356
 -
 IMG_9829.jpeg4.7 MB · Views: 356
 -
 IMG_9845.jpeg5.2 MB · Views: 359
 -
 IMG_9846.jpeg4.1 MB · Views: 303
 -
 IMG_9847.jpeg4.2 MB · Views: 349
 -
 IMG_9848.jpeg4.6 MB · Views: 399
 -
 IMG_9852.jpeg6.9 MB · Views: 384
 -
 IMG_9859.jpeg5.9 MB · Views: 326
 -
 IMG_9862.jpeg7 MB · Views: 358
 -
 IMG_9863.jpeg6.2 MB · Views: 340
 -
 IMG_9864.jpeg5.9 MB · Views: 358
Last edited:


") How are you planning to suspend the metroid within the tube?
How are you planning to suspend the metroid within the tube?